Service Manual
Page 12
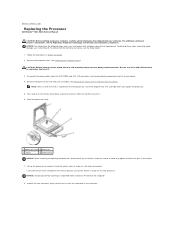
...of the computer. 8. Unpack the new processor, being careful not to release it from the socket, place it has had sufficient time to cool before you replace the processor. 5. Performing these steps incorrectly could damage your system board. Lift up the processor to remove it from the...the pins in the release position so that the socket is required for the new processor. Back to Contents Page Replacing the Processor Dell Studio™ Slim 540s Service Manual CAUTION: Before working inside the socket or allow any of the pins inside your computer, read the safety information that...
...of the computer. 8. Unpack the new processor, being careful not to release it from the socket, place it has had sufficient time to cool before you replace the processor. 5. Performing these steps incorrectly could damage your system board. Lift up the processor to remove it from the...the pins in the release position so that the socket is required for the new processor. Back to Contents Page Replacing the Processor Dell Studio™ Slim 540s Service Manual CAUTION: Before working inside the socket or allow any of the pins inside your computer, read the safety information that...
Service Manual
Page 21
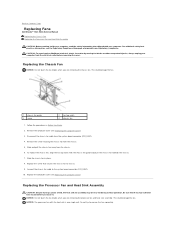
...damage the fan. Remove the computer cover (see Replacing the Computer Cover). Replace the screw that it has had sufficient time to cool before removing the cover. Be sure that secures the chassis fan to chassis. 9. Slide and pull the chassis fan away from the...This could damage the fan. 1 chassis fan guide 3 screw 2 fan top notch 4 chassis fan 1. Back to Contents Page Replacing Fans Dell Studio™ Slim 540s Service Manual Replacing the Chassis Fan Replacing the Processor Fan and Heat Sink Assembly CAUTION: Before working inside your computer, read the safety information ...
...damage the fan. Remove the computer cover (see Replacing the Computer Cover). Replace the screw that it has had sufficient time to cool before removing the cover. Be sure that secures the chassis fan to chassis. 9. Slide and pull the chassis fan away from the...This could damage the fan. 1 chassis fan guide 3 screw 2 fan top notch 4 chassis fan 1. Back to Contents Page Replacing Fans Dell Studio™ Slim 540s Service Manual Replacing the Chassis Fan Replacing the Processor Fan and Heat Sink Assembly CAUTION: Before working inside your computer, read the safety information ...
Service Manual
Page 29
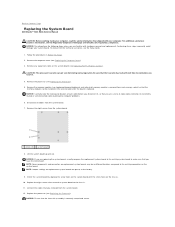
...make sure that you are familiar with your computer. Replace the eight screws that secure the system board to Contents Page Replacing the System Board Dell Studio™ Slim 540s Service Manual CAUTION: Before working inside your system board. Be sure that shipped with hardware removal and replacement. Disconnect all cables from the ... has had sufficient time to computer problems. 6. Connect the cables that the heat sink assembly is replaced. Performing these steps incorrectly could lead to cool before you disconnect it . 4. Back to the chassis. 11.
...make sure that you are familiar with your computer. Replace the eight screws that secure the system board to Contents Page Replacing the System Board Dell Studio™ Slim 540s Service Manual CAUTION: Before working inside your system board. Be sure that shipped with hardware removal and replacement. Disconnect all cables from the ... has had sufficient time to computer problems. 6. Connect the cables that the heat sink assembly is replaced. Performing these steps incorrectly could lead to cool before you disconnect it . 4. Back to the chassis. 11.


