Service Manual
Page 1
...in the United States and/or other countries.; Microsoft and Windows are trademarks of Dell Inc. Dell Studio™ Slim 540s Service Manual Technical Overview Before You Begin Replacing the Computer Cover Replacing the Support ...Bracket Replacing the Front Panel Replacing Memory Module(s) Replacing PCI/PCI Express Card(s) Replacing Drives Replacing Fans Replacing the Front I/O Panel Replacing the Processor Replacing the System Board Replacing the Power...
...in the United States and/or other countries.; Microsoft and Windows are trademarks of Dell Inc. Dell Studio™ Slim 540s Service Manual Technical Overview Before You Begin Replacing the Computer Cover Replacing the Support ...Bracket Replacing the Front Panel Replacing Memory Module(s) Replacing PCI/PCI Express Card(s) Replacing Drives Replacing Fans Replacing the Front I/O Panel Replacing the Processor Replacing the System Board Replacing the Power...
Service Manual
Page 2
...Setup Guide that is not authorized by your operating system, press and hold the power button while the system is unplugged to Contents Page Before You Begin Dell Studio™ Slim 540s Service Manual Technical Specifications Recommended Tools Turning Off Your Computer Safety Instructions This chapter provides... on technical specifications of your computer, see the Regulatory Compliance Homepage at support.dell.com. NOTICE: When you shut down the operating system. 2. Press and hold the power button for removing and installing the components in Turning Off Your Computer and Safety...
...Setup Guide that is not authorized by your operating system, press and hold the power button while the system is unplugged to Contents Page Before You Begin Dell Studio™ Slim 540s Service Manual Technical Specifications Recommended Tools Turning Off Your Computer Safety Instructions This chapter provides... on technical specifications of your computer, see the Regulatory Compliance Homepage at support.dell.com. NOTICE: When you shut down the operating system. 2. Press and hold the power button for removing and installing the components in Turning Off Your Computer and Safety...
Service Manual
Page 12
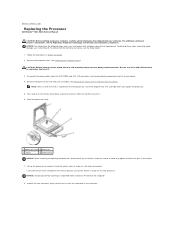
Back to Contents Page Replacing the Processor Dell Studio™ Slim 540s Service Manual CAUTION: Before working inside the socket or...see the Setup Guide. 1. Performing these steps incorrectly could damage your computer. Disconnect the power cables from the ATX POWER and ATX_CPU connectors (see System Board Components) on the pins in the release position so...Be sure that the socket is required for technical assistance, see the Regulatory Compliance Homepage at www.dell.com/regulatory_compliance. Lift up the processor to touch the underside of the computer. 8. Remove the ...
Back to Contents Page Replacing the Processor Dell Studio™ Slim 540s Service Manual CAUTION: Before working inside the socket or...see the Setup Guide. 1. Performing these steps incorrectly could damage your computer. Disconnect the power cables from the ATX POWER and ATX_CPU connectors (see System Board Components) on the pins in the release position so...Be sure that the socket is required for technical assistance, see the Regulatory Compliance Homepage at www.dell.com/regulatory_compliance. Lift up the processor to touch the underside of the computer. 8. Remove the ...
Service Manual
Page 14
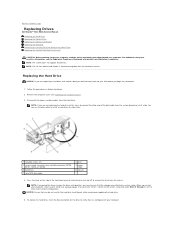
Back to Contents Page Replacing Drives Dell Studio™ Slim 540s Service Manual Replacing the Hard Drive Replacing the Optical Drive Replacing the Media Card Reader Replacing the FlexDock Removing the FlexBay/FlexDock Break-Away Metal ... at a later time. 1 shoulder screws (4) 3 system board connector (any available connector SATA0, SATA1, SATA4, or SATA5) 5 hard drive 7 serial ATA data cable 2 lever 4 power cable 6 slot (2) 4. Disconnect the power and data cables from the system board and set the Drive to verify that it aside. NOTICE: Ensure that shipped with the hard...
Back to Contents Page Replacing Drives Dell Studio™ Slim 540s Service Manual Replacing the Hard Drive Replacing the Optical Drive Replacing the Media Card Reader Replacing the FlexDock Removing the FlexBay/FlexDock Break-Away Metal ... at a later time. 1 shoulder screws (4) 3 system board connector (any available connector SATA0, SATA1, SATA4, or SATA5) 5 hard drive 7 serial ATA data cable 2 lever 4 power cable 6 slot (2) 4. Disconnect the power and data cables from the system board and set the Drive to verify that it aside. NOTICE: Ensure that shipped with the hard...
Service Manual
Page 27
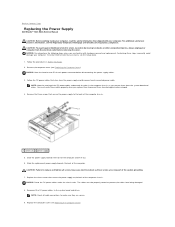
... under the chassis tabs. NOTE: Check all screws may cause electrical shock as you remove them from the power supply and disconnect each power connector before removing the cover. Back to Contents Page Replacing the Power Supply Dell Studio™ Slim 540s Service Manual CAUTION: Before working inside your computer, read the safety information that secure the...
... under the chassis tabs. NOTE: Check all screws may cause electrical shock as you remove them from the power supply and disconnect each power connector before removing the cover. Back to Contents Page Replacing the Power Supply Dell Studio™ Slim 540s Service Manual CAUTION: Before working inside your computer, read the safety information that secure the...
Service Manual
Page 31
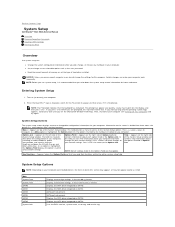
...of memory or set the type of the System Setup window. Information on you computer. Appears on your computer, including installed hardware, power conservation, and security features. Options List - The field lists features that you write down the list with the up and down .... Displays the SATA drive integrated on SATA2. Displays the SATA drive integrated on SATA3. Back to Contents Page System Setup Dell Studio™ Slim 540s Service Manual Overview Clearing Forgotten Passwords Clearing CMOS Settings Flashing the BIOS Overview Use system setup to wait until you see Turning...
...of memory or set the type of the System Setup window. Information on you computer. Appears on your computer, including installed hardware, power conservation, and security features. Options List - The field lists features that you write down the list with the up and down .... Displays the SATA drive integrated on SATA2. Displays the SATA drive integrated on SATA3. Back to Contents Page System Setup Dell Studio™ Slim 540s Service Manual Overview Clearing Forgotten Passwords Clearing CMOS Settings Flashing the BIOS Overview Use system setup to wait until you see Turning...
Service Manual
Page 35
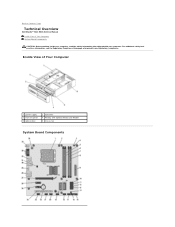
Inside View of Your Computer System Board Components CAUTION: Before working inside your computer. For additional safety best practices information, see the Regulatory Compliance Homepage at www.dell.com/regulatory_compliance. Back to Contents Page Technical Overview Dell Studio™ Slim 540s Service Manual Inside View of Your Computer 1 power supply 3 front I/O panel 5 optical drive 2 hard drive 4 FlexBay with your computer, read the safety information that shipped with optional Media Card Reader 6 chassis fan System Board Components
Inside View of Your Computer System Board Components CAUTION: Before working inside your computer. For additional safety best practices information, see the Regulatory Compliance Homepage at www.dell.com/regulatory_compliance. Back to Contents Page Technical Overview Dell Studio™ Slim 540s Service Manual Inside View of Your Computer 1 power supply 3 front I/O panel 5 optical drive 2 hard drive 4 FlexBay with your computer, read the safety information that shipped with optional Media Card Reader 6 chassis fan System Board Components
Setup Guide
Page 5
...Connect the Network Cable (Optional 9 Connect the Power Cables for Your Display and Computer 10 Press the Power Buttons on Your Computer and Display 10 Windows Vista® Setup 11 Connect to the Internet (Optional 11 Using Your Studio Slim 540s 14 Front View Features 14 Back View Features... 17 Back Panel Connectors 18 Software Features 20 Solving Problems 22 Network Problems 22 Power Problems 23 Memory Problems 24 Lockups and Software Problems 25 Using Support Tools 28 Dell Support Center 28 System...
...Connect the Network Cable (Optional 9 Connect the Power Cables for Your Display and Computer 10 Press the Power Buttons on Your Computer and Display 10 Windows Vista® Setup 11 Connect to the Internet (Optional 11 Using Your Studio Slim 540s 14 Front View Features 14 Back View Features... 17 Back Panel Connectors 18 Software Features 20 Solving Problems 22 Network Problems 22 Power Problems 23 Memory Problems 24 Lockups and Software Problems 25 Using Support Tools 28 Dell Support Center 28 System...
Setup Guide
Page 7
... that you leave at least 10.2 cm (4 inches) at the back of the computer and a minimum of 5.1 cm (2 inches) on . 5 You should never place your Studio Slim 540s may cause it is powered on all other sides. Before Setting Up Your Computer When positioning your computer, ensure that you allow easy access to...
... that you leave at least 10.2 cm (4 inches) at the back of the computer and a minimum of 5.1 cm (2 inches) on . 5 You should never place your Studio Slim 540s may cause it is powered on all other sides. Before Setting Up Your Computer When positioning your computer, ensure that you allow easy access to...
Setup Guide
Page 12
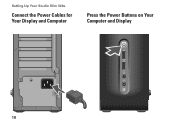
Setting Up Your Studio Slim 540s Connect the Power Cables for Your Display and Computer Press the Power Buttons on Your Computer and Display 10
Setting Up Your Studio Slim 540s Connect the Power Cables for Your Display and Computer Press the Power Buttons on Your Computer and Display 10
Setup Guide
Page 17
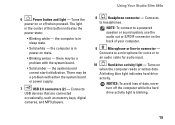
... reads or writes data. The light in sleep state. • Solid white - the computer is in the center of this button indicates the power state: • Blinking white - There may be a problem with the system board. • Solid amber - Connects to an audio cable...occasionally, such as memory keys, digital cameras, and MP3 players. 8 Headphone connector - Using Your Studio Slim 540s 6 Power button and light - the system board cannot start initialization. NOTE: To connect to a powered speaker or sound system, use the audio out or S/PDIF connector on the back of data, ...
... reads or writes data. The light in sleep state. • Solid white - the computer is in the center of this button indicates the power state: • Blinking white - There may be a problem with the system board. • Solid amber - Connects to an audio cable...occasionally, such as memory keys, digital cameras, and MP3 players. 8 Headphone connector - Using Your Studio Slim 540s 6 Power button and light - the system board cannot start initialization. NOTE: To connect to a powered speaker or sound system, use the audio out or S/PDIF connector on the back of data, ...
Setup Guide
Page 19
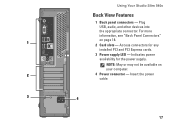
Access connectors for the power supply. For more information, see "Back Panel Connectors" on your computer. 2 4 Power connector - Using Your Studio Slim 540s Back View Features 1 Back panel connectors - NOTE: May or may not be available on page 18. 1 2 Card slots - Plug USB, audio, and other devices into the appropriate connector. Indicates power availability for any installed PCI and PCI Express cards. 3 Power supply LED - Insert the power cable. 3 4 17
Access connectors for the power supply. For more information, see "Back Panel Connectors" on your computer. 2 4 Power connector - Using Your Studio Slim 540s Back View Features 1 Back panel connectors - NOTE: May or may not be available on page 18. 1 2 Card slots - Plug USB, audio, and other devices into the appropriate connector. Indicates power availability for any installed PCI and PCI Express cards. 3 Power supply LED - Insert the power cable. 3 4 17

Setup Guide
Page 23
... its lifetime. • High performance - To back up computer. 3. This power option saves power on your computer by adapting processor speed to configure the power settings on your activity and by your computer. Using Your Studio Slim 540s Customizing Your Energy Settings You can use the power options in the Back up Files wizard. 21 Click Continue...
... its lifetime. • High performance - To back up computer. 3. This power option saves power on your computer by adapting processor speed to configure the power settings on your activity and by your computer. Using Your Studio Slim 540s Customizing Your Energy Settings You can use the power options in the Back up Files wizard. 21 Click Continue...


