
Service Manual
Page 11
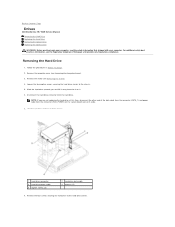
... Side I/O Panel). 6. Remove the side I/O panel (see Removing the Optical Drive). 5. Remove the hard drive (see Removing the System Board). 8. Remove the system board (see Removing the Hard Drive). 3. Remove the inverter (see Removing the Power Supply Unit). 4. Remove the...). 7. For additional safety best practices information, see the Regulatory Compliance Homepage at www.dell.com/regulatory_compliance. Back to Contents Page Support Assembly Dell Studio One 19/1909 Service Manual Removing the Support Assembly Replacing the Support Assembly WARNING: Before working inside your...
... Side I/O Panel). 6. Remove the side I/O panel (see Removing the Optical Drive). 5. Remove the hard drive (see Removing the System Board). 8. Remove the system board (see Removing the Hard Drive). 3. Remove the inverter (see Removing the Power Supply Unit). 4. Remove the...). 7. For additional safety best practices information, see the Regulatory Compliance Homepage at www.dell.com/regulatory_compliance. Back to Contents Page Support Assembly Dell Studio One 19/1909 Service Manual Removing the Support Assembly Replacing the Support Assembly WARNING: Before working inside your...
Service Manual
Page 13
... the shield (see Removing the Computer Cover). 3. NOTE: If you and lift it aside. 7. Back to Contents Page Drives Dell Studio One 19/1909 Service Manual Removing the Hard Drive Replacing the Hard Drive Removing the Optical Drive Replacing the Optical Drive WARNING: Before working inside your computer, read the safety information that shipped with your computer. Follow the procedures in Before...
... the shield (see Removing the Computer Cover). 3. NOTE: If you and lift it aside. 7. Back to Contents Page Drives Dell Studio One 19/1909 Service Manual Removing the Hard Drive Replacing the Hard Drive Removing the Optical Drive Replacing the Optical Drive WARNING: Before working inside your computer, read the safety information that shipped with your computer. Follow the procedures in Before...

Service Manual
Page 33
... the Regulatory Compliance Homepage at www.dell.com/regulatory_compliance. Follow the procedures in a secure location. For additional safety best practices information, see Removing the Hard Drive). 7. Remove the shield (see Removing the Computer Cover). 3. ...Disconnect the cables from the clamps NOTE: Make note of the cable routing before you dislodge the cables. 9. Remove the computer cover (see Removing the Shield). 4. Slide the side I /O panel to Contents Page Side I/O Panel Dell Studio One 19/1909...
... the Regulatory Compliance Homepage at www.dell.com/regulatory_compliance. Follow the procedures in a secure location. For additional safety best practices information, see Removing the Hard Drive). 7. Remove the shield (see Removing the Computer Cover). 3. ...Disconnect the cables from the clamps NOTE: Make note of the cable routing before you dislodge the cables. 9. Remove the computer cover (see Removing the Shield). 4. Slide the side I /O panel to Contents Page Side I/O Panel Dell Studio One 19/1909...
Service Manual
Page 44
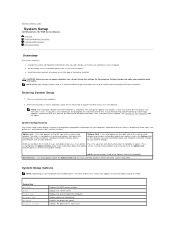
...Type CPU Speed Processor L1 Cache Displays the BIOS version number. Displays the system name. Back to Contents Page System Setup Dell Studio One 19/1909 Service Manual Overview Clearing Forgotten Passwords Clearing CMOS Settings Flashing the BIOS Overview Use system setup to: l Change the system ...: the options list, active options field, and key functions. and the option's current and available settings. Displays the service tag of hard drive installed CAUTION: Unless you are changeable. Displays the processor L1 cache size. Options List - This field appears on (or restart) your...
...Type CPU Speed Processor L1 Cache Displays the BIOS version number. Displays the system name. Back to Contents Page System Setup Dell Studio One 19/1909 Service Manual Overview Clearing Forgotten Passwords Clearing CMOS Settings Flashing the BIOS Overview Use system setup to: l Change the system ...: the options list, active options field, and key functions. and the option's current and available settings. Displays the service tag of hard drive installed CAUTION: Unless you are changeable. Displays the processor L1 cache size. Options List - This field appears on (or restart) your...
Service Manual
Page 50
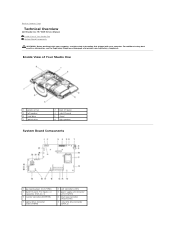
Back to Contents Page Technical Overview Dell Studio One 19/1909 Service Manual Inside View of Your Studio One 1 processor fan 3 left speaker 5 hard drive 7 optical drive 2 back I/O panel 4 side I/O panel 6 stand 8 right speaker System Board Components 1 password jumper (CLR_PSWD) 3 back I/O panel, PCI Express x4 connector (PCIE_4X_1) 5 inverter connector (INVERTER) 7 optical drive connector (ODD_POWER) 2 LCD connector (LVDS) 4 power supply unit connector (ATI_POWER1...
Back to Contents Page Technical Overview Dell Studio One 19/1909 Service Manual Inside View of Your Studio One 1 processor fan 3 left speaker 5 hard drive 7 optical drive 2 back I/O panel 4 side I/O panel 6 stand 8 right speaker System Board Components 1 password jumper (CLR_PSWD) 3 back I/O panel, PCI Express x4 connector (PCIE_4X_1) 5 inverter connector (INVERTER) 7 optical drive connector (ODD_POWER) 2 LCD connector (LVDS) 4 power supply unit connector (ATI_POWER1...

Setup Guide
Page 50
...; Core™2 Duo Intel Core2 Quad Intel Celeron® Intel Celeron Dual-Core Drives and devices Drives Wireless (optional) Camera (optional) One 3.5-inch internal hard-drive, one slim‑line slot-load optical drive LAN, 802.11b/g, 802.11 a/b/g/n Internal RF 1.3 mega pixel 48 Specifications System model Studio One 1909 This section provides information that you may vary by region.
...; Core™2 Duo Intel Core2 Quad Intel Celeron® Intel Celeron Dual-Core Drives and devices Drives Wireless (optional) Camera (optional) One 3.5-inch internal hard-drive, one slim‑line slot-load optical drive LAN, 802.11b/g, 802.11 a/b/g/n Internal RF 1.3 mega pixel 48 Specifications System model Studio One 1909 This section provides information that you may vary by region.


