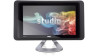

Studio One 19 Service Manual
Page 1
...to either trademarks or registered trademarks of Microsoft Corporation in trademarks and trade names other countries. Trademarks used in this text: Dell and the DELL logo are either the entities claiming the marks and names or their products. Model MTF March 2009 Rev. Microsoft, Windows,... names may be used in this document is strictly forbidden. disclaims any manner whatsoever without notice. © 2009 Dell Inc. Dell Studio One 19/1909 Service Manual Technical Overview Before You Begin Computer Cover Shield Microphone Stand Memory Module(s) Back I/O Panel Processor Fan and...
...to either trademarks or registered trademarks of Microsoft Corporation in trademarks and trade names other countries. Trademarks used in this text: Dell and the DELL logo are either the entities claiming the marks and names or their products. Model MTF March 2009 Rev. Microsoft, Windows,... names may be used in this document is strictly forbidden. disclaims any manner whatsoever without notice. © 2009 Dell Inc. Dell Studio One 19/1909 Service Manual Technical Overview Before You Begin Computer Cover Shield Microphone Stand Memory Module(s) Back I/O Panel Processor Fan and...
Studio One 19 Service Manual
Page 2
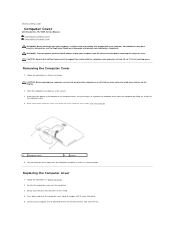
... open programs. 2. As you disconnect a cable, pull on its connector or on its pull-tab, not on the Dell Support website at www.dell.com/regulatory_compliance. Back to Contents Page Before You Begin Dell Studio One 19/1909 Service Manual Recommended Tools Turning Off Your Computer Safety Instructions This chapter provides procedures for complete information about 4 seconds...
... open programs. 2. As you disconnect a cable, pull on its connector or on its pull-tab, not on the Dell Support website at www.dell.com/regulatory_compliance. Back to Contents Page Before You Begin Dell Studio One 19/1909 Service Manual Recommended Tools Turning Off Your Computer Safety Instructions This chapter provides procedures for complete information about 4 seconds...
Studio One 19 Service Manual
Page 4
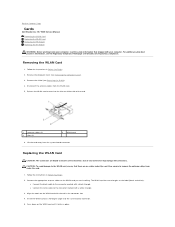
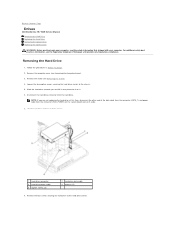
... system board connector. 5. Use of the card. 1 antenna cables (2) 3 clips (2) 2 WLAN card 6. Remove the shield (see Removing the Computer Cover). 3. Back to Contents Page Cards Dell Studio One 19/1909 Service Manual Removing the WLAN Card Replacing the WLAN Card Removing the RF Module Replacing the RF Module WARNING: Before working inside your computer. Insert...
... system board connector. 5. Use of the card. 1 antenna cables (2) 3 clips (2) 2 WLAN card 6. Remove the shield (see Removing the Computer Cover). 3. Back to Contents Page Cards Dell Studio One 19/1909 Service Manual Removing the WLAN Card Replacing the WLAN Card Removing the RF Module Replacing the RF Module WARNING: Before working inside your computer. Insert...
Studio One 19 Service Manual
Page 7
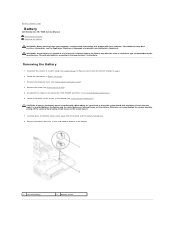
... the manufacturer's instructions. Locate the battery socket on the system board. 7. Otherwise, you attempt to Contents Page Battery Dell Studio One 19/1909 Service Manual Removing the Battery Replacing the Battery WARNING: Before working inside your computer. Remove the battery from the battery ...pry out the battery. Removing the Battery 1. Follow the procedures in system setup (see the Regulatory Compliance Homepage at www.dell.com/regulatory_compliance. Remove the shield (see Removing the Computer Cover). 4. For additional safety best practices information, see System Setup)...
... the manufacturer's instructions. Locate the battery socket on the system board. 7. Otherwise, you attempt to Contents Page Battery Dell Studio One 19/1909 Service Manual Removing the Battery Replacing the Battery WARNING: Before working inside your computer. Remove the battery from the battery ...pry out the battery. Removing the Battery 1. Follow the procedures in system setup (see the Regulatory Compliance Homepage at www.dell.com/regulatory_compliance. Remove the shield (see Removing the Computer Cover). 4. For additional safety best practices information, see System Setup)...
Studio One 19 Service Manual
Page 9
...pins into place. 5. Replacing the Computer Cover 1. Follow the procedures in Before You Begin. Back to Contents Page Computer Cover Dell Studio One 19/1909 Service Manual Removing the Computer Cover Replacing the Computer Cover WARNING: Before working inside your computer, read the safety information that shipped .... 3. Lift the computer cover away from the electrical outlet before removing the computer cover. Starting at the groove at www.dell.com/regulatory_compliance. Connect your computer from the computer and place it snaps into the holes on the display. 2. For additional ...
...pins into place. 5. Replacing the Computer Cover 1. Follow the procedures in Before You Begin. Back to Contents Page Computer Cover Dell Studio One 19/1909 Service Manual Removing the Computer Cover Replacing the Computer Cover WARNING: Before working inside your computer, read the safety information that shipped .... 3. Lift the computer cover away from the electrical outlet before removing the computer cover. Starting at the groove at www.dell.com/regulatory_compliance. Connect your computer from the computer and place it snaps into the holes on the display. 2. For additional ...

Studio One 19 Service Manual
Page 11
... the computer stand). Follow the instructions in Before You Begin. 2. Remove the system board (see the Regulatory Compliance Homepage at www.dell.com/regulatory_compliance. Remove the power supply unit (see Removing the Inverter). 7. Back to the LCD panel. 1 screws (14) 2... (see Removing the Optical Drive). 5. Remove the fourteen screws that secure the support assembly to Contents Page Support Assembly Dell Studio One 19/1909 Service Manual Removing the Support Assembly Replacing the Support Assembly WARNING: Before working inside your computer, read the safety information that...
... the computer stand). Follow the instructions in Before You Begin. 2. Remove the system board (see the Regulatory Compliance Homepage at www.dell.com/regulatory_compliance. Remove the power supply unit (see Removing the Inverter). 7. Back to the LCD panel. 1 screws (14) 2... (see Removing the Optical Drive). 5. Remove the fourteen screws that secure the support assembly to Contents Page Support Assembly Dell Studio One 19/1909 Service Manual Removing the Support Assembly Replacing the Support Assembly WARNING: Before working inside your computer, read the safety information that...
Studio One 19 Service Manual
Page 13
... 2. Remove the computer cover (see Removing the Shield). 4. Remove the four screws securing the hard drive to Contents Page Drives Dell Studio One 19/1909 Service Manual Removing the Hard Drive Replacing the Hard Drive Removing the Optical Drive Replacing the Optical Drive WARNING: Before working inside your... read the safety information that shipped with your computer. Slide the hard drive towards you are not replacing the hard drive at www.dell.com/regulatory_compliance. NOTE: If you and lift it aside. 7. Remove the shield (see Removing the Computer Cover). 3. Back to the...
... 2. Remove the computer cover (see Removing the Shield). 4. Remove the four screws securing the hard drive to Contents Page Drives Dell Studio One 19/1909 Service Manual Removing the Hard Drive Replacing the Hard Drive Removing the Optical Drive Replacing the Optical Drive WARNING: Before working inside your... read the safety information that shipped with your computer. Slide the hard drive towards you are not replacing the hard drive at www.dell.com/regulatory_compliance. NOTE: If you and lift it aside. 7. Remove the shield (see Removing the Computer Cover). 3. Back to the...
Studio One 19 Service Manual
Page 17
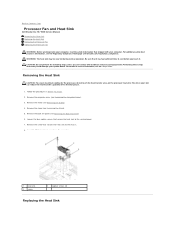
... the Back I/O Panel). 6. Be sure that it . Remove the back I/O panel (see the Regulatory Compliance Homepage at www.dell.com/regulatory_compliance. Performing these steps incorrectly could damage your skin can reduce the heat transfer capability of the thermal grease. 1. Carefully lift...the chassis. 8. For technical service information, see Removing the Stand). 5. Back to Contents Page Processor Fan and Heat Sink Dell Studio One 19/1909 Service Manual Removing the Heat Sink Replacing the Heat Sink Removing the Processor Fan Replacing the Processor Fan WARNING: Before working inside...
... the Back I/O Panel). 6. Be sure that it . Remove the back I/O panel (see the Regulatory Compliance Homepage at www.dell.com/regulatory_compliance. Performing these steps incorrectly could damage your skin can reduce the heat transfer capability of the thermal grease. 1. Carefully lift...the chassis. 8. For technical service information, see Removing the Stand). 5. Back to Contents Page Processor Fan and Heat Sink Dell Studio One 19/1909 Service Manual Removing the Heat Sink Replacing the Heat Sink Removing the Processor Fan Replacing the Processor Fan WARNING: Before working inside...
Studio One 19 Service Manual
Page 20
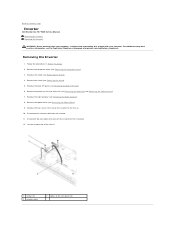
...safety best practices information, see Removing the Computer Cover). 3. Remove the computer cover (see the Regulatory Compliance Homepage at www.dell.com/regulatory_compliance. Remove the stand (see Removing the Back I/O Panel). 6. Disconnect the inverter cable from the inverter. 11...with your computer. Lift the inverter out of the chassis. 1 screws (2) 3 inverter cable 2 cables to Contents Page Inverter Dell Studio One 19/1909 Service Manual Removing the Inverter Replacing the Inverter WARNING: Before working inside your computer, read the safety information that connect the inverter...
...safety best practices information, see Removing the Computer Cover). 3. Remove the computer cover (see the Regulatory Compliance Homepage at www.dell.com/regulatory_compliance. Remove the stand (see Removing the Back I/O Panel). 6. Disconnect the inverter cable from the inverter. 11...with your computer. Lift the inverter out of the chassis. 1 screws (2) 3 inverter cable 2 cables to Contents Page Inverter Dell Studio One 19/1909 Service Manual Removing the Inverter Replacing the Inverter WARNING: Before working inside your computer, read the safety information that connect the inverter...
Studio One 19 Service Manual
Page 22
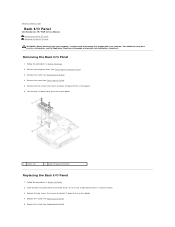
... the stand (see Removing the Computer Cover). 3. Follow the procedures in Before You Begin. 2. Back to Contents Page Back I/O Panel Dell Studio One 19/1909 Service Manual Removing the Back I/O Panel Replacing the Back I /O panel to the system board. 4. Remove the computer cover (see Removing... Stand). 5. Replace the two screws that shipped with your computer. Remove the shield (see the Regulatory Compliance Homepage at www.dell.com/regulatory_compliance. Follow the procedures in Before You Begin. 2. For additional safety best practices information, see Removing the Shield). 4....
... the stand (see Removing the Computer Cover). 3. Follow the procedures in Before You Begin. 2. Back to Contents Page Back I/O Panel Dell Studio One 19/1909 Service Manual Removing the Back I/O Panel Replacing the Back I /O panel to the system board. 4. Remove the computer cover (see Removing... Stand). 5. Replace the two screws that shipped with your computer. Remove the shield (see the Regulatory Compliance Homepage at www.dell.com/regulatory_compliance. Follow the procedures in Before You Begin. 2. For additional safety best practices information, see Removing the Shield). 4....
Studio One 19 Service Manual
Page 24
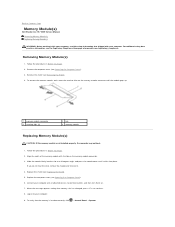
... Replacing the Shield). 5. Remove the shield (see Removing the Computer Cover). 3. Slide the module firmly into the slot at www.dell.com/regulatory_compliance. To remove the memory module, push apart the securing clips on the memory module connector until it . 4. If you...has changed, press to continue. 8. Remove the computer cover (see Removing the Shield). 4. Back to Contents Page Memory Module(s) Dell Studio One 19/1909 Service Manual Removing Memory Module(s) Replacing Memory Module(s) WARNING: Before working inside your computer, read the safety information that shipped with ...
... Replacing the Shield). 5. Remove the shield (see Removing the Computer Cover). 3. Slide the module firmly into the slot at www.dell.com/regulatory_compliance. To remove the memory module, push apart the securing clips on the memory module connector until it . 4. If you...has changed, press to continue. 8. Remove the computer cover (see Removing the Shield). 4. Back to Contents Page Memory Module(s) Dell Studio One 19/1909 Service Manual Removing Memory Module(s) Replacing Memory Module(s) WARNING: Before working inside your computer, read the safety information that shipped with ...
Studio One 19 Service Manual
Page 26
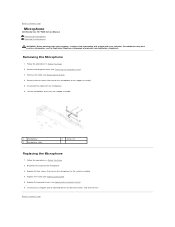
Back to Contents Page Microphone Dell Studio One 19/1909 Service Manual Removing the Microphone Replacing the Microphone WARNING: Before working inside your computer, read the safety information that secure the microphone to the system... them on. Reconnect the cable to Contents Page Lift the microphone away from the microphone. 6. Replace the shield (see the Regulatory Compliance Homepage at www.dell.com/regulatory_compliance. Replace the computer cover (see Removing the Shield). 4. Back to the microphone. 3. Remove the shield (see Replacing the Computer Cover). 6. Follow the ...
Back to Contents Page Microphone Dell Studio One 19/1909 Service Manual Removing the Microphone Replacing the Microphone WARNING: Before working inside your computer, read the safety information that secure the microphone to the system... them on. Reconnect the cable to Contents Page Lift the microphone away from the microphone. 6. Replace the shield (see the Regulatory Compliance Homepage at www.dell.com/regulatory_compliance. Replace the computer cover (see Removing the Shield). 4. Back to the microphone. 3. Remove the shield (see Replacing the Computer Cover). 6. Follow the ...
Studio One 19 Service Manual
Page 27
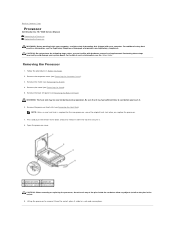
...Computer Cover). 3. Performing these steps incorrectly could damage your computer. Remove the computer cover (see the Regulatory Compliance Homepage at www.dell.com/regulatory_compliance. Remove the stand (see Removing the Heat Sink). Be sure that secures it. 8. Open the processor cover. 1 ...the procedures in Before You Begin. 2. For technical service information, see Removing the Shield). 4. Back to Contents Page Processor Dell Studio One 19/1909 Service Manual Removing the Processor Replacing the Processor WARNING: Before working inside the socket or allow any objects to fall on ...
...Computer Cover). 3. Performing these steps incorrectly could damage your computer. Remove the computer cover (see the Regulatory Compliance Homepage at www.dell.com/regulatory_compliance. Remove the stand (see Removing the Heat Sink). Be sure that secures it. 8. Open the processor cover. 1 ...the procedures in Before You Begin. 2. For technical service information, see Removing the Shield). 4. Back to Contents Page Processor Dell Studio One 19/1909 Service Manual Removing the Processor Replacing the Processor WARNING: Before working inside the socket or allow any objects to fall on ...
Studio One 19 Service Manual
Page 30
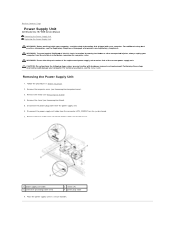
...the connector (ATX_POWER1) on the system board. 7. Remove the four screws that secure the power supply unit to Contents Page Power Supply Unit Dell Studio One 19/1909 Service Manual Removing the Power Supply Unit Replacing the Power Supply Unit WARNING: Before working inside your computer, read the safety information that of ...the power supply unit cable from the power supply unit. 6. For additional safety best practices information, see the Regulatory Compliance Homepage at www.dell.com/regulatory_compliance. WARNING: To guard against likelihood of the current power supply unit.
...the connector (ATX_POWER1) on the system board. 7. Remove the four screws that secure the power supply unit to Contents Page Power Supply Unit Dell Studio One 19/1909 Service Manual Removing the Power Supply Unit Replacing the Power Supply Unit WARNING: Before working inside your computer, read the safety information that of ...the power supply unit cable from the power supply unit. 6. For additional safety best practices information, see the Regulatory Compliance Homepage at www.dell.com/regulatory_compliance. WARNING: To guard against likelihood of the current power supply unit.
Studio One 19 Service Manual
Page 32
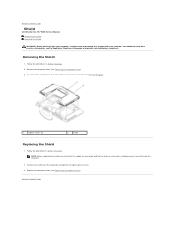
Back to Contents Page Shield Dell Studio One 19/1909 Service Manual Removing the Shield Replacing the Shield WARNING: Before working inside the computer. 2. NOTE: Before replacing the shield, ensure that all the cables are ... to Contents Page For additional safety best practices information, see Removing the Computer Cover). 3. Remove the computer cover (see the Regulatory Compliance Homepage at www.dell.com/regulatory_compliance. Removing the Shield 1. Follow the procedures in Before You Begin. 2. Follow the procedures in Before You Begin. Position the shield over the computer...
Back to Contents Page Shield Dell Studio One 19/1909 Service Manual Removing the Shield Replacing the Shield WARNING: Before working inside the computer. 2. NOTE: Before replacing the shield, ensure that all the cables are ... to Contents Page For additional safety best practices information, see Removing the Computer Cover). 3. Remove the computer cover (see the Regulatory Compliance Homepage at www.dell.com/regulatory_compliance. Removing the Shield 1. Follow the procedures in Before You Begin. 2. Follow the procedures in Before You Begin. Position the shield over the computer...
Studio One 19 Service Manual
Page 33
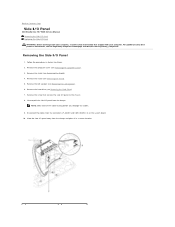
... cables from the clamps NOTE: Make note of the cable routing before you dislodge the cables. 9. Removing the Side I /O panel to Contents Page Side I/O Panel Dell Studio One 19/1909 Service Manual Removing the Side I/O Panel Replacing the Side I/O Panel WARNING: Before working inside your computer. Remove the stand (see the Regulatory Compliance Homepage at...
... cables from the clamps NOTE: Make note of the cable routing before you dislodge the cables. 9. Removing the Side I /O panel to Contents Page Side I/O Panel Dell Studio One 19/1909 Service Manual Removing the Side I/O Panel Replacing the Side I/O Panel WARNING: Before working inside your computer. Remove the stand (see the Regulatory Compliance Homepage at...

Studio One 19 Service Manual
Page 35
...Remove the four screws that shipped with your computer, read the safety information that secure the speaker to Contents Page Speakers Dell Studio One 19/1909 Service Manual Removing the Right Speaker Replacing the Right Speaker Removing the Left Speaker Replacing the Left Speaker WARNING: Before ... the computer cover (see Removing the Shield). 4. Remove the shield (see Removing the Computer Cover). 3. NOTE: Make a note of Your Studio One. 1. Follow the procedures in Before You Begin. 2. Remove the stand (see Inside View of the cable routing before you dislodge the cable....
...Remove the four screws that shipped with your computer, read the safety information that secure the speaker to Contents Page Speakers Dell Studio One 19/1909 Service Manual Removing the Right Speaker Replacing the Right Speaker Removing the Left Speaker Replacing the Left Speaker WARNING: Before ... the computer cover (see Removing the Shield). 4. Remove the shield (see Removing the Computer Cover). 3. NOTE: Make a note of Your Studio One. 1. Follow the procedures in Before You Begin. 2. Remove the stand (see Inside View of the cable routing before you dislodge the cable....
Studio One 19 Service Manual
Page 38
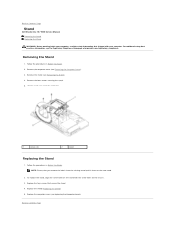
... stand away from the existing stand and fix them on the chassis. 3. Replace the shield (Replacing the Shield). 5. Back to Contents Page Stand Dell Studio One 19/1909 Service Manual Removing the Stand Replacing the Stand WARNING: Before working inside your computer, read the safety information that shipped with the screw holes on ...To replace the stand, align the screw holes on the stand with your computer. Remove the shield (see the Regulatory Compliance Homepage at www.dell.com/regulatory_compliance. Follow the procedures in Before You Begin. 2. Back to Contents Page
... stand away from the existing stand and fix them on the chassis. 3. Replace the shield (Replacing the Shield). 5. Back to Contents Page Stand Dell Studio One 19/1909 Service Manual Removing the Stand Replacing the Stand WARNING: Before working inside your computer, read the safety information that shipped with the screw holes on ...To replace the stand, align the screw holes on the stand with your computer. Remove the shield (see the Regulatory Compliance Homepage at www.dell.com/regulatory_compliance. Follow the procedures in Before You Begin. 2. Back to Contents Page
Studio One 19 Service Manual
Page 40
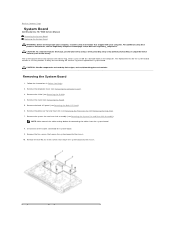
... heat sink assembly (see Removing the Shield). 4. Remove the shield (see Removing the System Fan and Heat Sink Assembly). Back to Contents Page System Board Dell Studio One 19/1909 Service Manual Removing the System Board Replacing the System Board WARNING: Before working inside your computer. Remove the five M2.5 x 5-mm screws that shipped with...
... heat sink assembly (see Removing the Shield). 4. Remove the shield (see Removing the System Fan and Heat Sink Assembly). Back to Contents Page System Board Dell Studio One 19/1909 Service Manual Removing the System Board Replacing the System Board WARNING: Before working inside your computer. Remove the five M2.5 x 5-mm screws that shipped with...
Studio One 19 Setup Guide
Page 55
... by Macrovision Corporation. Reverse engineering or disassembly is protected by method claims of this document also applies to the products listed below: • Dell™ Studio One 1909 • Dell™ Studio One 19 Macrovision Product Notice This product incorporates copyright protection technology that is prohibited. 53 Use of certain U.S. patents and other intellectual property rights owned by...
... by Macrovision Corporation. Reverse engineering or disassembly is protected by method claims of this document also applies to the products listed below: • Dell™ Studio One 1909 • Dell™ Studio One 19 Macrovision Product Notice This product incorporates copyright protection technology that is prohibited. 53 Use of certain U.S. patents and other intellectual property rights owned by...


