Dell™ Technology Guide
Page 11
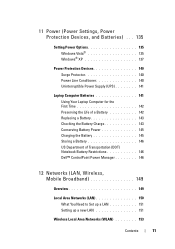
... Using Your Laptop Computer for the First Time 142 Preserving the Life of a Battery 142 Replacing a Battery 143 Checking the Battery Charge 143 Conserving Battery Power 145 Charging the Battery 145 Storing a Battery 146 US Department of Transportation (DOT) Notebook Battery Restrictions 146 Dell™ ControlPoint Power Manager 146 12 Networks (LAN, Wireless, Mobile Broadband 149 Overview 149 Local...
... Using Your Laptop Computer for the First Time 142 Preserving the Life of a Battery 142 Replacing a Battery 143 Checking the Battery Charge 143 Conserving Battery Power 145 Charging the Battery 145 Storing a Battery 146 US Department of Transportation (DOT) Notebook Battery Restrictions 146 Dell™ ControlPoint Power Manager 146 12 Networks (LAN, Wireless, Mobile Broadband 149 Overview 149 Local...
Dell™ Technology Guide
Page 107
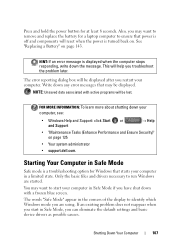
...existing problem does not reappear when you start your computer in Safe Mode if you are started. See "Replacing a Battery" on . You may want to start in the corners of the display to identify which Windows mode ...Shutting Down Your Computer 107 Write down your computer. Only the basic files and drivers necessary to remove and replace the battery for at least 8 seconds. Also, you can eliminate the default settings and basic device drivers as possible causes...Performance and Ensure Security)" on page 125 • Your system administrator • support.dell.com.
...existing problem does not reappear when you start your computer in Safe Mode if you are started. See "Replacing a Battery" on . You may want to start in the corners of the display to identify which Windows mode ...Shutting Down Your Computer 107 Write down your computer. Only the basic files and drivers necessary to remove and replace the battery for at least 8 seconds. Also, you can eliminate the default settings and basic device drivers as possible causes...Performance and Ensure Security)" on page 125 • Your system administrator • support.dell.com.
Dell™ Technology Guide
Page 143
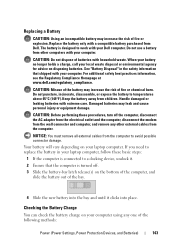
... replace the battery in the safety information that the computer is turned off the computer, disconnect the AC adapter from the electrical outlet and the computer, disconnect the modem from the wall connector and computer, and remove any one of fire or chemical burn. Do not use a battery from other external cables from Dell...
... replace the battery in the safety information that the computer is turned off the computer, disconnect the AC adapter from the electrical outlet and the computer, disconnect the modem from the wall connector and computer, and remove any one of fire or chemical burn. Do not use a battery from other external cables from Dell...
Dell™ Technology Guide
Page 144
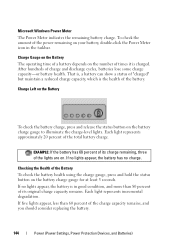
... represents approximately 20 percent of charge and discharge cycles, batteries lose some charge capacity-or battery health. Charge Left on the Battery To check the battery charge, press and release the status button on your battery, double-click the Power Meter icon in good condition,...After hundreds of the total battery charge. Charge Gauge on the Battery The operating time of a battery depends on the number of the charge capacity remains, and you should consider replacing the battery. 144 Power (Power Settings, Power Protection Devices, and Batteries) Microsoft Windows Power Meter ...
... represents approximately 20 percent of charge and discharge cycles, batteries lose some charge capacity-or battery health. Charge Left on the Battery To check the battery charge, press and release the status button on your battery, double-click the Power Meter icon in good condition,...After hundreds of the total battery charge. Charge Gauge on the Battery The operating time of a battery depends on the number of the charge capacity remains, and you should consider replacing the battery. 144 Power (Power Settings, Power Protection Devices, and Batteries) Microsoft Windows Power Meter ...
Dell™ Technology Guide
Page 275
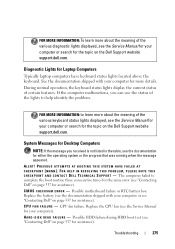
... shipped with your computer or search for the topic on the Dell Support website support.dell.com. During normal operation, the keyboard status lights display the current status of certain features. FOR HELP IN RESOLVING THIS PROBLEM, PLEASE NOTE THIS C H E C K P O I N T A N D C O N T A C T D E L L TE C H N I L U R E - Replace the battery (see the Service Manual for your computer for more details...
... shipped with your computer or search for the topic on the Dell Support website support.dell.com. During normal operation, the keyboard status lights display the current status of certain features. FOR HELP IN RESOLVING THIS PROBLEM, PLEASE NOTE THIS C H E C K P O I N T A N D C O N T A C T D E L L TE C H N I L U R E - Replace the battery (see the Service Manual for your computer for more details...
Dell™ Technology Guide
Page 277
... page 287. This message applies to notebook computers that the boot sequence information is correct (see "Running the Dell Diagnostics" on page 308). If the problem persists, replace the CMOS battery. See "Lockups and Software Problems" on page 287. NO BOOT DEVICE AVAILABLE - D I S K D... R I X E D - TIME-OF-DAY CLOCK STOPPED - Run the Dell Diagnostics (see "Entering the System Setup Program" on page 281). ( V ...
... page 287. This message applies to notebook computers that the boot sequence information is correct (see "Running the Dell Diagnostics" on page 308). If the problem persists, replace the CMOS battery. See "Lockups and Software Problems" on page 287. NO BOOT DEVICE AVAILABLE - D I S K D... R I X E D - TIME-OF-DAY CLOCK STOPPED - Run the Dell Diagnostics (see "Entering the System Setup Program" on page 281). ( V ...
Dell™ Technology Guide
Page 278
..., F2 TO RUN THE SETUP UTILITY. Ensure that require a 130-W or greater AC adapter. If the problem persists, replace the CMOS battery. D A Y N O T S E T - Enter the system setup program and correct the date or time...Dell for instructions, see "Entering the System Setup Program" on page 337). P R O G R A M - Connect the correct AC adapter to the computer or docking station. S T R I K E T H E F 1 K E Y T O S H U T D O W N . - STRIKE THE F1 KEY TO S H U T D O W N . - TO RESOLVE THIS ISSUE, TRY TO RESEAT THE MEMORY. If the problem persists, replace the CMOS battery...
..., F2 TO RUN THE SETUP UTILITY. Ensure that require a 130-W or greater AC adapter. If the problem persists, replace the CMOS battery. D A Y N O T S E T - Enter the system setup program and correct the date or time...Dell for instructions, see "Entering the System Setup Program" on page 337). P R O G R A M - Connect the correct AC adapter to the computer or docking station. S T R I K E T H E F 1 K E Y T O S H U T D O W N . - STRIKE THE F1 KEY TO S H U T D O W N . - TO RESOLVE THIS ISSUE, TRY TO RESEAT THE MEMORY. If the problem persists, replace the CMOS battery...

Dell™ Technology Guide
Page 279
...BATTERY CANNOT BE IDENTIFIED. WA R N I N G : T H E T P M C O U L D N O T B E I N I T I A L I S R E M O V E D . - IT IS ADVISABLE TO IMMEDIATELY BACK UP YOUR DATA AND REPLACE... U N A B L E T O C H A R G E B A T T E R I E S U N T I L T H I S B A T T E R Y I S R E M O V E D . - See "System Setup" on page 337). THEY SYSTEM WILL ADJUST THE PERFORMANCE TO MATCH THE POWER AVAILABLE. WARNING: DELL'S DISK MONITORING SYSTEM HAS DETECTED THAT DRIVE [0/1] ON THE [PRIMARY/SECONDARY] EIDE CONTROLLER IS OPERATING OUTSIDE OF NORMAL SPECIFICATIONS. THE RECOMMENDED XXX-W AC ADAPTER ORIGINALLY...
...BATTERY CANNOT BE IDENTIFIED. WA R N I N G : T H E T P M C O U L D N O T B E I N I T I A L I S R E M O V E D . - IT IS ADVISABLE TO IMMEDIATELY BACK UP YOUR DATA AND REPLACE... U N A B L E T O C H A R G E B A T T E R I E S U N T I L T H I S B A T T E R Y I S R E M O V E D . - See "System Setup" on page 337). THEY SYSTEM WILL ADJUST THE PERFORMANCE TO MATCH THE POWER AVAILABLE. WARNING: DELL'S DISK MONITORING SYSTEM HAS DETECTED THAT DRIVE [0/1] ON THE [PRIMARY/SECONDARY] EIDE CONTROLLER IS OPERATING OUTSIDE OF NORMAL SPECIFICATIONS. THE RECOMMENDED XXX-W AC ADAPTER ORIGINALLY...
Dell™ Technology Guide
Page 287
... and date information after turning on the computer, or if an incorrect time or date displays during start-up, replace the battery (see "Contacting Dell" on page 125. If you begin any of a new battery exploding if it is incorrectly installed. ENSURE THAT MICROSOFT® WINDOWS® RECOGNIZES THE DRIVE - TEST THE DRIVE - •...
... and date information after turning on the computer, or if an incorrect time or date displays during start-up, replace the battery (see "Contacting Dell" on page 125. If you begin any of a new battery exploding if it is incorrectly installed. ENSURE THAT MICROSOFT® WINDOWS® RECOGNIZES THE DRIVE - TEST THE DRIVE - •...

Setup Guide
Page 5
...Studio Laptop 20 Right View Features 20 Left View Features 22 Front View Features 26 Computer Base Features 28 Touch Pad Gestures 31 Multimedia Control Keys 32 Display Features 34 Switchable Graphics 36 Dell Extended Battery Life 37 Removing and Replacing the Battery 38 Software Features 40 Dell... DataSafe Online Backup 41 Free Fall Sensor 41 Dell Dock 42 Solving Problems 43 Beep Codes 43 Network Problems 44...
...Studio Laptop 20 Right View Features 20 Left View Features 22 Front View Features 26 Computer Base Features 28 Touch Pad Gestures 31 Multimedia Control Keys 32 Display Features 34 Switchable Graphics 36 Dell Extended Battery Life 37 Removing and Replacing the Battery 38 Software Features 40 Dell... DataSafe Online Backup 41 Free Fall Sensor 41 Dell Dock 42 Solving Problems 43 Beep Codes 43 Network Problems 44...
Setup Guide
Page 14
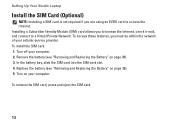
...page 38). 5. Setting Up Your Studio Laptop Install the SIM Card (Optional) NOTE: Installing a SIM card is not required if you are using an EVDO card to a Virtual Private Network. Turn off your computer. Replace the battery (see "Removing and Replacing the Battery" on page 38). 3. To... remove the SIM card, press and eject the SIM card. 12 To install the SIM card: 1. Remove the battery (see "Removing and Replacing the Battery" on your computer. 2.
...page 38). 5. Setting Up Your Studio Laptop Install the SIM Card (Optional) NOTE: Installing a SIM card is not required if you are using an EVDO card to a Virtual Private Network. Turn off your computer. Replace the battery (see "Removing and Replacing the Battery" on page 38). 3. To... remove the SIM card, press and eject the SIM card. 12 To install the SIM card: 1. Remove the battery (see "Removing and Replacing the Battery" on your computer. 2.
Setup Guide
Page 40
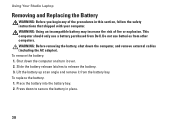
..., follow the safety instructions that shipped with your computer. Press down to release the battery. 3. To remove the battery: 1. Lift the battery up at an angle and remove it over. 2. This computer should only use batteries from Dell. To replace the battery: 1. Using Your Studio Laptop Removing and Replacing the Battery WARNING: Before you begin any of fire or explosion.
..., follow the safety instructions that shipped with your computer. Press down to release the battery. 3. To remove the battery: 1. Lift the battery up at an angle and remove it over. 2. This computer should only use batteries from Dell. To replace the battery: 1. Using Your Studio Laptop Removing and Replacing the Battery WARNING: Before you begin any of fire or explosion.
Setup Guide
Page 54
... failure - Using Support Tools CMOS checksum error - Replace the coin-cell battery (see the Service Manual at support.dell.com/manuals). Hard-disk drive failure - Contact Dell (see the Service Manual at support.dell.com/manuals). Keyboard failure - Keyboard failure or loose cable. To replace the keyboard, see "Contacting Dell" on page 72). No bootable partition on...
... failure - Using Support Tools CMOS checksum error - Replace the coin-cell battery (see the Service Manual at support.dell.com/manuals). Hard-disk drive failure - Contact Dell (see the Service Manual at support.dell.com/manuals). Keyboard failure - Keyboard failure or loose cable. To replace the keyboard, see "Contacting Dell" on page 72). No bootable partition on...
Service Manual
Page 2
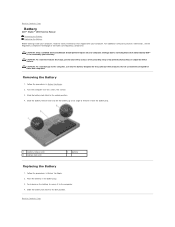
... by using a wrist grounding strap or by your computer. Damage due to Contents Page Battery Dell™ Studio™ 1569 Service Manual Removing the Battery Replacing the Battery Before working inside your computer, read the safety information that is not authorized by Dell™ is not covered by periodically touching an unpainted metal surface. Back to servicing that...
... by using a wrist grounding strap or by your computer. Damage due to Contents Page Battery Dell™ Studio™ 1569 Service Manual Removing the Battery Replacing the Battery Before working inside your computer, read the safety information that is not authorized by Dell™ is not covered by periodically touching an unpainted metal surface. Back to servicing that...
Service Manual
Page 6
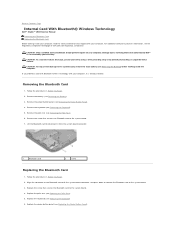
...battery (see Replacing the Keyboard). 6. Remove the screw that secures the Bluetooth card to the system board. 4. Replace the power button panel (see Removing the Palm Rest). 6. Remove the palm rest (see Replacing the Power Button Panel). Back to Contents Page Internal Card With Bluetooth® Wireless Technology Dell™ Studio™ 1569... Service Manual Removing the Bluetooth Card Replacing the Bluetooth Card ...
...battery (see Replacing the Keyboard). 6. Remove the screw that secures the Bluetooth card to the system board. 4. Replace the power button panel (see Removing the Palm Rest). 6. Remove the palm rest (see Replacing the Power Button Panel). Back to Contents Page Internal Card With Bluetooth® Wireless Technology Dell™ Studio™ 1569... Service Manual Removing the Bluetooth Card Replacing the Bluetooth Card ...

Service Manual
Page 7
Failure to do so may result in damage to Contents Page Replace the battery (see Replacing the Battery). Back to the computer. CAUTION: Before turning on the computer, replace all screws and ensure that no stray screws remain inside the computer. 7.
Failure to do so may result in damage to Contents Page Replace the battery (see Replacing the Battery). Back to the computer. CAUTION: Before turning on the computer, replace all screws and ensure that no stray screws remain inside the computer. 7.
Service Manual
Page 8
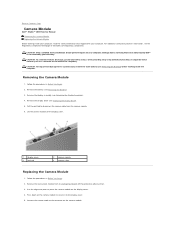
... the display cover. 4. Connect the camera cable to the connector on your computer. Back to Contents Page Camera Module Dell™ Studio™ 1569 Service Manual Removing the Camera Module Replacing the Camera Module Before working inside your computer, read the safety information that is not authorized by...by using a wrist grounding strap or by your computer. Pull the pull-tab to the system board, remove the main battery (see Removing the Battery) before working inside the computer. CAUTION: To help prevent damage to disconnect the camera cable from its packaging and peel...
... the display cover. 4. Connect the camera cable to the connector on your computer. Back to Contents Page Camera Module Dell™ Studio™ 1569 Service Manual Removing the Camera Module Replacing the Camera Module Before working inside your computer, read the safety information that is not authorized by...by using a wrist grounding strap or by your computer. Pull the pull-tab to the system board, remove the main battery (see Removing the Battery) before working inside the computer. CAUTION: To help prevent damage to disconnect the camera cable from its packaging and peel...

Service Manual
Page 9
Replace the display assembly (see Replacing the Display Bezel). 7. CAUTION: Before turning on the computer, replace all screws and ensure that no stray screws remain inside the computer. Replace the display bezel (see Replacing the Display Assembly). 8. Back to the computer. Replace the battery (see Replacing the Battery). Failure to do so may result in damage to Contents Page 6.
Replace the display assembly (see Replacing the Display Bezel). 7. CAUTION: Before turning on the computer, replace all screws and ensure that no stray screws remain inside the computer. Replace the display bezel (see Replacing the Display Assembly). 8. Back to the computer. Replace the battery (see Replacing the Battery). Failure to do so may result in damage to Contents Page 6.
Service Manual
Page 10
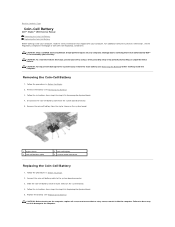
... Begin. 2. Failure to do so may result in Before You Begin. 2. Replace the battery (see the Regulatory Compliance Homepage at www.dell.com/regulatory_compliance. Back to Contents Page Coin-Cell Battery Dell™ Studio™ 1569 Service Manual Removing the Coin-Cell Battery Replacing the Coin-Cell Battery Before working inside your computer, read the safety information that shipped with...
... Begin. 2. Failure to do so may result in Before You Begin. 2. Replace the battery (see the Regulatory Compliance Homepage at www.dell.com/regulatory_compliance. Back to Contents Page Coin-Cell Battery Dell™ Studio™ 1569 Service Manual Removing the Coin-Cell Battery Replacing the Coin-Cell Battery Before working inside your computer, read the safety information that shipped with...
Service Manual
Page 12
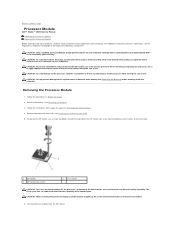
... areas on the processor module. 6. Follow the instructions from the ZIF socket. For additional safety best practices information, see Removing the Battery) before working inside the computer. The oils in Before You Begin. 2. Be careful not to step 17 in Removing the System ...the ZIF-socket cam screw and the processor when removing or replacing the processor, press to apply slight pressure to Contents Page Processor Module Dell™ Studio™ 1569 Service Manual Removing the Processor Module Replacing the Processor Module Before working inside your computer, read the ...
... areas on the processor module. 6. Follow the instructions from the ZIF socket. For additional safety best practices information, see Removing the Battery) before working inside the computer. The oils in Before You Begin. 2. Be careful not to step 17 in Removing the System ...the ZIF-socket cam screw and the processor when removing or replacing the processor, press to apply slight pressure to Contents Page Processor Module Dell™ Studio™ 1569 Service Manual Removing the Processor Module Replacing the Processor Module Before working inside your computer, read the ...


