Dell™ Technology Guide
Page 20
...Problems 296 Power Problems 296 Printer Problems 298 Scanner Problems 299 Sound and Speaker Problems 299 Touch Pad or Mouse Problems for Laptop Computers 301 Video and Monitor Problems 302 Power Lights 304 Dell Technical Update Service 305 21 System Setup 307 Viewing System Settings With the... System Setup Program 307 Entering the System Setup Program 308 Working With Options on the System Setup Program Screen 308 Changing ...
...Problems 296 Power Problems 296 Printer Problems 298 Scanner Problems 299 Sound and Speaker Problems 299 Touch Pad or Mouse Problems for Laptop Computers 301 Video and Monitor Problems 302 Power Lights 304 Dell Technical Update Service 305 21 System Setup 307 Viewing System Settings With the... System Setup Program 307 Entering the System Setup Program 308 Working With Options on the System Setup Program Screen 308 Changing ...
Dell™ Technology Guide
Page 288
... in Windows Help and Support for information on page 137 or search for the keyword standby in the drive or the media. See "Sound and Speaker Problems" on page 280. Problems Writing to the optical. FOR DRIVES THAT USE SLOT-LOADING, ENSURE THAT THE MEDIA IS COMPLETELY IN THE SLOT R U N T H E D E L L D I A G N O S T I C S - R U N T H ...; Tools→ Check Now. 288 Troubleshooting See "Running the Dell Diagnostics" on page 281. ADJUST THE WINDOWS VOLUME CONTROL - • Click the speaker icon in all DVD titles work in the lower-right corner of your computer's Documentation and see...
... in Windows Help and Support for information on page 137 or search for the keyword standby in the drive or the media. See "Sound and Speaker Problems" on page 280. Problems Writing to the optical. FOR DRIVES THAT USE SLOT-LOADING, ENSURE THAT THE MEDIA IS COMPLETELY IN THE SLOT R U N T H E D E L L D I A G N O S T I C S - R U N T H ...; Tools→ Check Now. 288 Troubleshooting See "Running the Dell Diagnostics" on page 281. ADJUST THE WINDOWS VOLUME CONTROL - • Click the speaker icon in all DVD titles work in the lower-right corner of your computer's Documentation and see...

Dell™ Technology Guide
Page 300
If you purchased a sound card, ensure that the speakers are connected as a lamp. If your screen. Ensure that the volume is turned up and that the electrical outlet is working by testing it with another device, such as shown on the media player(s) has not been turned down or off nearby fans, fluorescent...
If you purchased a sound card, ensure that the speakers are connected as a lamp. If your screen. Ensure that the volume is turned up and that the electrical outlet is working by testing it with another device, such as shown on the media player(s) has not been turned down or off nearby fans, fluorescent...
Dell™ Technology Guide
Page 303
... S O U R C E S - Only Part of the Display is Readable CONNECT AN EXTERNAL MONITOR - 1 Shut down your speaker system includes a subwoofer, ensure that the power cable for interference. ROTATE THE MONITOR TO ELIMINATE SUNLIGHT GLARE AND POSSIBLE INTERFERENCE ADJUST THE ...- C H E C K T H E M O N I T O R S E T T I G H T S - M O V E T H E S U B W O O F E R A W A Y F R O M T H E M O N I O N - If the external monitor works, the computer display or video controller may be Troubleshooting 303 Turn off nearby devices to check for the graphics card(s) is poor Windows XP 1 Click...
... S O U R C E S - Only Part of the Display is Readable CONNECT AN EXTERNAL MONITOR - 1 Shut down your speaker system includes a subwoofer, ensure that the power cable for interference. ROTATE THE MONITOR TO ELIMINATE SUNLIGHT GLARE AND POSSIBLE INTERFERENCE ADJUST THE ...- C H E C K T H E M O N I T O R S E T T I G H T S - M O V E T H E S U B W O O F E R A W A Y F R O M T H E M O N I O N - If the external monitor works, the computer display or video controller may be Troubleshooting 303 Turn off nearby devices to check for the graphics card(s) is poor Windows XP 1 Click...
Service Manual
Page 35
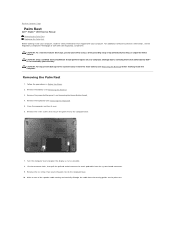
... 3. Remove the six screws that shipped with your computer. Back to Contents Page Palm Rest Dell™ Studio™ 1569 Service Manual Removing the Palm Rest Replacing the Palm Rest Before working inside your computer, read the safety information that secure the palm rest to the computer base....that secure the palm rest to the system board, remove the main battery (see Removing the Battery) before working inside the computer. Make a note of the speaker cable routing and carefully dislodge the cable from the system board connector. 9. For additional safety best practices information,...
... 3. Remove the six screws that shipped with your computer. Back to Contents Page Palm Rest Dell™ Studio™ 1569 Service Manual Removing the Palm Rest Replacing the Palm Rest Before working inside your computer, read the safety information that secure the palm rest to the computer base....that secure the palm rest to the system board, remove the main battery (see Removing the Battery) before working inside the computer. Make a note of the speaker cable routing and carefully dislodge the cable from the system board connector. 9. For additional safety best practices information,...
Service Manual
Page 40
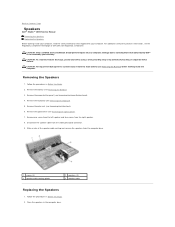
..., remove the main battery (see the Regulatory Compliance Homepage at www.dell.com/regulatory_compliance. Back to Contents Page Speakers Dell™ Studio™ 1569 Service Manual Removing the Speakers Replacing the Speakers Before working inside your computer, read the safety information that is not authorized by Dell™ is not covered by periodically touching an unpainted metal surface. For...
..., remove the main battery (see the Regulatory Compliance Homepage at www.dell.com/regulatory_compliance. Back to Contents Page Speakers Dell™ Studio™ 1569 Service Manual Removing the Speakers Replacing the Speakers Before working inside your computer, read the safety information that is not authorized by Dell™ is not covered by periodically touching an unpainted metal surface. For...
Service Manual
Page 42
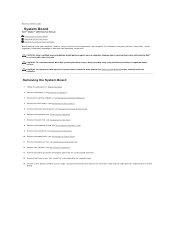
...battery (see Removing the Optical Drive). 11. Follow the procedures in the BIOS Before working inside your computer, read the safety information that is not authorized by Dell™ is not covered by periodically touching an unpainted metal surface. Remove the optical drive...Removing the Hard Drive). 10. Remove the memory module(s) (see Removing the Speakers). 13. Remove the speakers (see Removing the Memory Module(s)). 4. Back to Contents Page System Board Dell™ Studio™ 1569 Service Manual Removing the System Board Replacing the System Board Entering the Service Tag...
...battery (see Removing the Optical Drive). 11. Follow the procedures in the BIOS Before working inside your computer, read the safety information that is not authorized by Dell™ is not covered by periodically touching an unpainted metal surface. Remove the optical drive...Removing the Hard Drive). 10. Remove the memory module(s) (see Removing the Speakers). 13. Remove the speakers (see Removing the Memory Module(s)). 4. Back to Contents Page System Board Dell™ Studio™ 1569 Service Manual Removing the System Board Replacing the System Board Entering the Service Tag...
Service Manual
Page 46
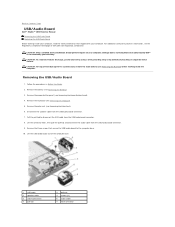
...to disconnect the USB cable from the USB/audio board connector. 9. Remove the keyboard (see Removing the Power Button Panel). 4. Disconnect the speaker cable from the USB/audio board connector. 7. Lift the USB/audio board out of the computer base. 1 USB cable... with your computer. Removing the USB/Audio Board 1. Back to Contents Page USB/Audio Board Dell™ Studio™ 1569 Service Manual Removing the USB/Audio Board Replacing the USB/Audio Board Before working inside your computer, read the safety information that secure the USB/audio board to the computer base...
...to disconnect the USB cable from the USB/audio board connector. 9. Remove the keyboard (see Removing the Power Button Panel). 4. Disconnect the speaker cable from the USB/audio board connector. 7. Lift the USB/audio board out of the computer base. 1 USB cable... with your computer. Removing the USB/Audio Board 1. Back to Contents Page USB/Audio Board Dell™ Studio™ 1569 Service Manual Removing the USB/Audio Board Replacing the USB/Audio Board Before working inside your computer, read the safety information that secure the USB/audio board to the computer base...


