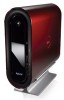

Setup Guide
Page 2
Your Studio Hybrid was designed with the environment in mind. Learn more at www.dell.com/hybrid.
Your Studio Hybrid was designed with the environment in mind. Learn more at www.dell.com/hybrid.
Setup Guide
Page 4
... by Bluetooth SIG, Inc. Reproduction of these materials in any proprietary interest in the U.S. disclaims any manner whatsoever without notice. © 2008 Dell Inc. CAUTION: A CAUTION indicates a potential for property damage, personal injury, or death. Microsoft, Windows, Windows Vista and Windows Vista start ...the Blu‑ray Disc Association; A01 Information in the United States and/or other countries.; and other than its own. Dell Inc. Trademarks used in this document to refer to either potential damage to hardware or loss of data and tells you make...
... by Bluetooth SIG, Inc. Reproduction of these materials in any proprietary interest in the U.S. disclaims any manner whatsoever without notice. © 2008 Dell Inc. CAUTION: A CAUTION indicates a potential for property damage, personal injury, or death. Microsoft, Windows, Windows Vista and Windows Vista start ...the Blu‑ray Disc Association; A01 Information in the United States and/or other countries.; and other than its own. Dell Inc. Trademarks used in this document to refer to either potential damage to hardware or loss of data and tells you make...
Setup Guide
Page 5
Contents Setting Up Your Studio Hybrid 5 Before Setting Up Your Computer 5 Install the Stand 5 Connect the Display 8 Set Up the Keyboard and Mouse...12 Attach the Cable Clip (Optional 12 Windows Vista® Setup 13 Connect to the Internet (Optional 13 Using Your Studio Hybrid 16 Front View Features 16 Back View Features 18 Using the Optical Disc Drive 20 Changing the Sleeve 21 Software Features 22... 25 Power Problems 26 Memory Problems 27 Lockups and Software Problems 28 Using Support Tools 30 Dell Support Center 30 System Messages 30 Hardware Troubleshooter 32...
Contents Setting Up Your Studio Hybrid 5 Before Setting Up Your Computer 5 Install the Stand 5 Connect the Display 8 Set Up the Keyboard and Mouse...12 Attach the Cable Clip (Optional 12 Windows Vista® Setup 13 Connect to the Internet (Optional 13 Using Your Studio Hybrid 16 Front View Features 16 Back View Features 18 Using the Optical Disc Drive 20 Changing the Sleeve 21 Software Features 22... 25 Power Problems 26 Memory Problems 27 Lockups and Software Problems 28 Using Support Tools 30 Dell Support Center 30 System Messages 30 Hardware Troubleshooter 32...

Setup Guide
Page 6
System Recovery Options 35 System Restore 35 Dell Factory Image Restore 36 Operating System Reinstallation 38 Getting Help 40 Technical Support and Customer Service 41 DellConnect 41 Online Services 41 AutoTech Service 42 Product Information 43 Returning Items for Repair Under Warranty or for Credit 43 Before You Call 44 Contacting Dell 45 Finding More Information and Resources 46 Basic Specifications 48 Appendix 53 Macrovision Product Notice 53 Index 54 4
System Recovery Options 35 System Restore 35 Dell Factory Image Restore 36 Operating System Reinstallation 38 Getting Help 40 Technical Support and Customer Service 41 DellConnect 41 Online Services 41 AutoTech Service 42 Product Information 43 Returning Items for Repair Under Warranty or for Credit 43 Before You Call 44 Contacting Dell 45 Finding More Information and Resources 46 Basic Specifications 48 Appendix 53 Macrovision Product Notice 53 Index 54 4
Setup Guide
Page 7
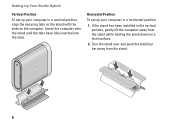
...automatically rotates the illuminated name and symbols to the computer. NOTICE: Placing or stacking heavy or sharp objects on . While powered on, the Dell™ logos on either in ) at the back of the computer and a minimum of the computer illuminate when the computer is vertical, ...it is horizontal. 5 To prevent overheating ensure that you leave at least 10.2 cm (4 in a vertical or horizontal position. Setting Up Your Studio Hybrid This section provides information about setting up your computer either side of 5.1 cm (2 in) on all other sides. Before Setting Up Your Computer...
...automatically rotates the illuminated name and symbols to the computer. NOTICE: Placing or stacking heavy or sharp objects on . While powered on, the Dell™ logos on either in ) at the back of the computer and a minimum of the computer illuminate when the computer is vertical, ...it is horizontal. 5 To prevent overheating ensure that you leave at least 10.2 cm (4 in a vertical or horizontal position. Setting Up Your Studio Hybrid This section provides information about setting up your computer either side of 5.1 cm (2 in) on all other sides. Before Setting Up Your Computer...
Setup Guide
Page 8
Horizontal Position To set up your computer in a vertical position, align the securing tabs on the stand with the slots on a level surface. 2. Turn the stand over and push the stabilizer bar away from the stand while holding the stand down on the computer. If the stand has been installed in the vertical position, gently lift the computer away from the stand. 6 Lower the computer onto the stand until the tabs have fully inserted into the slots. Setting Up Your Studio Hybrid Vertical Position To set up your computer in a horizontal position: 1.
Horizontal Position To set up your computer in a vertical position, align the securing tabs on the stand with the slots on a level surface. 2. Turn the stand over and push the stabilizer bar away from the stand while holding the stand down on the computer. If the stand has been installed in the vertical position, gently lift the computer away from the stand. 6 Lower the computer onto the stand until the tabs have fully inserted into the slots. Setting Up Your Studio Hybrid Vertical Position To set up your computer in a horizontal position: 1.
Setup Guide
Page 9
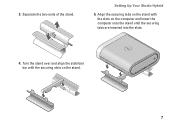
3. Align the securing tabs on the stand with the securing slots on the computer and lower the computer onto the stand until the securing tabs are inserted into the slots. 4. Turn the stand over and align the stabilizer bar with the slots on the stand. 7 Separate the two ends of the stand. Setting Up Your Studio Hybrid 5.
3. Align the securing tabs on the stand with the securing slots on the computer and lower the computer onto the stand until the securing tabs are inserted into the slots. 4. Turn the stand over and align the stabilizer bar with the slots on the stand. 7 Separate the two ends of the stand. Setting Up Your Studio Hybrid 5.
Setup Guide
Page 10
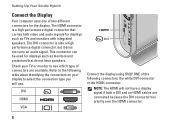
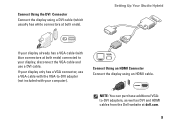
... white DVI connector or the HDMI connector. This connector can be used for displays such as TVs and monitors with integrated speakers. Setting Up Your Studio Hybrid Connect the Display Your computer uses one of connectors are connected because the DVI connector has priority over the HDMI connector. 8 The HDMI connector is...
... white DVI connector or the HDMI connector. This connector can be used for displays such as TVs and monitors with integrated speakers. Setting Up Your Studio Hybrid Connect the Display Your computer uses one of connectors are connected because the DVI connector has priority over the HDMI connector. 8 The HDMI connector is...
Setup Guide
Page 11
Connect Using an HDMI Connector Connect the display using a DVI cable (which usually has white connectors at dell.com. 9 NOTE: You can purchase additional VGAto-DVI adapters, as well as DVI and HDMI cables from the Dell website at both ends) connected to -DVI adapter (not included with the VGA-to your computer... your display, disconnect the VGA cable and use a DVI cable. Connect Using the DVI Connector Connect the display using an HDMI cable. Setting Up Your Studio Hybrid If your display already has a VGA cable (with blue connectors at both ends).
Connect Using an HDMI Connector Connect the display using a DVI cable (which usually has white connectors at dell.com. 9 NOTE: You can purchase additional VGAto-DVI adapters, as well as DVI and HDMI cables from the Dell website at both ends) connected to -DVI adapter (not included with the VGA-to your computer... your display, disconnect the VGA cable and use a DVI cable. Connect Using the DVI Connector Connect the display using an HDMI cable. Setting Up Your Studio Hybrid If your display already has a VGA cable (with blue connectors at both ends).
Setup Guide
Page 12
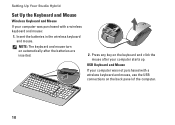
USB Keyboard and Mouse If your computer was purchased with a wireless keyboard and mouse, use the USB connections on the back panel of the computer. 10 NOTE: The keyboard and mouse turn on the keyboard and click the mouse after the batteries are inserted. 2. Press any key on automatically after your computer starts up. Setting Up Your Studio Hybrid Set Up the Keyboard and Mouse Wireless Keyboard and Mouse If your computer was not purchased with a wireless keyboard and mouse: 1. Insert the batteries in the wireless keyboard and mouse.
USB Keyboard and Mouse If your computer was purchased with a wireless keyboard and mouse, use the USB connections on the back panel of the computer. 10 NOTE: The keyboard and mouse turn on the keyboard and click the mouse after the batteries are inserted. 2. Press any key on automatically after your computer starts up. Setting Up Your Studio Hybrid Set Up the Keyboard and Mouse Wireless Keyboard and Mouse If your computer was not purchased with a wireless keyboard and mouse: 1. Insert the batteries in the wireless keyboard and mouse.
Setup Guide
Page 13
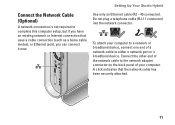
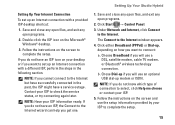
... cable modem, or Ethernet jack), you have an existing network or Internet connection that the network cable has been securely attached. 11 Setting Up Your Studio Hybrid Connect the Network Cable (Optional) A network connection is not required to a network or broadband device, connect one end of your computer to complete this computer...
... cable modem, or Ethernet jack), you have an existing network or Internet connection that the network cable has been securely attached. 11 Setting Up Your Studio Hybrid Connect the Network Cable (Optional) A network connection is not required to a network or broadband device, connect one end of your computer to complete this computer...
Setup Guide
Page 14
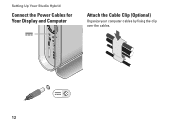
Setting Up Your Studio Hybrid Connect the Power Cables for Your Display and Computer Attach the Cable Clip (Optional) Organize your computer cables by fixing the clip over the cables. 12
Setting Up Your Studio Hybrid Connect the Power Cables for Your Display and Computer Attach the Cable Clip (Optional) Organize your computer cables by fixing the clip over the cables. 12
Setup Guide
Page 15
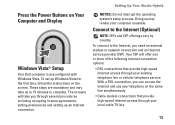
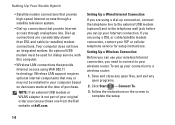
Setting Up Your Studio Hybrid NOTICE: Do not interrupt the operating system's setup process. Your ISP will take up Windows Vista for the first time, follow the instructions on Your Computer and Display Windows Vista® Setup Your Dell computer is preconfigured with Windows Vista. With a DSL connection, you can access the Internet and...
Setting Up Your Studio Hybrid NOTICE: Do not interrupt the operating system's setup process. Your ISP will take up Windows Vista for the first time, follow the instructions on Your Computer and Display Windows Vista® Setup Your Dell computer is preconfigured with Windows Vista. With a DSL connection, you can access the Internet and...
Setup Guide
Page 16
... a wireless router: 1. Save and close any open files, and exit any open programs. 2. Follow the instructions on decisions made at dell.com. An optional USB modem must be installed in your wireless router. Setting Up a Wired Internet Connection If you need to connect to... Dial‑up connections that may or may not be used for setup instructions. Click Start → Connect To. 3. Setting Up Your Studio Hybrid • Satellite modem connections that provide high‑speed Internet access through a telephone line. To set up your wireless Internet connection, you ...
... a wireless router: 1. Save and close any open files, and exit any open programs. 2. Follow the instructions on decisions made at dell.com. An optional USB modem must be installed in your wireless router. Setting Up a Wired Internet Connection If you need to connect to... Dial‑up connections that may or may not be used for setup instructions. Click Start → Connect To. 3. Setting Up Your Studio Hybrid • Satellite modem connections that provide high‑speed Internet access through a telephone line. To set up your wireless Internet connection, you ...
Setup Guide
Page 17
... the past, the ISP might have a service outage. Follow the instructions on the Microsoft® Windows® desktop. 3. NOTE: Have your ISP. 5. Setting Up Your Studio Hybrid Setting Up Your Internet Connection To set up an Internet connection with a provided ISP desktop shortcut: 1. Save and close any open files, and exit any...
... the past, the ISP might have a service outage. Follow the instructions on the Microsoft® Windows® desktop. 3. NOTE: Have your ISP. 5. Setting Up Your Studio Hybrid Setting Up Your Internet Connection To set up an Internet connection with a provided ISP desktop shortcut: 1. Save and close any open files, and exit any...
Setup Guide
Page 18
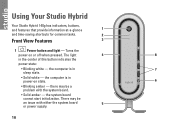
... state. • Solid white - there may be a problem with either the system board 5 or power supply. 16 the system board cannot start initialization. Using Your Studio Hybrid Your Studio Hybrid 140g has indicators, buttons, and features that provide information at-a-glance 1 and time-saving shortcuts for common tasks. 2 Front View Features 3 1 Power button and...
... state. • Solid white - there may be a problem with either the system board 5 or power supply. 16 the system board cannot start initialization. Using Your Studio Hybrid Your Studio Hybrid 140g has indicators, buttons, and features that provide information at-a-glance 1 and time-saving shortcuts for common tasks. 2 Front View Features 3 1 Power button and...
Setup Guide
Page 19
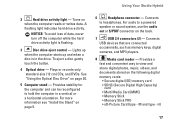
... control - See "Using the Optical Disc Drive" on page 5. 6 Headphone connector - Provides a fast and convenient way to hold the computer in the drive. Using Your Studio Hybrid 2 Hard drive activity light - To eject a disc gently touch the button. 4 Optical drive - H) 17 A flashing light indicates hard drive activity. Turns on the back. 7 USB...
... control - See "Using the Optical Disc Drive" on page 5. 6 Headphone connector - Provides a fast and convenient way to hold the computer in the drive. Using Your Studio Hybrid 2 Hard drive activity light - To eject a disc gently touch the button. 4 Optical drive - H) 17 A flashing light indicates hard drive activity. Turns on the back. 7 USB...
Setup Guide
Page 20
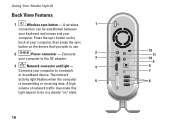
... sync button on " state. 18 A high volume of your computer. The network activity light flashes when the computer 5 6 is transmitting or receiving data. Using Your Studio Hybrid Back View Features 1 Wireless sync button - A wireless 1 connection can be in a steady "on the device that you wish to a network 7 or broadband device...
... sync button on " state. 18 A high volume of your computer. The network activity light flashes when the computer 5 6 is transmitting or receiving data. Using Your Studio Hybrid Back View Features 1 Wireless sync button - A wireless 1 connection can be in a steady "on the device that you wish to a network 7 or broadband device...
Setup Guide
Page 21
... amplifiers and TVs for both audio and video signals. NOTE: For a monitor without going through optical digital cables. Using Your Studio Hybrid 4 HDMI 1.2 connector - NOTE: Before you buy a lock, ensure that it works with the security cable slot on support.dell.com or when contacting technical support. 10 Line-out or headphone connector -
... amplifiers and TVs for both audio and video signals. NOTE: For a monitor without going through optical digital cables. Using Your Studio Hybrid 4 HDMI 1.2 connector - NOTE: Before you buy a lock, ensure that it works with the security cable slot on support.dell.com or when contacting technical support. 10 Line-out or headphone connector -
Setup Guide
Page 22
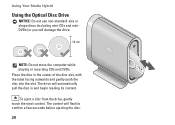
The drive will flash to confirm a few seconds before ejecting the disc. 20 To eject a disc from the drive, gently touch the eject control. Place the disc in and begin reading its content. The control will automatically pull the disc in the center of the disc slot, with the label facing outwards and gently push the disc into the slot. Using Your Studio Hybrid Using the Optical Disc Drive NOTICE: Do not use non-standard-size or shape discs (including mini-CDs and miniDVDs) or you will damage the drive. 12 cm NOTE: Do not move the computer while playing or recording CDs and DVDs.
The drive will flash to confirm a few seconds before ejecting the disc. 20 To eject a disc from the drive, gently touch the eject control. Place the disc in and begin reading its content. The control will automatically pull the disc in the center of the disc slot, with the label facing outwards and gently push the disc into the slot. Using Your Studio Hybrid Using the Optical Disc Drive NOTICE: Do not use non-standard-size or shape discs (including mini-CDs and miniDVDs) or you will damage the drive. 12 cm NOTE: Do not move the computer while playing or recording CDs and DVDs.
