
User's Guide
Page 3
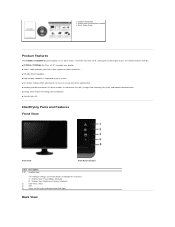
...Contrast. 1 Shortcut key: Preset Modes (Default) 2 Shortcut key: Brightness/Contrast (Default) 3 OSD menu select 4 EXIT 5 Power On/Off (light indicator below Dell logo) Back View The monitor features include: ■ ST2220L/ST2220M: 54.61cm (21.5") viewable area display. ■ 1920 x 1080 resolution, plus full-screen support...Star compliance. ■ Security lock slot. l Safety Information l Drivers and Documentation media l Quick Setup Guide Product Features The ST2220L/ST2220M flat panel display has an active matrix, Thin-Film Transistor (TFT), and Liquid Crystal Display (LCD).
...Contrast. 1 Shortcut key: Preset Modes (Default) 2 Shortcut key: Brightness/Contrast (Default) 3 OSD menu select 4 EXIT 5 Power On/Off (light indicator below Dell logo) Back View The monitor features include: ■ ST2220L/ST2220M: 54.61cm (21.5") viewable area display. ■ 1920 x 1080 resolution, plus full-screen support...Star compliance. ■ Security lock slot. l Safety Information l Drivers and Documentation media l Quick Setup Guide Product Features The ST2220L/ST2220M flat panel display has an active matrix, Thin-Film Transistor (TFT), and Liquid Crystal Display (LCD).
User's Guide
Page 11
...not be available in your country or region in the United States, call 800-WWW-DELL (800-999-3355). Contacting Dell For customers in the Choose A Country/Region drop-down menu at www.dell.com\regulatory_compliance. Visit support.dell.com. 2. Click Contact Us on safety instructions, see the regulatory compliance website located... link based on your need. 5. NOTE: If you do not have an active Internet connection, you . Back to Contents Page Appendix Dell™ ST2220L/ST2220M monitor User's Guide Safety Instructions FCC Notice (U.S. FCC Notice (U.S. Verify your area.
...not be available in your country or region in the United States, call 800-WWW-DELL (800-999-3355). Contacting Dell For customers in the Choose A Country/Region drop-down menu at www.dell.com\regulatory_compliance. Visit support.dell.com. 2. Click Contact Us on safety instructions, see the regulatory compliance website located... link based on your need. 5. NOTE: If you do not have an active Internet connection, you . Back to Contents Page Appendix Dell™ ST2220L/ST2220M monitor User's Guide Safety Instructions FCC Notice (U.S. FCC Notice (U.S. Verify your area.

User's Guide
Page 14
...Press any key to launch the OSD menu and press Main Menu for the OSD menu to disappear. 1. Preset Modes Select 2 Use this button for different display preset modes on your monitor. Back to Contents Page Operating the Monitor Dell™ ST2220L/ST2220M monitor User's Guide Using the Front ...Panel Controls Using the On-Screen Display (OSD) Menu Setting the Maximum Resolution Using the Dell Soundbar (Optional) Using the Tilt Using the Front Panel Use ...
...Press any key to launch the OSD menu and press Main Menu for the OSD menu to disappear. 1. Preset Modes Select 2 Use this button for different display preset modes on your monitor. Back to Contents Page Operating the Monitor Dell™ ST2220L/ST2220M monitor User's Guide Using the Front ...Panel Controls Using the On-Screen Display (OSD) Menu Setting the Maximum Resolution Using the Dell Soundbar (Optional) Using the Tilt Using the Front Panel Use ...

User's Guide
Page 15
... to another, the option name is only available when you move between the setting options. Press the and buttons to make your changes. 6. Or Main Menu for the monitor. 3. See the table for a complete list of all the options available for non Analog (non VGA) Input NOTE: Auto Adjust is ... to enter the slide bar and then use the and buttons, according to the indicators on the menu, to select the desired parameter. 5. Press the button once to the main menu or exit the OSD menu. Press the button to return to activate the highlighted option. 4. As you are using the analog (...
... to another, the option name is only available when you move between the setting options. Press the and buttons to make your changes. 6. Or Main Menu for the monitor. 3. See the table for a complete list of all the options available for non Analog (non VGA) Input NOTE: Auto Adjust is ... to enter the slide bar and then use the and buttons, according to the indicators on the menu, to select the desired parameter. 5. Press the button once to the main menu or exit the OSD menu. Press the button to return to activate the highlighted option. 4. As you are using the analog (...

User's Guide
Page 16
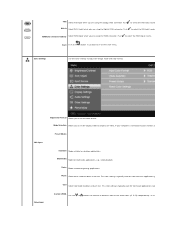
... your computer recognizes your monitor on the monitor screen. Press the button to increase the brightness and Press the button to or exit the main menu. Contrast Adjust the Brightness first, and then adjust the Contrast only if further adjustment is to used to select between the darkest and lightest areas... button to increase contrast and press the button to scan for your monitor. The Contrast function adjusts the degree of the backlight. The Input Source menu is necessary. Auto Select Scan for Sources.
... your computer recognizes your monitor on the monitor screen. Press the button to increase the brightness and Press the button to or exit the main menu. Contrast Adjust the Brightness first, and then adjust the Contrast only if further adjustment is to used to select between the darkest and lightest areas... button to increase contrast and press the button to scan for your monitor. The Contrast function adjusts the degree of the backlight. The Input Source menu is necessary. Auto Select Scan for Sources.
User's Guide
Page 17
... Preset Modes VGA input Standard Mode suitable for color-intensive applications (photograph image editing Video input Cool Select cool mode to or exit the main menu. This color setting is typically used for selective models) Select HDMI input when you are using the analog (VGA) connector. VGA Select VGA input when...
... Preset Modes VGA input Standard Mode suitable for color-intensive applications (photograph image editing Video input Cool Select cool mode to or exit the main menu. This color setting is typically used for selective models) Select HDMI input when you are using the analog (VGA) connector. VGA Select VGA input when...

User's Guide
Page 18
... image increases the purple hue in the normal mode and the right half of the video image. Saturation Allows you to or exit the main menu.
... image increases the purple hue in the normal mode and the right half of the video image. Saturation Allows you to or exit the main menu.

User's Guide
Page 19
... image left and right. Wide Mode Adjusts the image ratio as 4:3 or full screen. Horizontal Position Use the and buttons to or exit the main menu. Maximum is '100' (+).
... image left and right. Wide Mode Adjusts the image ratio as 4:3 or full screen. Horizontal Position Use the and buttons to or exit the main menu. Maximum is '100' (+).

User's Guide
Page 20
... above power button for best user experience and optimum performance of 6 languages (English, Espanol, Francais, Deutsch, Simplified Chinese, Japanese Menu Transparency Allows you pressed a button. Menu Timer OSD Hold Time: Sets the amount of the audio Power Save Audio Turns the Audio Power on or off during power save... mode. All buttons are allowed. Back Push to go back to the original factory settings. Menu Lock Controls user access to transparent. Line Out Source Select the source of time the OSD will remain active after the last time you ...
... above power button for best user experience and optimum performance of 6 languages (English, Espanol, Francais, Deutsch, Simplified Chinese, Japanese Menu Transparency Allows you pressed a button. Menu Timer OSD Hold Time: Sets the amount of the audio Power Save Audio Turns the Audio Power on or off during power save... mode. All buttons are allowed. Back Push to go back to the original factory settings. Menu Lock Controls user access to transparent. Line Out Source Select the source of time the OSD will remain active after the last time you ...

User's Guide
Page 21
Personalize Reset all OSD settings to allow direct access. Select one control menu for each shortcut key to the factory default settings. Factory Reset Back Press the button to go back to help eliminate any image retention. LCD Conditioning If an image appears to be retained on the front panel. Using the LCD does not remove burn-in. There are 2 shortcut keys on the monitor, select LCD Conditioning to or exit the main menu.
Personalize Reset all OSD settings to allow direct access. Select one control menu for each shortcut key to the factory default settings. Factory Reset Back Press the button to go back to help eliminate any image retention. LCD Conditioning If an image appears to be retained on the front panel. Using the LCD does not remove burn-in. There are 2 shortcut keys on the monitor, select LCD Conditioning to or exit the main menu.


