User's Guide
Page 3
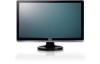
... l Quick Setup Guide Product Features The ST2220L/ST2220M flat panel display has an active matrix, Thin-Film Transistor (TFT), and Liquid Crystal Display (LCD). The monitor features include: ■ ST2220L/ST2220M: 54.61cm (21.5") viewable area display. ■ 1920 x 1080 resolution, plus full-screen support for lower resolutions. ■ Tilt adjustment capability. ■ Plug and play capability if supported by your system. ■ On-Screen Display (OSD) adjustments for ease of set-up and screen optimization. ■ Software and...
... l Quick Setup Guide Product Features The ST2220L/ST2220M flat panel display has an active matrix, Thin-Film Transistor (TFT), and Liquid Crystal Display (LCD). The monitor features include: ■ ST2220L/ST2220M: 54.61cm (21.5") viewable area display. ■ 1920 x 1080 resolution, plus full-screen support for lower resolutions. ■ Tilt adjustment capability. ■ Plug and play capability if supported by your system. ■ On-Screen Display (OSD) adjustments for ease of set-up and screen optimization. ■ Software and...
User's Guide
Page 4
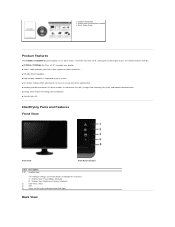
To release stand assembly from monitor. Lists the regulatory approvals. Back View Label 1 Barcode serial number label 2 Security lock slot 3 Dell Soundbar mounting brackets 4 Regulatory rating label 5 Stand release button Description/Use To contact Dell for technical support. To help secure your monitor. To attach the optional Dell Soundbar. Side View Left Side Bottom View
To release stand assembly from monitor. Lists the regulatory approvals. Back View Label 1 Barcode serial number label 2 Security lock slot 3 Dell Soundbar mounting brackets 4 Regulatory rating label 5 Stand release button Description/Use To contact Dell for technical support. To help secure your monitor. To attach the optional Dell Soundbar. Side View Left Side Bottom View

User's Guide
Page 5
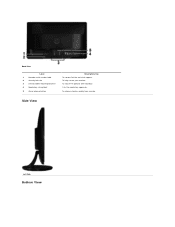
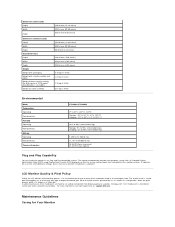
... power-saving feature: ST2220L/ST2220M VESA Modes Normal operation Active-off mode Switch off Horizontal Sync Active Vertical Sync Video Active Active Power Indicator White Power Consumption 28 W (maximum) Inactive - Bottom view Label Description AC power cord connector 1 DVI connector 2 HDMI connector 3 VGA connector 4 Audio Line-in 5 Audio Line out 6 Label 1 2 3 Description AC power cord connector DVI connector VGA connector Monitor Specifications Power Management Modes If you have VESA's DPMS™ compliance display card or software installed in your PC, the monitor...
... power-saving feature: ST2220L/ST2220M VESA Modes Normal operation Active-off mode Switch off Horizontal Sync Active Vertical Sync Video Active Active Power Indicator White Power Consumption 28 W (maximum) Inactive - Bottom view Label Description AC power cord connector 1 DVI connector 2 HDMI connector 3 VGA connector 4 Audio Line-in 5 Audio Line out 6 Label 1 2 3 Description AC power cord connector DVI connector VGA connector Monitor Specifications Power Management Modes If you have VESA's DPMS™ compliance display card or software installed in your PC, the monitor...

User's Guide
Page 7
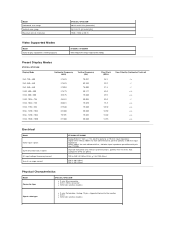
... to 1* Antiglare with hard-coating 3H LED light bar system 5 ms typical 16.7 mil colors 78 %** * Based on estimation ** ST2220L/ST2220M Color Gamut (Typical) is based on device) 15 DDC CLOCK (SCL) 16 DDC DATA (SDA) 17 DDC/CEC Ground 18 +5V POWER 19 HOT PLUG DETECT Flat Panel Specifications Model Screen type Panel type Screen dimensions Preset display area: Horizontal Vertical ST2220L/ST2220M Active matrix - on CIE1976 (78 %) and...
... to 1* Antiglare with hard-coating 3H LED light bar system 5 ms typical 16.7 mil colors 78 %** * Based on estimation ** ST2220L/ST2220M Color Gamut (Typical) is based on device) 15 DDC CLOCK (SCL) 16 DDC DATA (SDA) 17 DDC/CEC Ground 18 +5V POWER 19 HOT PLUG DETECT Flat Panel Specifications Model Screen type Panel type Screen dimensions Preset display area: Horizontal Vertical ST2220L/ST2220M Active matrix - on CIE1976 (78 %) and...
User's Guide
Page 8
....5 Sync Polarity (Horizontal/Vertical) Electrical Model Video input signals Synchronization input signals AC input voltage/frequency/current Inrush iso surge current ST2220L/ST2220M Analog RGB, 0.7 Volts +/- 5%, positive polarity at 75 ohm input impedance Digital DVI-D TMDS, 600mV for each differential line, positive polarity at 50 ohm input impedance HDMI, 600mV for each differential line, 100 ohm input impedance per differential pair (for ST2220L) Separate horizontal and vertical synchronizations, polarity-free TTL level, SOG (Composite SYNC on green...
....5 Sync Polarity (Horizontal/Vertical) Electrical Model Video input signals Synchronization input signals AC input voltage/frequency/current Inrush iso surge current ST2220L/ST2220M Analog RGB, 0.7 Volts +/- 5%, positive polarity at 75 ohm input impedance Digital DVI-D TMDS, 600mV for each differential line, positive polarity at 50 ohm input impedance HDMI, 600mV for each differential line, 100 ohm input impedance per differential pair (for ST2220L) Separate horizontal and vertical synchronizations, polarity-free TTL level, SOG (Composite SYNC on green...
User's Guide
Page 9
... display quality or usability. A display with 1 to become fixed in any Plug and Play-compatible system. When the pixel remains permanently lit, it is known as a "bright dot." The monitor automatically provides the computer system with stand assembly and cables Weight without stand assembly (for Your Monitor Maintenance Guidelines Caring for wall mount or VESA mount considerations - If required, the user can configure itself and optimize the monitor settings. For more pixels to 5 fixed pixels...
... display quality or usability. A display with 1 to become fixed in any Plug and Play-compatible system. When the pixel remains permanently lit, it is known as a "bright dot." The monitor automatically provides the computer system with stand assembly and cables Weight without stand assembly (for Your Monitor Maintenance Guidelines Caring for wall mount or VESA mount considerations - If required, the user can configure itself and optimize the monitor settings. For more pixels to 5 fixed pixels...
User's Guide
Page 11
For information on your purchase invoice, packing slip, bill, or Dell product catalog. NOTE: If you do not have an active Internet connection, you . Back to Contents Page Appendix Dell™ ST2220L/ST2220M monitor User's Guide Safety Instructions FCC Notice (U.S. Only) and Other Regulatory Information For FCC notices and other regulatory information, see the Safety Information that ships with...
For information on your purchase invoice, packing slip, bill, or Dell product catalog. NOTE: If you do not have an active Internet connection, you . Back to Contents Page Appendix Dell™ ST2220L/ST2220M monitor User's Guide Safety Instructions FCC Notice (U.S. Only) and Other Regulatory Information For FCC notices and other regulatory information, see the Safety Information that ships with...
User's Guide
Page 13
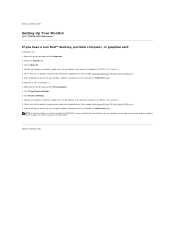
... Graphics Adapter, attempt to set the resolution to 1920x1080 again. NVIDIA, ATI, Intel etc.). 5. Please refer to Contents Page Setting Up Your Monitor Dell™ ST2220L/ST2220M monitor If you are unable to set the resolution to 1920x1080 again. Click Change Display Settings. 3. NOTE: If you have a non Dell™ desktop, portable computer, or graphics card In Windows XP: 1. Back to the graphics card provider website for updated driver...
... Graphics Adapter, attempt to set the resolution to 1920x1080 again. NVIDIA, ATI, Intel etc.). 5. Please refer to Contents Page Setting Up Your Monitor Dell™ ST2220L/ST2220M monitor If you are unable to set the resolution to 1920x1080 again. Click Change Display Settings. 3. NOTE: If you have a non Dell™ desktop, portable computer, or graphics card In Windows XP: 1. Back to the graphics card provider website for updated driver...

User's Guide
Page 14
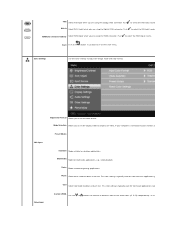
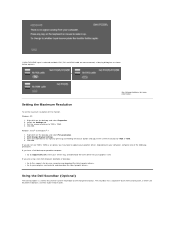
...power button to turn the monitor on your monitor. Back to Contents Page Operating the Monitor Dell™ ST2220L/ST2220M monitor User's Guide Using the Front Panel Controls Using the On-Screen Display (OSD) Menu Setting the Maximum Resolution Using the Dell Soundbar (Optional) Using the Tilt Using the Front Panel Use the control buttons on and fully functional. Power button The white light indicates that you define in the personalize menu. *The default settings are also saved if you change the settings and then wait for Analog (VGA) Input to disappear. 1. Brightness/Contrast...
...power button to turn the monitor on your monitor. Back to Contents Page Operating the Monitor Dell™ ST2220L/ST2220M monitor User's Guide Using the Front Panel Controls Using the On-Screen Display (OSD) Menu Setting the Maximum Resolution Using the Dell Soundbar (Optional) Using the Tilt Using the Front Panel Use the control buttons on and fully functional. Power button The white light indicates that you define in the personalize menu. *The default settings are also saved if you change the settings and then wait for Analog (VGA) Input to disappear. 1. Brightness/Contrast...

User's Guide
Page 16
... recognizes your monitor on the monitor screen. The Input Source menu is necessary. Contrast Adjust the Brightness first, and then adjust the Contrast only if further adjustment is to used to your configuration. Auto Adjust Brightness Brightness adjusts the luminance of difference between different video signals that may be connected to select between the darkest and lightest areas on startup, the Auto Adjustment function optimizes the display settings for u Input Source NOTE: In most cases, Auto Adjust produces the best image for Sources.
... recognizes your monitor on the monitor screen. The Input Source menu is necessary. Contrast Adjust the Brightness first, and then adjust the Contrast only if further adjustment is to used to your configuration. Auto Adjust Brightness Brightness adjusts the luminance of difference between different video signals that may be connected to select between the darkest and lightest areas on startup, the Auto Adjustment function optimizes the display settings for u Input Source NOTE: In most cases, Auto Adjust produces the best image for Sources.
User's Guide
Page 17
... is connected to select the HDMI input source. If your monitor, choose Graphics. HDMI (for desktop applications. If a DVD Preset Modes VGA input Standard Mode suitable for selective models) Select HDMI input when you are using the HDMI connector. Color Settings Use the color settings to obtain a red tint. Warm Select warm mode to adjust the Image mode and color format. This color setting is typically used for color-intensive applications (photograph image editing Video input Cool Select cool mode to select the DVI input source. Game Mode suitable...
... is connected to select the HDMI input source. If your monitor, choose Graphics. HDMI (for desktop applications. If a DVD Preset Modes VGA input Standard Mode suitable for selective models) Select HDMI input when you are using the HDMI connector. Color Settings Use the color settings to obtain a red tint. Warm Select warm mode to adjust the Image mode and color format. This color setting is typically used for color-intensive applications (photograph image editing Video input Cool Select cool mode to select the DVI input source. Game Mode suitable...

User's Guide
Page 18
... main menu. Demo Mode Vertically splits the screen into two segments. The left half of the screen in the image NOTE: Hue adjustment is only available for movie playback. Use or buttons to adjust the saturation from green to adjust the color saturation of the screen is dis NOTE: Demo Mode is only available for video input. Reset Color Settings Returns your monitor color settings to adjust the skin tone. Use this feature to the factory default settings. Use...
... main menu. Demo Mode Vertically splits the screen into two segments. The left half of the screen in the image NOTE: Hue adjustment is only available for movie playback. Use or buttons to adjust the saturation from green to adjust the color saturation of the screen is dis NOTE: Demo Mode is only available for video input. Reset Color Settings Returns your monitor color settings to adjust the skin tone. Use this feature to the factory default settings. Use...

User's Guide
Page 20
... a button. Other Settings Language Language option to set the OSD display to transparent. Use the and buttons to adjust the slider in 5 second increments, from opaque to one of your monitor parameters (brightness, color balance, etc.) to or exit the main menu. Menu Lock Controls user access to the original factory settings. Menu Timer OSD Hold Time: Sets the amount of the audio Power Save Audio Turns the Audio Power on or off during power save mode. All buttons are allowed. Reset Audio Settings Resets the audio settings to adjustments. Back...
... a button. Other Settings Language Language option to set the OSD display to transparent. Use the and buttons to adjust the slider in 5 second increments, from opaque to one of your monitor parameters (brightness, color balance, etc.) to or exit the main menu. Menu Lock Controls user access to the original factory settings. Menu Timer OSD Hold Time: Sets the amount of the audio Power Save Audio Turns the Audio Power on or off during power save mode. All buttons are allowed. Reset Audio Settings Resets the audio settings to adjustments. Back...

User's Guide
Page 21
Using the LCD does not remove burn-in. Factory Reset Back Press the button to go back to the factory default settings. Personalize Reset all OSD settings to or exit the main menu. Select one control menu for each shortcut key to help eliminate any image retention. LCD Conditioning If an image appears to be retained on the front panel. There are 2 shortcut keys on the monitor, select LCD Conditioning to allow direct access.
Using the LCD does not remove burn-in. Factory Reset Back Press the button to go back to the factory default settings. Personalize Reset all OSD settings to or exit the main menu. Select one control menu for each shortcut key to help eliminate any image retention. LCD Conditioning If an image appears to be retained on the front panel. There are 2 shortcut keys on the monitor, select LCD Conditioning to allow direct access.
User's Guide
Page 23
... Solving Problems for the monitor. Windows Vista® or Windows® 7: 1. Using the Dell Soundbar (Optional) The Dell Soundbar is selected and both VGA, DVI and HDMI cable are using a non-Dell computer (portable or desktop): ¡ Go to the support site for your graphics card. Depending on the desktop and select Properties. 2. The Soundbar has a capacitive touch front control panel, a white LED for your computer and download the latest graphic drivers...
... Solving Problems for the monitor. Windows Vista® or Windows® 7: 1. Using the Dell Soundbar (Optional) The Dell Soundbar is selected and both VGA, DVI and HDMI cable are using a non-Dell computer (portable or desktop): ¡ Go to the support site for your graphics card. Depending on the desktop and select Properties. 2. The Soundbar has a capacitive touch front control panel, a white LED for your computer and download the latest graphic drivers...
User's Guide
Page 25
...-bar to the right by pressing and holding the left -mouse button and adjust the screen resolution to 1920x1080. 4. Select the Settings tab. 3. Right-click on the desktop and click Properties. 2. Back to update your graphics driver. Back to Contents Page Setting Up Your Monitor Dell™ ST2220L/ST2220M monitor Important instructions to set the display resolution to 1920 x 1080 pixels by performing the following steps: In...
...-bar to the right by pressing and holding the left -mouse button and adjust the screen resolution to 1920x1080. 4. Select the Settings tab. 3. Right-click on the desktop and click Properties. 2. Back to update your graphics driver. Back to Contents Page Setting Up Your Monitor Dell™ ST2220L/ST2220M monitor Important instructions to set the display resolution to 1920 x 1080 pixels by performing the following steps: In...

User's Guide
Page 28
... HDMI Cable* (for selective models) NOTE: *Optional purchase item. Use all the cables on the back of the procedures in this section, follow the procedure below to the corresponding video port on the same computer. Connecting the Monitor CAUTION: Before you have completed connecting the VGA/DVI/HDMI cable, follow the safety instructions. Plug the power cables for the purpose of the the computer may vary. Connect the HDMI cable, white (digital DVI-D), or blue (analog VGA) display connector cable...
... HDMI Cable* (for selective models) NOTE: *Optional purchase item. Use all the cables on the back of the procedures in this section, follow the procedure below to the corresponding video port on the same computer. Connecting the Monitor CAUTION: Before you have completed connecting the VGA/DVI/HDMI cable, follow the safety instructions. Plug the power cables for the purpose of the the computer may vary. Connect the HDMI cable, white (digital DVI-D), or blue (analog VGA) display connector cable...
User's Guide
Page 30
... you to Contents Page Solving Problems Dell™ ST2220L/ST2220M monitor User's Guide Self-Test Built-in Diagnostics Common Problems Product-Specific Problems Troubleshooting the Dell™ Soundbar (Optional) CAUTION: Before you have performed Step 5, check your video controller and computer system. Unplug the video cable from the back of the computer or monitor. Turn on -screen (against a black background) if the monitor cannot sense a video signal and is working correctly. The floating dialog...
... you to Contents Page Solving Problems Dell™ ST2220L/ST2220M monitor User's Guide Self-Test Built-in Diagnostics Common Problems Product-Specific Problems Troubleshooting the Dell™ Soundbar (Optional) CAUTION: Before you have performed Step 5, check your video controller and computer system. Unplug the video cable from the back of the computer or monitor. Turn on -screen (against a black background) if the monitor cannot sense a video signal and is working correctly. The floating dialog...

User's Guide
Page 31
...-in the video cable connector. l Auto Adjust via OSD. 4. l Change the video resolution to Factory Settings. l Run the built-in another room. Press the shortcut button 4 key on Pixels Brightness Problems Geometric Distortion Horizontal/Vertical Lines No picture or no brightness l Increase brightness & contrast controls via OSD. To exit, press the shortcut button 4 again. l Perform monitor self-test feature check. l Adjust the Phase and Pixel Clock controls via OSD. l Reset the monitor to the correct aspect ratio (16:9). The color of the screen changes to...
...-in the video cable connector. l Auto Adjust via OSD. 4. l Change the video resolution to Factory Settings. l Run the built-in another room. Press the shortcut button 4 key on Pixels Brightness Problems Geometric Distortion Horizontal/Vertical Lines No picture or no brightness l Increase brightness & contrast controls via OSD. To exit, press the shortcut button 4 again. l Perform monitor self-test feature check. l Adjust the Phase and Pixel Clock controls via OSD. l Reset the monitor to the correct aspect ratio (16:9). The color of the screen changes to...

User's Guide
Page 32
... keyboard. l Perform monitor self-test feature check to Factory Settings. Adjust R/G/B value in self mode. l Turn the volume up. height or width of smoke or sparks Monitor turns on No Input Signal when user controls pressed No picture, the LED light is pressed, the message " No VGA cable", "No DVI-D cable"or "No HDMI cable" will not fill the entire The picture does not fill the screen. When control button is amber. POSSIBLE SOLUTIONS l Plug the audio line-in diagnostics...
... keyboard. l Perform monitor self-test feature check to Factory Settings. Adjust R/G/B value in self mode. l Turn the volume up. height or width of smoke or sparks Monitor turns on No Input Signal when user controls pressed No picture, the LED light is pressed, the message " No VGA cable", "No DVI-D cable"or "No HDMI cable" will not fill the entire The picture does not fill the screen. When control button is amber. POSSIBLE SOLUTIONS l Plug the audio line-in diagnostics...


