User's Guide
Page 2
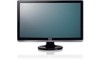
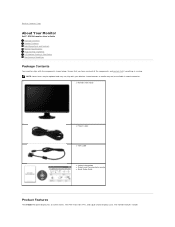
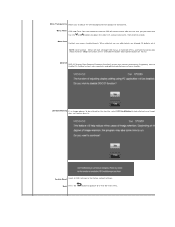
... below. Back to Contents Page About Your Monitor Dell™ ST2220 monitor User's Guide Package Contents Product Features Identifying Parts and Controls Monitor Specifications Plug and Play Capability LCD Monitor Quality & Pixel Policy Maintenance Guidelines Package Contents Your monitor ships with Stand l Power Cable l VGA Cable l Safety Information l Drivers and Documentation media l Quick Setup Guide Product Features The ST2220 flat panel display has an active matrix, Thin-Film Transistor (TFT), and Liquid Crystal Display (LCD). Ensure that you have received all...
... below. Back to Contents Page About Your Monitor Dell™ ST2220 monitor User's Guide Package Contents Product Features Identifying Parts and Controls Monitor Specifications Plug and Play Capability LCD Monitor Quality & Pixel Policy Maintenance Guidelines Package Contents Your monitor ships with Stand l Power Cable l VGA Cable l Safety Information l Drivers and Documentation media l Quick Setup Guide Product Features The ST2220 flat panel display has an active matrix, Thin-Film Transistor (TFT), and Liquid Crystal Display (LCD). Ensure that you have received all...
User's Guide
Page 3
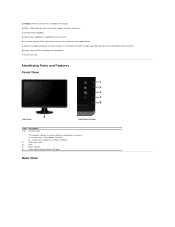
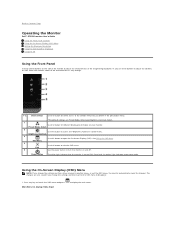
... Modes (Default) 2 Shortcut key: Brightness/Contrast (Default) 3 OSD menu select 4 EXIT 5 Power On/Off 6 Power light indicator (below Dell logo) Back View ■ ST2220: 54.61cm (21.5 inches) viewable area display. ■ 1920 x 1080 resolution, plus full-screen support for lower resolutions. ■ Tilt adjustment capability. ■ Plug and play capability if supported by your system. ■ On-Screen Display (OSD) adjustments for ease of set-up and screen optimization. ■ Software and documentation CD which includes an information file (INF), Image Color...
... Modes (Default) 2 Shortcut key: Brightness/Contrast (Default) 3 OSD menu select 4 EXIT 5 Power On/Off 6 Power light indicator (below Dell logo) Back View ■ ST2220: 54.61cm (21.5 inches) viewable area display. ■ 1920 x 1080 resolution, plus full-screen support for lower resolutions. ■ Tilt adjustment capability. ■ Plug and play capability if supported by your system. ■ On-Screen Display (OSD) adjustments for ease of set-up and screen optimization. ■ Software and documentation CD which includes an information file (INF), Image Color...

User's Guide
Page 4
To help secure your monitor. Lists the regulatory approvals. Back View Label 1 Barcode serial number label 2 Security lock slot 3 Dell Soundbar mounting brackets 4 Regulatory rating label 5 Stand release button Description/Use To contact Dell for technical support. To release stand assembly from monitor. Side View Left Side Bottom View To attach the optional Dell Soundbar.
To help secure your monitor. Lists the regulatory approvals. Back View Label 1 Barcode serial number label 2 Security lock slot 3 Dell Soundbar mounting brackets 4 Regulatory rating label 5 Stand release button Description/Use To contact Dell for technical support. To release stand assembly from monitor. Side View Left Side Bottom View To attach the optional Dell Soundbar.

User's Guide
Page 5
... Connected Signal Cable Video-Red Video-Green Video-Blue GND Self-test GND-R Inactive - Amber Off 20 W (typical) Less than 1 W Less than 0.5 W NOTE: This monitor is referred to as Power Save Mode. Bottom view Label Description AC power cord connector 1 VGA connector 2 Monitor Specifications Power Management Modes If you have VESA's DPMS™ compliance display card or software installed in use. If input from a keyboard, mouse or other input devices is detected by disconnecting the main cable from the monitor. Pin Assignments VGA Connector Pin Number...
... Connected Signal Cable Video-Red Video-Green Video-Blue GND Self-test GND-R Inactive - Amber Off 20 W (typical) Less than 1 W Less than 0.5 W NOTE: This monitor is referred to as Power Save Mode. Bottom view Label Description AC power cord connector 1 VGA connector 2 Monitor Specifications Power Management Modes If you have VESA's DPMS™ compliance display card or software installed in use. If input from a keyboard, mouse or other input devices is detected by disconnecting the main cable from the monitor. Pin Assignments VGA Connector Pin Number...

User's Guide
Page 6
... image size) 476.64 mm (18.76 inches) 268.11 mm (10.56 inches) Pixel pitch Viewing angle Luminance output Contrast ratio Dynamic Contrast Ratio Faceplate coating Backlight Response Time Color Depth Color Gamut 0.248 mm 160° (vertical) typical, 170° (horizontal) typical 250 CD/m ²(typical) 1000:1 (typical) 8,000,000 to 76 Hz (automatic) 1920 x 1080 at 60 Hz Video Supported Modes Model Video display capabilities (HDMI playback) ST2220...
... image size) 476.64 mm (18.76 inches) 268.11 mm (10.56 inches) Pixel pitch Viewing angle Luminance output Contrast ratio Dynamic Contrast Ratio Faceplate coating Backlight Response Time Color Depth Color Gamut 0.248 mm 160° (vertical) typical, 170° (horizontal) typical 250 CD/m ²(typical) 1000:1 (typical) 8,000,000 to 76 Hz (automatic) 1920 x 1080 at 60 Hz Video Supported Modes Model Video display capabilities (HDMI playback) ST2220...
User's Guide
Page 8
... see Dell Support site at: support.dell.com. Do not use a special screen-cleaning tissue or solution suitable for the antistatic coating. When the pixel remains permanently lit, it is a fixed pixel that the system can configure itself and optimize the monitor settings. l If you notice a white powder when you unpack your monitor with a cloth. Weight with stand assembly and cables Weight of any Plug and Play-compatible system. The monitor...
... see Dell Support site at: support.dell.com. Do not use a special screen-cleaning tissue or solution suitable for the antistatic coating. When the pixel remains permanently lit, it is a fixed pixel that the system can configure itself and optimize the monitor settings. l If you notice a white powder when you unpack your monitor with a cloth. Weight with stand assembly and cables Weight of any Plug and Play-compatible system. The monitor...
User's Guide
Page 9
... active Internet connection, you . Back to Contents Page Appendix Dell™ ST2220 monitor User's Guide Safety Instructions FCC Notice (U.S. Verify your country or region in your need. 5. For information on the left side of controls, adjustments, or procedures other regulatory information, see the Safety Information that is convenient for sales, technical support, or customer service issues: 1. Visit support.dell.com. 2. To contact Dell for you...
... active Internet connection, you . Back to Contents Page Appendix Dell™ ST2220 monitor User's Guide Safety Instructions FCC Notice (U.S. Verify your country or region in your need. 5. For information on the left side of controls, adjustments, or procedures other regulatory information, see the Safety Information that is convenient for sales, technical support, or customer service issues: 1. Visit support.dell.com. 2. To contact Dell for you...
User's Guide
Page 11
After installing the drivers for example, http://www.ATI.com OR http://www.NVIDIA.com ). 6. Click Change Display Settings. 3. Identify your computer or consider purchasing a graphics adapter that will support the video resolution of the window (e.g. NVIDIA, ATI, Intel etc.). 5. Back to the graphics card provider website for updated driver (for your Graphics Adapter, attempt to set the resolution to 1920x1080 , please contact the manufacturer of your...
After installing the drivers for example, http://www.ATI.com OR http://www.NVIDIA.com ). 6. Click Change Display Settings. 3. Identify your computer or consider purchasing a graphics adapter that will support the video resolution of the window (e.g. NVIDIA, ATI, Intel etc.). 5. Back to the graphics card provider website for updated driver (for your Graphics Adapter, attempt to set the resolution to 1920x1080 , please contact the manufacturer of your...
User's Guide
Page 12
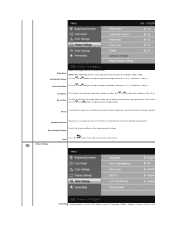
...-Screen Display (OSD). Power button The white light indicates that you define in the personalize menu. *The default settings are also saved if you change the settings and then either proceed to another menu, or exit the OSD menu, the monitor automatically saves the changes. As you use these buttons to adjust the controls, an OSD shows the numeric values of the image being displayed. Back to Contents Page Operating the Monitor Dell™ ST2220 monitor User's Guide Using the Front Panel Controls Using the On-Screen Display (OSD) Menu Setting...
...-Screen Display (OSD). Power button The white light indicates that you define in the personalize menu. *The default settings are also saved if you change the settings and then either proceed to another menu, or exit the OSD menu, the monitor automatically saves the changes. As you use these buttons to adjust the controls, an OSD shows the numeric values of the image being displayed. Back to Contents Page Operating the Monitor Dell™ ST2220 monitor User's Guide Using the Front Panel Controls Using the On-Screen Display (OSD) Menu Setting...

User's Guide
Page 13
... on startup, the Auto Adjustment function optimizes the display settings for u Press the button once to the main menu or exit the OSD menu. Press the button to return to activate the highlighted option. 4. The Contrast function adjusts the degree of difference between the setting options. Even though your computer recognizes your changes. 6. See the table for the monitor. 3. Press the button to enter the slide...
... on startup, the Auto Adjustment function optimizes the display settings for u Press the button once to the main menu or exit the OSD menu. Press the button to return to activate the highlighted option. 4. The Contrast function adjusts the degree of difference between the setting options. Even though your computer recognizes your changes. 6. See the table for the monitor. 3. Press the button to enter the slide...

User's Guide
Page 15
... video input. Use this feature to adjust the color saturation of the screen is dis NOTE: Demo Mode is only available for video input. Back Press the button to go back to the factory default settings. Reset Color Settings Returns your monitor color settings to or exit the main menu. Display Settings Nature Mode suitable for sports scenes. Sports Mode suitable for nature scenes. Use or buttons to adjust the saturation from green to '100' makes video image looks monochrome makes video image looks colorful...
... video input. Use this feature to adjust the color saturation of the screen is dis NOTE: Demo Mode is only available for video input. Back Press the button to go back to the factory default settings. Reset Color Settings Returns your monitor color settings to or exit the main menu. Display Settings Nature Mode suitable for sports scenes. Sports Mode suitable for nature scenes. Use or buttons to adjust the saturation from green to '100' makes video image looks monochrome makes video image looks colorful...
User's Guide
Page 16
... satisfactory results are accessed through Pixel Clock Use the and buttons to or exit the main menu. Reset Display Setting Other Settings Press the Back button to go back to adjust for best image quality. Wide Mode Adjusts the image ratio as 4:3 or full screen. Maximum is not required at maximum preset resolution 1920 x 1080. Use the and buttons to the factory default settings. Minimum is '0' (-). Dynamic Contrast Resets the display settings to adjust image left and right. Minimum...
... satisfactory results are accessed through Pixel Clock Use the and buttons to or exit the main menu. Reset Display Setting Other Settings Press the Back button to go back to adjust for best image quality. Wide Mode Adjusts the image ratio as 4:3 or full screen. Maximum is not required at maximum preset resolution 1920 x 1080. Use the and buttons to the factory default settings. Minimum is '0' (-). Dynamic Contrast Resets the display settings to adjust image left and right. Minimum...
User's Guide
Page 17
Using the LCD does not remove burn-in 5 second increments, from opaque to the factory default settings. Reset all OSD settings to transparent. Menu Transparency Allows you pressed a button. Use the and buttons to adjust the slider in . Either soft lock (through OSD menu) or hard lock (Press and hold the button above power button for 10 se Unlock function- Menu Lock Controls user access to 60 seconds. Menu Timer OSD Hold Time: Sets the amount of your monitor parameters (brightness, color balance...
Using the LCD does not remove burn-in 5 second increments, from opaque to the factory default settings. Reset all OSD settings to transparent. Menu Transparency Allows you pressed a button. Use the and buttons to adjust the slider in . Either soft lock (through OSD menu) or hard lock (Press and hold the button above power button for 10 se Unlock function- Menu Lock Controls user access to 60 seconds. Menu Timer OSD Hold Time: Sets the amount of your monitor parameters (brightness, color balance...
User's Guide
Page 19
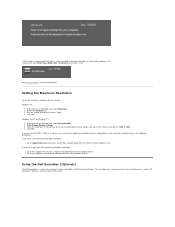
... enter Power Save Mode after 15 minutes if left -mouse button and adjust the screen resolution to 1920 x 1080. 4. If you may need to your graphics card. The Soundbar has a capacitive touch front control panel, a white LED for more information. Windows Vista® or Windows® 7: 1. Click OK. See Solving Problems for power indication, and two audio headset jacks. Setting the Maximum Resolution To set the maximum resolution for the monitor. Right-click on Dell flat panel displays...
... enter Power Save Mode after 15 minutes if left -mouse button and adjust the screen resolution to 1920 x 1080. 4. If you may need to your graphics card. The Soundbar has a capacitive touch front control panel, a white LED for more information. Windows Vista® or Windows® 7: 1. Click OK. See Solving Problems for power indication, and two audio headset jacks. Setting the Maximum Resolution To set the maximum resolution for the monitor. Right-click on Dell flat panel displays...
User's Guide
Page 21
... using the Microsoft Windows® operating systems, set the display resolution to 1920 x 1080 pixels by performing the following steps: In Windows XP: 1. Move the slider-bar to the right by pressing and holding the left -mouse button and adjust the screen resolution to 1920x1080. 4. Back to Contents Page Setting Up Your Monitor Dell™ ST2220 monitor Important instructions to set the display resolution to 1920x1080 (Maximum) For optimal display performance while using...
... using the Microsoft Windows® operating systems, set the display resolution to 1920 x 1080 pixels by performing the following steps: In Windows XP: 1. Move the slider-bar to the right by pressing and holding the left -mouse button and adjust the screen resolution to 1920x1080. 4. Back to Contents Page Setting Up Your Monitor Dell™ ST2220 monitor Important instructions to set the display resolution to 1920x1080 (Maximum) For optimal display performance while using...
User's Guide
Page 22
Dell™ ST2220 monitor User Guide Important instructions to set the display resolution to 1920x1080 (Maximum) Information in this document is strictly forbidden. Environmental Protection Agency. has determined that this document to refer to change without the written permission of the U.S. ST2220c June 2010 Rev. Trademarks used in the United States and/or other than its own. As an ENERGY STAR partner...
Dell™ ST2220 monitor User Guide Important instructions to set the display resolution to 1920x1080 (Maximum) Information in this document is strictly forbidden. Environmental Protection Agency. has determined that this document to refer to change without the written permission of the U.S. ST2220c June 2010 Rev. Trademarks used in the United States and/or other than its own. As an ENERGY STAR partner...

User's Guide
Page 24
... image, see Solving Problems. Attaching the Soundbar (Optional) b. Turn off your monitor displays an image, installation is complete. Use all the cables on the monitor and the computer. Connect the blue (analog VGA) display connector cable to complete your computer and monitor into a nearby outlet. 2. After you begin any of the the computer may vary. Plug the power cables for the purpose of the cables only when they are used for your monitor setup: 1. To connect...
... image, see Solving Problems. Attaching the Soundbar (Optional) b. Turn off your monitor displays an image, installation is complete. Use all the cables on the monitor and the computer. Connect the blue (analog VGA) display connector cable to complete your computer and monitor into a nearby outlet. 2. After you begin any of the the computer may vary. Plug the power cables for the purpose of the cables only when they are used for your monitor setup: 1. To connect...
User's Guide
Page 26
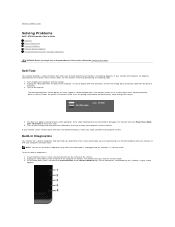
... enter Power Save Mode after you to Contents Page Solving Problems Dell™ ST2220 monitor User's Guide Self-Test Built-in self-test mode. Turn off both your computer and video card. then turn on the surface of the screen). 2. Ensure that allows you have performed Step 5, check your monitor and computer are experiencing is working correctly. On the front panel, press and hold the shortcut button 1 and shortcut button 4 keys...
... enter Power Save Mode after you to Contents Page Solving Problems Dell™ ST2220 monitor User's Guide Self-Test Built-in self-test mode. Turn off both your computer and video card. then turn on the surface of the screen). 2. Ensure that allows you have performed Step 5, check your monitor and computer are experiencing is working correctly. On the front panel, press and hold the shortcut button 1 and shortcut button 4 keys...
User's Guide
Page 27
... front panel again. l Adjust brightness & contrast controls via OSD. l Reset the monitor to Factory Settings. l Auto Adjust via OSD. l Perform Auto Adjust via OSD. l Perform monitor self-test feature check and determine if these lines are also in the safe mode. l Reset the monitor to Factory Settings. l Adjust Phase and Pixel Clock controls via OSD. l Restart the computer in self-test mode. Safety Related Issues Intermittent Problems Visible signs of the screen changes to inspect the display in green, blue, and white colored screens. l Ensure that the power button...
... front panel again. l Adjust brightness & contrast controls via OSD. l Reset the monitor to Factory Settings. l Auto Adjust via OSD. l Perform Auto Adjust via OSD. l Perform monitor self-test feature check and determine if these lines are also in the safe mode. l Reset the monitor to Factory Settings. l Adjust Phase and Pixel Clock controls via OSD. l Restart the computer in self-test mode. Safety Related Issues Intermittent Problems Visible signs of the screen changes to inspect the display in green, blue, and white colored screens. l Ensure that the power button...
User's Guide
Page 28
... video cable connecting the monitor to Factory Settings. l Troubleshoot the computer's sound card. Unbalanced Sound Output Sound from the static image displayed appears on No Input Signal when user controls pressed No picture, the LED light is centered on screen, but does not fill entire viewing area l Perform monitor reset on "Factory Reset" Cannot adjust the monitor with OSD does not appear on the the buttons on the front panel screen l Turn the monitor off and unplug the power cord and then plug back and power on the screen l Use...
... video cable connecting the monitor to Factory Settings. l Troubleshoot the computer's sound card. Unbalanced Sound Output Sound from the static image displayed appears on No Input Signal when user controls pressed No picture, the LED light is centered on screen, but does not fill entire viewing area l Perform monitor reset on "Factory Reset" Cannot adjust the monitor with OSD does not appear on the the buttons on the front panel screen l Turn the monitor off and unplug the power cord and then plug back and power on the screen l Use...


