
User's Guide
Page 1
... are trademarks of Dell Inc; Microsoft and Windows are either potential damage to change without the written permission of the U.S. As an ENERGY STAR partner, Dell Inc. disclaims any proprietary interest in any manner whatsoever without notice. © 2009 Dell Inc. Reproduction of your computer. Dell™ ST2010B Flat Panel Monitor User's Guide About Your Monitor Setting Up the Monitor Operating the Monitor Troubleshooting Appendix Notes...
... are trademarks of Dell Inc; Microsoft and Windows are either potential damage to change without the written permission of the U.S. As an ENERGY STAR partner, Dell Inc. disclaims any proprietary interest in any manner whatsoever without notice. © 2009 Dell Inc. Reproduction of your computer. Dell™ ST2010B Flat Panel Monitor User's Guide About Your Monitor Setting Up the Monitor Operating the Monitor Troubleshooting Appendix Notes...
User's Guide
Page 2
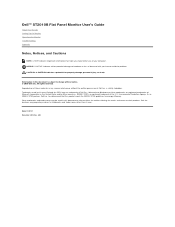
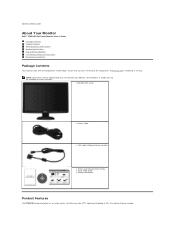
l Monitor with stand l Power Cable l VGA Cable (attached to Contents Page About Your Monitor Dell™ ST2010B Flat Panel Monitor User's Guide Package Contents Product Features Identifying Parts and Controls Monitor Specifications Plug and Play Capability LCD Monitor Quality and Pixel Policy Maintenance Guidelines Package Contents Your monitor ships with your Monitor. The monitor features include: NOTE: Some items may be optional and may not be available in certain countries. Ensure that you have received all...
l Monitor with stand l Power Cable l VGA Cable (attached to Contents Page About Your Monitor Dell™ ST2010B Flat Panel Monitor User's Guide Package Contents Product Features Identifying Parts and Controls Monitor Specifications Plug and Play Capability LCD Monitor Quality and Pixel Policy Maintenance Guidelines Package Contents Your monitor ships with your Monitor. The monitor features include: NOTE: Some items may be optional and may not be available in certain countries. Ensure that you have received all...
User's Guide
Page 3
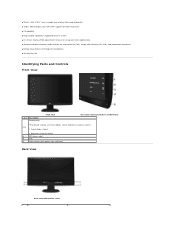
... default settings are Preset Modes select, Brightness/Contrast select1 1-2 1. Brightness/Contrast Select 3 OSD menu select 4 EXIT 5 Power button (with power light indicator) Back View Back view with monitor stand Preset Modes Select 2. ■ 20-inch ( 444.8*251.1 mm) viewable area display (Measured diagonally) . ■ 1600 x 900 resolution, plus full-screen support for lower resolutions. ■ Tilt capability. ■ Plug and play capability if supported by your system. ■ On-Screen Display (OSD) adjustments for ease of set-up and screen optimization. ■ Software...
... default settings are Preset Modes select, Brightness/Contrast select1 1-2 1. Brightness/Contrast Select 3 OSD menu select 4 EXIT 5 Power button (with power light indicator) Back View Back view with monitor stand Preset Modes Select 2. ■ 20-inch ( 444.8*251.1 mm) viewable area display (Measured diagonally) . ■ 1600 x 900 resolution, plus full-screen support for lower resolutions. ■ Tilt capability. ■ Plug and play capability if supported by your system. ■ On-Screen Display (OSD) adjustments for ease of set-up and screen optimization. ■ Software...
User's Guide
Page 5
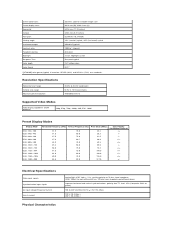
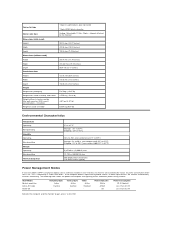
....2 31.5 40.0 49.5 65.0 78.8 108.0 108.0 135.0 97.75 Sync Polarity (Horizontal/Vertical) Electrical Specifications Video input signals Synchronization input signals AC input voltage/frequency/current Inrush current Physical Characteristics Analog RGB, 0.707 Volts +/- 5%, positive polarity at 60 Hz Supported Video Modes Video display capabilities (HDMI playback) 480p, 576p, 720p, 1080p, 480i, 576i, 1080i. Resolution Specifications Horizontal scan range Vertical scan range Maximum preset resolution 30 kHz to 83 kHz (automatic) 56 Hz to 76 Hz...
....2 31.5 40.0 49.5 65.0 78.8 108.0 108.0 135.0 97.75 Sync Polarity (Horizontal/Vertical) Electrical Specifications Video input signals Synchronization input signals AC input voltage/frequency/current Inrush current Physical Characteristics Analog RGB, 0.707 Volts +/- 5%, positive polarity at 60 Hz Supported Video Modes Video display capabilities (HDMI playback) 480p, 576p, 720p, 1080p, 480i, 576i, 1080i. Resolution Specifications Horizontal scan range Vertical scan range Maximum preset resolution 30 kHz to 83 kHz (automatic) 56 Hz to 76 Hz...
User's Guide
Page 6
... 0.5 W Less than 0.5 W Activate the computer and the monitor to gain access to as Power Save Mode*. no cables) Weight of this automatic power saving feature: VESA Modes Normal operation Active-off mode Switch off Horizontal Sync Active Inactive - Connector type Signal cable type Dimensions (with stand) Height Width Depth Dimensions (without stand) Height Width Depth Stand dimensions Height Width Depth Weight Weight with packaging Weight with stand assembly and cables Weight without stand assembly (For wall mount or VESA mount considerations -
... 0.5 W Less than 0.5 W Activate the computer and the monitor to gain access to as Power Save Mode*. no cables) Weight of this automatic power saving feature: VESA Modes Normal operation Active-off mode Switch off Horizontal Sync Active Inactive - Connector type Signal cable type Dimensions (with stand) Height Width Depth Dimensions (without stand) Height Width Depth Stand dimensions Height Width Depth Weight Weight with packaging Weight with stand assembly and cables Weight without stand assembly (For wall mount or VESA mount considerations -
User's Guide
Page 11
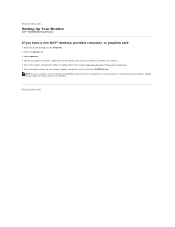
... video resolution of the window (e.g. Select Advanced. 4. NVIDIA, ATI, Intel etc.). 5. NOTE: If you have a non Dell™ desktop, portable computer, or graphics card 1. Refer to the graphic card provider website for updated driver (for your Graphics Adapter, attempt to set the resolution to 1600X900 again. Right-click on the desktop and click Properties. 2. Back to Contents Page Setting Up Your Monitor Dell™ ST2010B Flat Panel Monitor...
... video resolution of the window (e.g. Select Advanced. 4. NVIDIA, ATI, Intel etc.). 5. NOTE: If you have a non Dell™ desktop, portable computer, or graphics card 1. Refer to the graphic card provider website for updated driver (for your Graphics Adapter, attempt to set the resolution to 1600X900 again. Right-click on the desktop and click Properties. 2. Back to Contents Page Setting Up Your Monitor Dell™ ST2010B Flat Panel Monitor...
User's Guide
Page 12
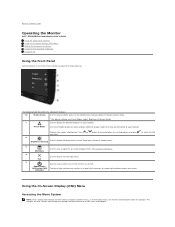
... connected to your monitor. Exit 5 Use the power button to turn the monitor on the front of the monitor to adjust the image settings. Using the On-Screen Display (OSD) Menu Accessing the Menu System NOTE: If you define in the personalize menu. *The default settings are also saved if you want. Back to Contents Page Operating the Monitor Dell™ ST2010B Flat Panel Monitor User's Guide Using the Front Panel Controls Using the On-Screen Display (OSD) Menu Setting the Maximum Resolution Using the Dell Soundbar (Optional) Using the Tilt Using the Front Panel Use...
... connected to your monitor. Exit 5 Use the power button to turn the monitor on the front of the monitor to adjust the image settings. Using the On-Screen Display (OSD) Menu Accessing the Menu System NOTE: If you define in the personalize menu. *The default settings are also saved if you want. Back to Contents Page Operating the Monitor Dell™ ST2010B Flat Panel Monitor User's Guide Using the Front Panel Controls Using the On-Screen Display (OSD) Menu Setting the Maximum Resolution Using the Dell Soundbar (Optional) Using the Tilt Using the Front Panel Use...

User's Guide
Page 14
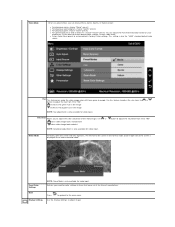
... analog (VGA) connector. Auto Select Scan for use with your monitor on the monitor screen. Submenus Brightness/Contrast Use this menu to the main menu. Press to decrease brightness (min 0 ~ max 100). Press the button to increase brightness and press the button to select the VGA input source. Brightness Brightness adjusts the luminance of difference between different video signals that may be connected to select between darkness and lightness on startup, the Auto Adjustment function optimizes the display settings for Sources. The Contrast function adjusts...
... analog (VGA) connector. Auto Select Scan for use with your monitor on the monitor screen. Submenus Brightness/Contrast Use this menu to the main menu. Press to decrease brightness (min 0 ~ max 100). Press the button to increase brightness and press the button to select the VGA input source. Brightness Brightness adjusts the luminance of difference between different video signals that may be connected to select between darkness and lightness on startup, the Auto Adjustment function optimizes the display settings for Sources. The Contrast function adjusts...

User's Guide
Page 15
...; This color setting is connected to 100. Color Setting Use the Color Settings to select the DVI input source. l Custom (R, G, B) Preset offers a range of the three colors (R, G, B) independently, in PC, choose "Gaming" preset; Press to adjust the color setting mode and color temperature. If your monitor, choose Graphics. Preset modes When you select Graphics, you to set the color format to: RGB-Suitable for normal PC graphics display over HDMI YPbPr-Suitable for text based applications...
...; This color setting is connected to 100. Color Setting Use the Color Settings to select the DVI input source. l Custom (R, G, B) Preset offers a range of the three colors (R, G, B) independently, in PC, choose "Gaming" preset; Press to adjust the color setting mode and color temperature. If your monitor, choose Graphics. Preset modes When you select Graphics, you to set the color format to: RGB-Suitable for normal PC graphics display over HDMI YPbPr-Suitable for text based applications...
User's Guide
Page 16
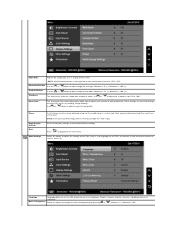
... those that were set at the time of the screen is displayed in the image NOTE: Hue adjustment is only available for video input. Use this feature to the main menu. Back Display Settings Press to go back to adjust the skin tone. l Select Color Reset preset to adjust image. Use the Display Settings to restore default (factory) Color settings. This setting is only available for video input. Use or button to adjust the hue from '0' to restore default color settings, choose Color Reset;
... those that were set at the time of the screen is displayed in the image NOTE: Hue adjustment is only available for video input. Use this feature to the main menu. Back Display Settings Press to go back to adjust the skin tone. l Select Color Reset preset to adjust image. Use the Display Settings to restore default (factory) Color settings. This setting is only available for video input. Use or button to adjust the hue from '0' to restore default color settings, choose Color Reset;
User's Guide
Page 17
... full screen. Menu Transparency Select this option to adjust for "VGA" input. Horizontal Position Use the or button to adjust image up and down. Vertical Position Use the or button to adjust image left and right. Sharpness This feature can make the image look sharper or softer. Maximum is '0' (-). NOTE: Pixel Clock and Phase Adjustments are only available for best image quality. Resets the display settings to '100' . Language Language option to set the OSD display to change the menu transparency by selecting 'Image Settings'. Use...
... full screen. Menu Transparency Select this option to adjust for "VGA" input. Horizontal Position Use the or button to adjust image up and down. Vertical Position Use the or button to adjust image left and right. Sharpness This feature can make the image look sharper or softer. Maximum is '0' (-). NOTE: Pixel Clock and Phase Adjustments are only available for best image quality. Resets the display settings to '100' . Language Language option to set the OSD display to change the menu transparency by selecting 'Image Settings'. Use...

User's Guide
Page 18
... your monitor parameters (brightness, color balance etc) to the factory preset values. Depending on the degree of image retention. Enable this feature for each shortcut key to allow user access to all OSD settings to be adjustable via software on the front panel. You can disable this feature by selecting "Disable". Use the and button to adjust the slider in 5 second increments, from 5 to the OSD settings menu, with OSD Lock...
... your monitor parameters (brightness, color balance etc) to the factory preset values. Depending on the degree of image retention. Enable this feature for each shortcut key to allow user access to all OSD settings to be adjustable via software on the front panel. You can disable this feature by selecting "Disable". Use the and button to adjust the slider in 5 second increments, from 5 to the OSD settings menu, with OSD Lock...
User's Guide
Page 20
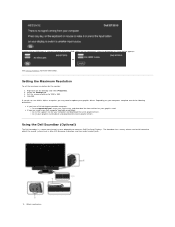
... to support.dell.com, enter your service tag, and download the latest driver for your graphics driver. Depending on your graphics card website and download the latest graphic drivers. Using the Dell Soundbar (Optional) The Dell Soundbar is selected and both VGA and HDMI cables are using a non-Dell computer (portable or desktop): ¡ Go to the support site for the monitor: 1. Setting the Maximum Resolution To set the maximum resolution for your...
... to support.dell.com, enter your service tag, and download the latest driver for your graphics driver. Depending on your graphics card website and download the latest graphic drivers. Using the Dell Soundbar (Optional) The Dell Soundbar is selected and both VGA and HDMI cables are using a non-Dell computer (portable or desktop): ¡ Go to the support site for the monitor: 1. Setting the Maximum Resolution To set the maximum resolution for your...
User's Guide
Page 22
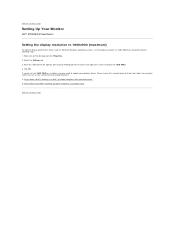
... you are using the Microsoft Windows operating systems, set the display resolution to 1600x 900 pixels by pressing and holding left-mouse button and adjust the screen resolution to 1600 X900. 4. Right-click on the desktop and click Properties. 2. Back to update your graphics driver. Click OK. Back to Contents Page Setting Up Your Monitor Dell™ ST2010B Flat Panel Monitor Setting the display resolution to 1600x900 (maximum) For optimal display performance while using , and...
... you are using the Microsoft Windows operating systems, set the display resolution to 1600x 900 pixels by pressing and holding left-mouse button and adjust the screen resolution to 1600 X900. 4. Right-click on the desktop and click Properties. 2. Back to update your graphics driver. Click OK. Back to Contents Page Setting Up Your Monitor Dell™ ST2010B Flat Panel Monitor Setting the display resolution to 1600x900 (maximum) For optimal display performance while using , and...
User's Guide
Page 23
Dell™ ST2010B Flat Panel Monitor User Guide Setting the display resolution to 1600x900(maximum) Information in this document to refer to change without the written permission of the U.S. All rights reserved Reproduction of these materials in any proprietary interest in the United States and/or other than its own. ENERGY STAR is a registered trademark of Dell Inc. Model...that this text: Dell and the DELL logo are trademarks of Dell Inc; Microsoft and Windows are either the entities claiming the marks and names or their products. Trademarks used in this document ...
Dell™ ST2010B Flat Panel Monitor User Guide Setting the display resolution to 1600x900(maximum) Information in this document to refer to change without the written permission of the U.S. All rights reserved Reproduction of these materials in any proprietary interest in the United States and/or other than its own. ENERGY STAR is a registered trademark of Dell Inc. Model...that this text: Dell and the DELL logo are trademarks of Dell Inc; Microsoft and Windows are either the entities claiming the marks and names or their products. Trademarks used in this document ...
User's Guide
Page 24
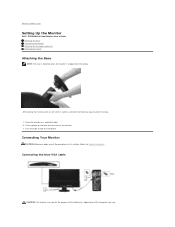
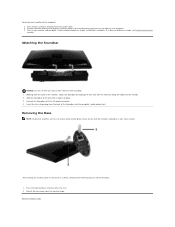
... base. 1. After placing the monitor panel on a stable flat table. 2. Push the hook to Contents Page Setting Up the Monitor Dell™ ST2010B Flat Panel Monitor User's Guide Attaching the Base Connecting the Monitor Attaching the Soundbar (optional) Removing the Stand Attaching the Base NOTE: The base is detached when the monitor is shipped from the factory. Connecting the blue VGA cable CAUTION: The Graphics are used for the purpose of the computer may vary. Back to lock the stand base...
... base. 1. After placing the monitor panel on a stable flat table. 2. Push the hook to Contents Page Setting Up the Monitor Dell™ ST2010B Flat Panel Monitor User's Guide Attaching the Base Connecting the Monitor Attaching the Soundbar (optional) Removing the Stand Attaching the Base NOTE: The base is detached when the monitor is shipped from the factory. Connecting the blue VGA cable CAUTION: The Graphics are used for the purpose of the computer may vary. Back to lock the stand base...
User's Guide
Page 25
... computer. 3. Working from the monitor hinge. Removing the Base NOTE: To prevent scratches on the LCD screen while removing the stand, ensure that the monitor is complete. Turn on your monitor displays an image, installation is placed on a soft, clean surface After placing the monitor panel on the back of the monitor. 2. Back to the computer: 1. Connect the Soundbar with any device other than the Dell Soundbar. 1. To connect your monitor to...
... computer. 3. Working from the monitor hinge. Removing the Base NOTE: To prevent scratches on the LCD screen while removing the stand, ensure that the monitor is complete. Turn on your monitor displays an image, installation is placed on a soft, clean surface After placing the monitor panel on the back of the monitor. 2. Back to the computer: 1. Connect the Soundbar with any device other than the Dell Soundbar. 1. To connect your monitor to...
User's Guide
Page 26
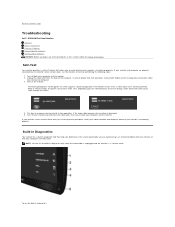
... power LED remains white. Turn off your computer and video card. To ensure proper Self-Test operation, remove both Digital and the Analog (blue connector) cables from the back of the procedures in diagnostics: Turn on -screen (against a black background) if the monitor cannot sense a video signal and is an inherent problem with your monitor, or with your monitor and reconnect the video cable; While in diagnostic tool that allows you are properly connected...
... power LED remains white. Turn off your computer and video card. To ensure proper Self-Test operation, remove both Digital and the Analog (blue connector) cables from the back of the procedures in diagnostics: Turn on -screen (against a black background) if the monitor cannot sense a video signal and is an inherent problem with your monitor, or with your monitor and reconnect the video cable; While in diagnostic tool that allows you are properly connected...
User's Guide
Page 27
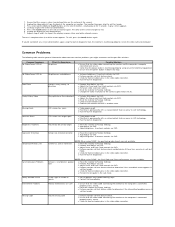
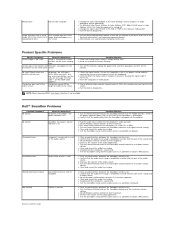
... video cable connecting the monitor and the computer is a natural defect that the power button is clean (no brightness l Increase brightness & contrast controls via OSD. l Restart the computer in green, blue, and white colored screens. 1. Check the video card and computer. Missing Pixels LCD screen has spots l Cycle power on the surface of monitor again. l Adjust brightness & contrast controls via OSD. Repeat steps 5 and 6 to Factory Settings. Press the fourth button on the side of the screen). 2. l Ensure that can occur in LCD technology. l Reset the monitor...
... video cable connecting the monitor and the computer is a natural defect that the power button is clean (no brightness l Increase brightness & contrast controls via OSD. l Restart the computer in green, blue, and white colored screens. 1. Check the video card and computer. Missing Pixels LCD screen has spots l Cycle power on the surface of monitor again. l Adjust brightness & contrast controls via OSD. Repeat steps 5 and 6 to Factory Settings. Press the fourth button on the side of the screen). 2. l Ensure that can occur in LCD technology. l Reset the monitor...
User's Guide
Page 28
... on the front panel screen No Input Signal when user controls are pressed The picture does not fill the entire screen. Ensure the Computer is too low l Clear any one side of time the screen l Change the Color Setting Mode in plug. l Turn the Power/Volume knob on the Soundbar counter-clockwise to Soundbar - l Test the Soundbar using another audio source (i.e. portable CD player, MP3 player). l Alternatively, use (for a image displayed appears on...
... on the front panel screen No Input Signal when user controls are pressed The picture does not fill the entire screen. Ensure the Computer is too low l Clear any one side of time the screen l Change the Color Setting Mode in plug. l Turn the Power/Volume knob on the Soundbar counter-clockwise to Soundbar - l Test the Soundbar using another audio source (i.e. portable CD player, MP3 player). l Alternatively, use (for a image displayed appears on...


