

Dell Users Guide
Page 3
Contents About Your Monitor 5 Package Contents 5 Product Features 6 Identifying Parts and Controls 7 Monitor Specifications 9 Plug and Play Capability 12 LCD Monitor Quality & Pixel Policy 16 Maintenance Guidelines 16 Setting Up the Monitor 17 Attaching the Stand 17 Connecting Your Monitor 18 Organizing Your Cables 19 Removing the Monitor Stand 20 Operating the Monitor 21 Power On the Monitor 21 Using the Front-Panel Controls 21 Using the On-Screen Display (OSD) Menu 23 Setting the Maximum Resolution 43 Using the Tilt 45 3
Contents About Your Monitor 5 Package Contents 5 Product Features 6 Identifying Parts and Controls 7 Monitor Specifications 9 Plug and Play Capability 12 LCD Monitor Quality & Pixel Policy 16 Maintenance Guidelines 16 Setting Up the Monitor 17 Attaching the Stand 17 Connecting Your Monitor 18 Organizing Your Cables 19 Removing the Monitor Stand 20 Operating the Monitor 21 Power On the Monitor 21 Using the Front-Panel Controls 21 Using the On-Screen Display (OSD) Menu 23 Setting the Maximum Resolution 43 Using the Tilt 45 3
Dell Users Guide
Page 6
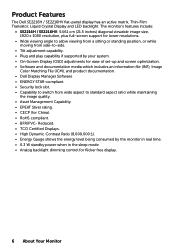
The monitor's features include: • SE2216H / SE2216HV: 54.61 cm (21.5 inches) diagonal viewable image size, 1920 x 1080 resolution, plus full-screen support for lower resolutions. • Wide viewing angle to allow viewing from a sitting or standing position, or while moving from side-to-side. • Tilt adjustment capability. • Plug and play capability if supported by the monitor in real time. • 0.3 W standby power when in the sleep mode. • Analog backlight dimming control for...
The monitor's features include: • SE2216H / SE2216HV: 54.61 cm (21.5 inches) diagonal viewable image size, 1920 x 1080 resolution, plus full-screen support for lower resolutions. • Wide viewing angle to allow viewing from a sitting or standing position, or while moving from side-to-side. • Tilt adjustment capability. • Plug and play capability if supported by the monitor in real time. • 0.3 W standby power when in the sleep mode. • Analog backlight dimming control for...

Dell Users Guide
Page 7
Identifying Parts and Controls Front View 1. Use to contact Dell for technical support. Function buttons (For more information, see Operating the Monitor) 2 Power On/Off button (with LED indicator) NOTE: For displays with security lock (security lock not included). Back View Back View with Monitor Stand Label 1 2 3 Description Security lock slot Barcode serial number label Cable management slot Use Secures monitor with glossy bezels the user should consider the placement of the display as the bezel may...
Identifying Parts and Controls Front View 1. Use to contact Dell for technical support. Function buttons (For more information, see Operating the Monitor) 2 Power On/Off button (with LED indicator) NOTE: For displays with security lock (security lock not included). Back View Back View with Monitor Stand Label 1 2 3 Description Security lock slot Barcode serial number label Cable management slot Use Secures monitor with glossy bezels the user should consider the placement of the display as the bezel may...
Dell Users Guide
Page 13
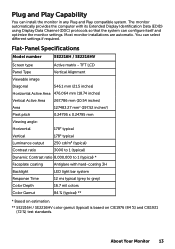
... The monitor automatically provides the computer with hard-coating 3H Backlight LED light bar system Response Time 12 ms typical (grey to grey) Color Depth 16.7 mil colors Color Gamut 84 % (typical) ** * Based on estimation. ** SE2216H / SE2216HV color gamut (typical) is based on CIE1976 (84 %) and CIE1931 (72 %) test standards. Flat-Panel Specifications Model number SE2216H / SE2216HV Screen type Active matrix - TFT LCD Panel Type Vertical Alignment Viewable image Diagonal 546.1 mm (21.5 inches) Horizontal...
... The monitor automatically provides the computer with hard-coating 3H Backlight LED light bar system Response Time 12 ms typical (grey to grey) Color Depth 16.7 mil colors Color Gamut 84 % (typical) ** * Based on estimation. ** SE2216H / SE2216HV color gamut (typical) is based on CIE1976 (84 %) and CIE1931 (72 %) test standards. Flat-Panel Specifications Model number SE2216H / SE2216HV Screen type Active matrix - TFT LCD Panel Type Vertical Alignment Viewable image Diagonal 546.1 mm (21.5 inches) Horizontal...
Dell Users Guide
Page 14
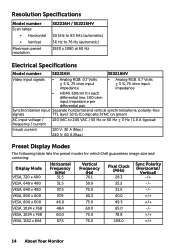
... (automatic) 1920 x 1080 at 60 Hz Electrical Specifications Model number SE2216H SE2216HV Video input signals • Analog RGB: 0.7 Volts ± 5 %, 75 ohm input impedance • Analog RGB: 0.7 Volts ± 5 %, 75 ohm input impedance • HDMI, 600mV for each differential line, 100 ohm input impedance per differential pair Synchronization input Separate horizontal and vertical synchronizations, polarity-free signals TTL level, SOG (Composite SYNC on green) AC input voltage / 100 VAC to 240 VAC / 50...
... (automatic) 1920 x 1080 at 60 Hz Electrical Specifications Model number SE2216H SE2216HV Video input signals • Analog RGB: 0.7 Volts ± 5 %, 75 ohm input impedance • Analog RGB: 0.7 Volts ± 5 %, 75 ohm input impedance • HDMI, 600mV for each differential line, 100 ohm input impedance per differential pair Synchronization input Separate horizontal and vertical synchronizations, polarity-free signals TTL level, SOG (Composite SYNC on green) AC input voltage / 100 VAC to 240 VAC / 50...

Dell Users Guide
Page 17
... fixed in use a dynamically changing screen saver and power off with water. Avoid using detergent of the monitor. • Handle your monitor with 1 to see Dell Support site at: http://www.dell.com/support/monitors. LCD Monitor Quality & Pixel Policy During the LCD Monitor manufacturing process, it is known as a "dark dot." When the pixel remains permanently lit, it off your antistatic screen, slightly dampen a soft, clean cloth with a cloth. For best...
... fixed in use a dynamically changing screen saver and power off with water. Avoid using detergent of the monitor. • Handle your monitor with 1 to see Dell Support site at: http://www.dell.com/support/monitors. LCD Monitor Quality & Pixel Policy During the LCD Monitor manufacturing process, it is known as a "dark dot." When the pixel remains permanently lit, it off your antistatic screen, slightly dampen a soft, clean cloth with a cloth. For best...

Dell Users Guide
Page 22
... monitor to open the on the front of preset color modes. Use the Exit key to turn on the monitor. SE2216H: Front-Panel Keys A Preset modes B Input Source C Menu D Exit Description Use the Preset modes key to choose from menu and sub-menus. 22 Operating the Monitor See Using the OSD Menu. Use the Input Source key to select between different video signals that may be connected to your monitor. • VGA input • HDMI input Use the Menu key to adjust the image settings. Using...
... monitor to open the on the front of preset color modes. Use the Exit key to turn on the monitor. SE2216H: Front-Panel Keys A Preset modes B Input Source C Menu D Exit Description Use the Preset modes key to choose from menu and sub-menus. 22 Operating the Monitor See Using the OSD Menu. Use the Input Source key to select between different video signals that may be connected to your monitor. • VGA input • HDMI input Use the Menu key to adjust the image settings. Using...

Dell Users Guide
Page 29
Operating the Monitor 29 Color Use the Color menu to DVI adapter. • YPbPr: Select this option if your DVD player supports only YPbPr output. Input Color Format Allows you to set the video input mode to: • RGB: Select this option if your monitor is connected to a computer or DVD player using the HDMI to adjust the monitor's color settings.
Operating the Monitor 29 Color Use the Color menu to DVI adapter. • YPbPr: Select this option if your DVD player supports only YPbPr output. Input Color Format Allows you to set the video input mode to: • RGB: Select this option if your monitor is connected to a computer or DVD player using the HDMI to adjust the monitor's color settings.

Dell Users Guide
Page 31
... or Game preset mode. Hue Saturation Reset Color Settings Display • Custom Color: Allows you to adjust the desired flesh tone color. This feature can adjust the color saturation of the video image. Resets your own preset color mode. Use the Display menu to the factory defaults. Press the and keys to increase the colorful appearance of the video image. Press to adjust the Red, Green, and Blue values and create your monitor's color settings to adjust the monitor's display settings. Press to '100...
... or Game preset mode. Hue Saturation Reset Color Settings Display • Custom Color: Allows you to adjust the desired flesh tone color. This feature can adjust the color saturation of the video image. Resets your own preset color mode. Use the Display menu to the factory defaults. Press the and keys to increase the colorful appearance of the video image. Press to adjust the Red, Green, and Blue values and create your monitor's color settings to adjust the monitor's display settings. Press to '100...

Dell Users Guide
Page 32
... Pixel Clock adjustments allow you select Game or Movie preset mode. This feature can make the image look sharper or softer. Reset Display Select this option to adjust image up and down. Vertical Position Use the or buttons to restore default display settings. Use or to adjust the sharpness from '0' to '100'. NOTE: Pixel Clock and Phase adjustment are only available for best image quality. Minimum is '0' (-). Aspect Ratio Horizontal Position Adjusts the image ratio as Wide...
... Pixel Clock adjustments allow you select Game or Movie preset mode. This feature can make the image look sharper or softer. Reset Display Select this option to adjust image up and down. Vertical Position Use the or buttons to restore default display settings. Use or to adjust the sharpness from '0' to '100'. NOTE: Pixel Clock and Phase adjustment are only available for best image quality. Minimum is '0' (-). Aspect Ratio Horizontal Position Adjusts the image ratio as Wide...

Dell Users Guide
Page 39
... cannot remove severe cases of image retention. Reset Other Settings Factory Reset Select this option to adjust the monitor display settings like the brightness, color balance etc. Resets all OSD settings to help reduce minor cases of image retention or burn-in. Disable: Disables the DDC/CI option and the following message appears on the monitor, select LCD Conditioning to the factory preset values. NOTE: Use LCD Conditioning only when you experience a problem with image retention...
... cannot remove severe cases of image retention. Reset Other Settings Factory Reset Select this option to adjust the monitor display settings like the brightness, color balance etc. Resets all OSD settings to help reduce minor cases of image retention or burn-in. Disable: Disables the DDC/CI option and the following message appears on the monitor, select LCD Conditioning to the factory preset values. NOTE: Use LCD Conditioning only when you experience a problem with image retention...

Dell Users Guide
Page 43
... x 1080 pixels by performing the following steps: In Windows Vista, Windows 7, Windows 8 or Windows 8.1: 1. Setting the Maximum Resolution For optimal display performance while using , and follow the provided 1:If you have a Dell desktop or a Dell portable computer with Internet access 2:If you have a non Dell desktop, portable computer, or graphics card Operating the Monitor 43 Click OK. Right-click on the desktop and click Screen Resolution. 3. Click...
... x 1080 pixels by performing the following steps: In Windows Vista, Windows 7, Windows 8 or Windows 8.1: 1. Setting the Maximum Resolution For optimal display performance while using , and follow the provided 1:If you have a Dell desktop or a Dell portable computer with Internet access 2:If you have a non Dell desktop, portable computer, or graphics card Operating the Monitor 43 Click OK. Right-click on the desktop and click Screen Resolution. 3. Click...
Dell Users Guide
Page 44
... to switch to the graphics card provider website for updated driver (for your graphics adapter, attempt to set the resolution to 1920 x 1080 again. Click Advanced display settings. 3. Identify your graphics controller supplier from the description at the top of 1920 x 1080 . 44 Operating the Monitor If you have a Dell desktop or a Dell portable computer with Internet access 1. Click Change Display Settings. 4. Click Display adapter properties. 4. After installing the drivers...
... to switch to the graphics card provider website for updated driver (for your graphics adapter, attempt to set the resolution to 1920 x 1080 again. Click Advanced display settings. 3. Identify your graphics controller supplier from the description at the top of 1920 x 1080 . 44 Operating the Monitor If you have a Dell desktop or a Dell portable computer with Internet access 1. Click Change Display Settings. 4. Click Display adapter properties. 4. After installing the drivers...

Dell Users Guide
Page 46
... will enter Power Save Mode after you use the previous procedure, check your video controller and computer, because your monitor is functioning properly. If your monitor screen remains blank after 5 minutes if left at this section, follow the Safety Instruction Self-Test Your monitor provides a self-test feature that allows you to check whether your monitor is working correctly. While in this state. 5. Turn off both...
... will enter Power Save Mode after you use the previous procedure, check your video controller and computer, because your monitor is functioning properly. If your monitor screen remains blank after 5 minutes if left at this section, follow the Safety Instruction Self-Test Your monitor provides a self-test feature that allows you to check whether your monitor is working correctly. While in this state. 5. Turn off both...

Dell Users Guide
Page 47
... an inherent problem with your monitor, or with your computer and video card. Ensure that helps you determine if the screen abnormality you do not detect any abnormalities. 7. Inspect the display for any screen abnormalities upon using the built-in self-test mode. Troubleshooting 47 NOTE: You can run the built-in green, blue, black, white screens. Check the video card and computer. Press the Button 4 on the front panel again...
... an inherent problem with your monitor, or with your computer and video card. Ensure that helps you determine if the screen abnormality you do not detect any abnormalities. 7. Inspect the display for any screen abnormalities upon using the built-in self-test mode. Troubleshooting 47 NOTE: You can run the built-in green, blue, black, white screens. Check the video card and computer. Press the Button 4 on the front panel again...
Dell Users Guide
Page 48
... the power button is depressed fully. • Ensure that the correct Input Source is selected via OSD. • Eliminate video extension cables. • Reset the monitor to Factory Settings. Picture is selected via OSD. • Reset the monitor to the correct aspect ratio (16:9). • Perform Auto Adjust via OSD. • Adjust the Phase and Pixel Clock controls via the Input Source ) Select button. Shaky/Jittery Video Wavy picture or fine movement • Change the video resolution to Factory Settings. • Check...
... the power button is depressed fully. • Ensure that the correct Input Source is selected via OSD. • Eliminate video extension cables. • Reset the monitor to Factory Settings. Picture is selected via OSD. • Reset the monitor to the correct aspect ratio (16:9). • Perform Auto Adjust via OSD. • Adjust the Phase and Pixel Clock controls via the Input Source ) Select button. Shaky/Jittery Video Wavy picture or fine movement • Change the video resolution to Factory Settings. • Check...
Dell Users Guide
Page 49
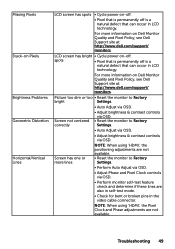
Picture too dim or too • Reset the monitor to Factory bright Settings. • Auto Adjust via OSD. Missing Pixels Stuck-on Pixels Brightness Problems Geometric Distortion Horizontal/Vertical Lines LCD screen has spots • Cycle power on-off. • Pixel that is permanently off is a natural defect that can occur in LCD technology. Troubleshooting 49 spots • Pixel that is a natural defect that can occur in the video cable connector. Screen not centered correctly • Adjust brightness & contrast controls via...
Picture too dim or too • Reset the monitor to Factory bright Settings. • Auto Adjust via OSD. Missing Pixels Stuck-on Pixels Brightness Problems Geometric Distortion Horizontal/Vertical Lines LCD screen has spots • Cycle power on-off. • Pixel that is permanently off is a natural defect that can occur in LCD technology. Troubleshooting 49 spots • Pixel that is a natural defect that can occur in the video cable connector. Screen not centered correctly • Adjust brightness & contrast controls via...

Dell Users Guide
Page 50
... feature check. • Ensure that the video cable on the application. • Try different Color Preset Settings in Color Settings OSD. Monitor malfunctions • Ensure that the video cable connecting the monitor to Graphics or Video depending on & off . • Change the Input Color Format to Factory Settings. Adjust R/G/B value in Color Settings OSD if the Color Management is turned off connecting the monitor to the computer is connected properly and is secure. • Reset the monitor to PC RGB or...
... feature check. • Ensure that the video cable on the application. • Try different Color Preset Settings in Color Settings OSD. Monitor malfunctions • Ensure that the video cable connecting the monitor to Graphics or Video depending on & off . • Change the Input Color Format to Factory Settings. Adjust R/G/B value in Color Settings OSD if the Color Management is turned off connecting the monitor to the computer is connected properly and is secure. • Reset the monitor to PC RGB or...

Dell Users Guide
Page 51
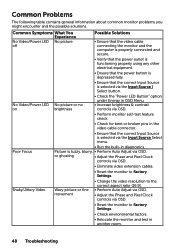
... the power cord, plug back, and then turn off the monitor at appears on the front panel No Input Signal when user controls are pressed Image is locked. Product-Specific Problems Specific Symptoms What You Experience Possible Solutions Screen image is too small Cannot adjust the monitor with the buttons on the screen all times when not in the Display OSD. • Reset the monitor to unlock (for more information, see Power Management Modes. • Alternatively, use a dynamically changing screensaver. Troubleshooting...
... the power cord, plug back, and then turn off the monitor at appears on the front panel No Input Signal when user controls are pressed Image is locked. Product-Specific Problems Specific Symptoms What You Experience Possible Solutions Screen image is too small Cannot adjust the monitor with the buttons on the screen all times when not in the Display OSD. • Reset the monitor to unlock (for more information, see Power Management Modes. • Alternatively, use a dynamically changing screensaver. Troubleshooting...

Dell Dell Display Manager Users Guide
Page 1
Using the Quick Settings Dialog Clicking Dell Display Manager's notification tray icon opens the Quick Settings dialog box. Dell Display Manager User's Guide 1 The Quick Settings dialog box also provides access to Dell Display Manager's advanced user interface which is used to manage a monitor or a group of monitors. It allows manual adjustment of the displayed image, assignment of the monitor's Brightness and Contrast levels, Preset Modes can be manually selected or set to Auto Mode, and the screen resolution can be changed. Information about monitors connected to the...
Using the Quick Settings Dialog Clicking Dell Display Manager's notification tray icon opens the Quick Settings dialog box. Dell Display Manager User's Guide 1 The Quick Settings dialog box also provides access to Dell Display Manager's advanced user interface which is used to manage a monitor or a group of monitors. It allows manual adjustment of the displayed image, assignment of the monitor's Brightness and Contrast levels, Preset Modes can be manually selected or set to Auto Mode, and the screen resolution can be changed. Information about monitors connected to the...


