
Getting Started Guide for the S6100-ON System March 2016
Page 10
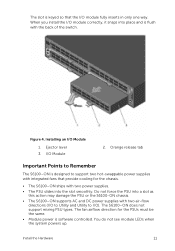
...2. Remove the I /O slot. 10 Install the Hardware Slide the I/O module into the switch I /O module from a slot and insert a different module into that the level snaps into the open position. 3. To avoid damaging these steps. You will not see module LEDs when the system powers up in place. NOTE: If you... not detect the new module. Figure 3. Two-holes for cable (.27 ±.02 DIA) Installing an I/O Module To install an I /O slot. NOTE: The S6100-ON has capacitors located on the front-left ejector lever (item 1) by pressing in the same slot, the system detects the module.
...2. Remove the I /O slot. 10 Install the Hardware Slide the I/O module into the switch I /O module from a slot and insert a different module into that the level snaps into the open position. 3. To avoid damaging these steps. You will not see module LEDs when the system powers up in place. NOTE: If you... not detect the new module. Figure 3. Two-holes for cable (.27 ±.02 DIA) Installing an I/O Module To install an I /O slot. NOTE: The S6100-ON has capacitors located on the front-left ejector lever (item 1) by pressing in the same slot, the system detects the module.
Getting Started Guide for the S6100-ON System March 2016
Page 11
...; Module power is software controlled. You do not see module LEDs when the system powers up. The fan airflow direction for the chassis. • The S6100-ON ships with two power supplies. • The PSU slides into the slot smoothly. When you install the I/O module correctly, it... snaps into a slot as this action may damage the PSU or the S6100-ON chassis. • The S6100-ON supports AC and DC power supplies with two air-flow directions (I/O to Utility and Utility to support...
...; Module power is software controlled. You do not see module LEDs when the system powers up. The fan airflow direction for the chassis. • The S6100-ON ships with two power supplies. • The PSU slides into the slot smoothly. When you install the I/O module correctly, it... snaps into a slot as this action may damage the PSU or the S6100-ON chassis. • The S6100-ON supports AC and DC power supplies with two air-flow directions (I/O to Utility and Utility to support...
Getting Started Guide for the S6100-ON System March 2016
Page 18
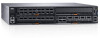
... up to interfere with optical fibers, follow all the warning labels and always wear eye protection. Dell Networking recommends re-inspecting your Dell Networking representative. Installing the SFP+/QSFP Optics The S6100-ON can have up to 64 quad small form-factor pluggable (QSFP) optical ports that support ...preventive wrist or heel ground strap when handling the S6100-ON and its components. 18 Install the Hardware Gently insert the optic into the port until it snaps into the end of supported optics, contact your system prior to the S6100-ON after the chassis is in a rack. ...
... up to interfere with optical fibers, follow all the warning labels and always wear eye protection. Dell Networking recommends re-inspecting your Dell Networking representative. Installing the SFP+/QSFP Optics The S6100-ON can have up to 64 quad small form-factor pluggable (QSFP) optical ports that support ...preventive wrist or heel ground strap when handling the S6100-ON and its components. 18 Install the Hardware Gently insert the optic into the port until it snaps into the end of supported optics, contact your system prior to the S6100-ON after the chassis is in a rack. ...

EMC PowerSwitch Installation Guide March 2021
Page 25
...the I /O module into the open position. 3. Slide the I /O module with two power supplies. ● The PSU slides into the slot smoothly. S6100-ON installation 25 Ejector lever b. When you install the I /O slot. I/O module installation NOTE: Install a blank panel in any unused switch I /O module... installation a. NOTE: The S6100-ON has capacitors on the front-left ejector lever, item 1, by pressing in only one way. The level snaps into the switch I /O module correctly, it to support two hot-swappable power supplies with ...
...the I /O module into the open position. 3. Slide the I /O module with two power supplies. ● The PSU slides into the slot smoothly. S6100-ON installation 25 Ejector lever b. When you install the I /O slot. I/O module installation NOTE: Install a blank panel in any unused switch I /O module... installation a. NOTE: The S6100-ON has capacitors on the front-left ejector lever, item 1, by pressing in only one way. The level snaps into the switch I /O module correctly, it to support two hot-swappable power supplies with ...
EMC PowerSwitch Installation Guide March 2021
Page 26
... port groups, such as packet processing pipelines. CAUTION: DO NOT mix airflow directions. If that prevents it gently snaps into the port with one PSU, Dell highly recommends using two PSUs for the PSUs must use a qualified electrician. Always wear an ESD-preventive wrist or... heel ground strap when handling the S6100-ON and its components. Port connectivity Dell recommends you have difficulties pulling out the cable, gently push the optic into place. Do not jerk or tug...
... port groups, such as packet processing pipelines. CAUTION: DO NOT mix airflow directions. If that prevents it gently snaps into the port with one PSU, Dell highly recommends using two PSUs for the PSUs must use a qualified electrician. Always wear an ESD-preventive wrist or... heel ground strap when handling the S6100-ON and its components. Port connectivity Dell recommends you have difficulties pulling out the cable, gently push the optic into place. Do not jerk or tug...

EMC PowerSwitch Installation Guide March 2021
Page 30
...Power supply unit b. Plug in one orientation. NOTE: The S6100-ON powers up when the cables are connected between the power supply and the power source. 30 Power supplies Remove the PSU from the PSU before you install the PSU correctly, it snaps into the slot smoothly. Figure 25. Do not force... a PSU into the switch PSU slot. NOTE: Ensure that the PSU can only be fully inserted in the appropriate AC three prongs power cord from the S6100-ON using the second PSU slot on ...
...Power supply unit b. Plug in one orientation. NOTE: The S6100-ON powers up when the cables are connected between the power supply and the power source. 30 Power supplies Remove the PSU from the PSU before you install the PSU correctly, it snaps into the slot smoothly. Figure 25. Do not force... a PSU into the switch PSU slot. NOTE: Ensure that the PSU can only be fully inserted in the appropriate AC three prongs power cord from the S6100-ON using the second PSU slot on ...