User's Guide
Page 7
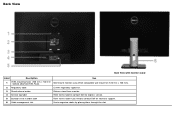
Release stand from monitor. Refer to this label to contact Dell for technical support. Refer to this label if you need to organize cables by placing them through the slot. Back View Back View with monitor stand Label Description 1 VESA mounting holes (100 mm x 100 mm - Use to contact Dell for express service. List the regulatory approvals. behind attached VESA Plate) 2 Regulatory label 3 Stand release button 4 Service tag label 5 Barcode serial number label 6 Cable management slot Use Wall mount monitor using VESA-compatible wall mount kit (100 mm x 100 mm).
Release stand from monitor. Refer to this label to contact Dell for technical support. Refer to this label if you need to organize cables by placing them through the slot. Back View Back View with monitor stand Label Description 1 VESA mounting holes (100 mm x 100 mm - Use to contact Dell for express service. List the regulatory approvals. behind attached VESA Plate) 2 Regulatory label 3 Stand release button 4 Service tag label 5 Barcode serial number label 6 Cable management slot Use Wall mount monitor using VESA-compatible wall mount kit (100 mm x 100 mm).
User's Guide
Page 12
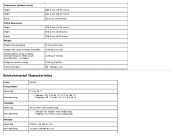
... Width Depth Stand dimensions Height Width Depth Weight Weight with packaging Weight with stand assembly and cables Weight without stand assembly (For wall mount or VESA mount considerations - no cables) Weight of stand assembly Front frame gloss 380.3 mm (14.97 inches) 641.9 mm (25.27....62 lb) 1.65 kg (3.64 lb) 90~100 gloss unit Environmental Characteristics Model Temperature Operating Non-operating Humidity Operating Non-operating Altitude Operating Non-operating S2740L 0 °C to 40 °C Storage: -20 °C to 60 °C (-4 °F to 140 °F) Shipping: -20 °C to 60 &#...
... Width Depth Stand dimensions Height Width Depth Weight Weight with packaging Weight with stand assembly and cables Weight without stand assembly (For wall mount or VESA mount considerations - no cables) Weight of stand assembly Front frame gloss 380.3 mm (14.97 inches) 641.9 mm (25.27....62 lb) 1.65 kg (3.64 lb) 90~100 gloss unit Environmental Characteristics Model Temperature Operating Non-operating Humidity Operating Non-operating Altitude Operating Non-operating S2740L 0 °C to 40 °C Storage: -20 °C to 60 °C (-4 °F to 140 °F) Shipping: -20 °C to 60 &#...
User's Guide
Page 19
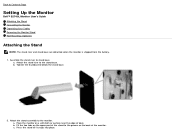
... into place. Back to the monitor. Attach the stand assembly to Contents Page Setting Up the Monitor Dell™ S2740L Monitor User's Guide Attaching the Stand Connecting the Monitor Organizing Your Cables Removing the Monitor Stand Wall Mounting (Optional) Attaching the Stand NOTE: The stand riser and stand base are detached when the monitor...
... into place. Back to the monitor. Attach the stand assembly to Contents Page Setting Up the Monitor Dell™ S2740L Monitor User's Guide Attaching the Stand Connecting the Monitor Organizing Your Cables Removing the Monitor Stand Wall Mounting (Optional) Attaching the Stand NOTE: The stand riser and stand base are detached when the monitor...
User's Guide
Page 24
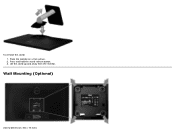
Wall Mounting (Optional) (Screw dimension: M4 x 10 mm). Place the monitor on a flat surface. 2. Lift the stand up and away from the monitor. Press and hold the stand release button. 3. To remove the stand: 1.
Wall Mounting (Optional) (Screw dimension: M4 x 10 mm). Place the monitor on a flat surface. 2. Lift the stand up and away from the monitor. Press and hold the stand release button. 3. To remove the stand: 1.
User's Guide
Page 25
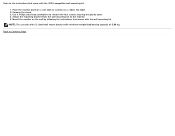
... four screws securing the plastic cover. 4. Remove the stand. 3. Place the monitor panel on a soft cloth or cushion on the wall by following the instructions that come with the VESA-compatible wall mounting kit. 1. Mount the monitor on a stable, flat table. 2. Use a Philips crosshead screwdriver to the monitor. 5. Back to the instructions that comes...
... four screws securing the plastic cover. 4. Remove the stand. 3. Place the monitor panel on a soft cloth or cushion on the wall by following the instructions that come with the VESA-compatible wall mounting kit. 1. Mount the monitor on a stable, flat table. 2. Use a Philips crosshead screwdriver to the monitor. 5. Back to the instructions that comes...


