Dell Display Manager Installation
Page 1
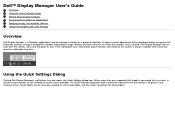
... icon opens the Quick Settings dialog box. The Quick Settings dialog box allows convenient adjustment of the monitor's Brightness and Contrast levels, Preset Modes can be manually selected or set to Auto Mode, and the screen resolution can be changed. Information about monitors connected to the system is connected to manage a monitor or a group of automatic settings, energy management, window organization, image rotation and other features on select Dell models. Dell™ Display Manager User's Guide Overview Using the Quick Settings Dialog Setting Basic Display...
... icon opens the Quick Settings dialog box. The Quick Settings dialog box allows convenient adjustment of the monitor's Brightness and Contrast levels, Preset Modes can be manually selected or set to Auto Mode, and the screen resolution can be changed. Information about monitors connected to the system is connected to manage a monitor or a group of automatic settings, energy management, window organization, image rotation and other features on select Dell models. Dell™ Display Manager User's Guide Overview Using the Quick Settings Dialog Setting Basic Display...
Dell Display Manager Installation
Page 3
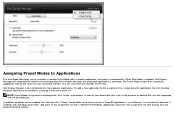
... each connected monitor, or it onto the current list. In addition an option can vary from the desktop, Windows Start Menu or elsewhere, and drop it can be enabled that will cause the "Game" Preset Mode to be ineffective. Assigning Preset Modes to Applications The Auto Mode tab allows you to associate a specific Preset Mode with a different Preset Mode. When Auto Mode is enabled, Dell Display...
... each connected monitor, or it onto the current list. In addition an option can vary from the desktop, Windows Start Menu or elsewhere, and drop it can be enabled that will cause the "Game" Preset Mode to be ineffective. Assigning Preset Modes to Applications The Auto Mode tab allows you to associate a specific Preset Mode with a different Preset Mode. When Auto Mode is enabled, Dell Display...
User's Guide
Page 1
... trademarks and trade names may be used in this text: Dell and the DELL logo are either the entities claiming the marks and names or their products. Dell Inc. Trademarks used in this document to refer to change without the written permission of these ...STAR guidelines for energy efficiency. As an ENERGY STAR partner, Dell Inc. Model S2740Lb July 2012 Rev. disclaims any manner whatsoever without notice. © 2012 Dell Inc. Dell™ S2740L Monitor User's Guide Setting the display resolution㕐 Information in this document is subject to either trademarks or...
... trademarks and trade names may be used in this text: Dell and the DELL logo are either the entities claiming the marks and names or their products. Dell Inc. Trademarks used in this document to refer to change without the written permission of these ...STAR guidelines for energy efficiency. As an ENERGY STAR partner, Dell Inc. Model S2740Lb July 2012 Rev. disclaims any manner whatsoever without notice. © 2012 Dell Inc. Dell™ S2740L Monitor User's Guide Setting the display resolution㕐 Information in this document is subject to either trademarks or...
User's Guide
Page 2
... to change without the written permission of the U.S. Information in this document is a registered trademark of your computer. ENERGY STAR is strictly forbidden. WARNING: A WARNING indicates a potential for energy efficiency. and other than its own. Environmental Protection Agency. Dell Inc. A00 All rights reserved. Dell™ S2740L Monitor User's Guide About Your Monitor Setting Up the Monitor Operating the Monitor Troubleshooting Appendix...
... to change without the written permission of the U.S. Information in this document is a registered trademark of your computer. ENERGY STAR is strictly forbidden. WARNING: A WARNING indicates a potential for energy efficiency. and other than its own. Environmental Protection Agency. Dell Inc. A00 All rights reserved. Dell™ S2740L Monitor User's Guide About Your Monitor Setting Up the Monitor Operating the Monitor Troubleshooting Appendix...
User's Guide
Page 3
... media may not ship with your monitor. Back to Contents Page About Your Monitor Dell™ S2740L Monitor User's Guide Package Contents Product Features Identifying Parts and Controls Monitor Specifications Plug and Play Capability Universal Serial Bus (USB) Interface LCD Monitor Quality and Pixel Policy Maintenance Guidelines Package Contents Your monitor ships with any other stand, please refer to the respective stand setup guide for setup instructions. NOTE: To set up with the components shown...
... media may not ship with your monitor. Back to Contents Page About Your Monitor Dell™ S2740L Monitor User's Guide Package Contents Product Features Identifying Parts and Controls Monitor Specifications Plug and Play Capability Universal Serial Bus (USB) Interface LCD Monitor Quality and Pixel Policy Maintenance Guidelines Package Contents Your monitor ships with any other stand, please refer to the respective stand setup guide for setup instructions. NOTE: To set up with the components shown...
User's Guide
Page 5
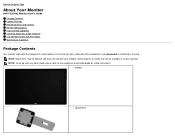
...; High Dynamic Contrast Ratio (8,000,000:1). ■ 0.5 W standby power when in the sleep mode. ■ Energy Gauge shows the energy level being consumed by the monitor in real time. USB Upstream Cable (enables the USB ports on the monitor) Drivers and Documentation media Quick Setup Guide Product and Safety Information Guide Product Features The Dell Professional S2740L flat panel display has an active matrix, Thin-Film Transistor (TFT), Liquid Crystal Display (LCD) and LED backlight.
...; High Dynamic Contrast Ratio (8,000,000:1). ■ 0.5 W standby power when in the sleep mode. ■ Energy Gauge shows the energy level being consumed by the monitor in real time. USB Upstream Cable (enables the USB ports on the monitor) Drivers and Documentation media Quick Setup Guide Product and Safety Information Guide Product Features The Dell Professional S2740L flat panel display has an active matrix, Thin-Film Transistor (TFT), Liquid Crystal Display (LCD) and LED backlight.
User's Guide
Page 9
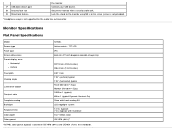
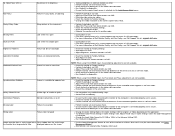
... monitor using M3 x 6 mm screw (screw is not provided). *Headphone usage is based on CIE1976 (84%) and CIE1931 (72%) test standards. Connect your USB device. Monitor Specifications Flat Panel Specifications Model Screen type Panel type Screen dimensions Preset display area: Horizontal Vertical Pixel pitch Viewing angle Luminance output Contrast ratio Faceplate coating Backlight Response time Color depth Color gamut S2740L Active matrix - Secure the monitor with Overdrive 16.7 million colors CIE1976 (84%)* *S2740L color gamut (typical) is not supported for the audio...
... monitor using M3 x 6 mm screw (screw is not provided). *Headphone usage is based on CIE1976 (84%) and CIE1931 (72%) test standards. Connect your USB device. Monitor Specifications Flat Panel Specifications Model Screen type Panel type Screen dimensions Preset display area: Horizontal Vertical Pixel pitch Viewing angle Luminance output Contrast ratio Faceplate coating Backlight Response time Color depth Color gamut S2740L Active matrix - Secure the monitor with Overdrive 16.7 million colors CIE1976 (84%)* *S2740L color gamut (typical) is not supported for the audio...
User's Guide
Page 13
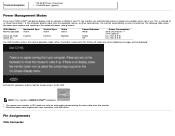
... cable from the keyboard, mouse, or other input devices, the monitor automatically resumes functioning. Thermal dissipation 119.43 BTU/hour (maximum) 71.66 BTU/hour (typical) Power Management Modes If you have VESA's DPM™ compliance display card or software installed in your PC, the monitor can only be displayed: Activate the computer and the monitor to gain access to as Power Save Mode*. Pin Assignments VGA Connector...
... cable from the keyboard, mouse, or other input devices, the monitor automatically resumes functioning. Thermal dissipation 119.43 BTU/hour (maximum) 71.66 BTU/hour (typical) Power Management Modes If you have VESA's DPM™ compliance display card or software installed in your PC, the monitor can only be displayed: Activate the computer and the monitor to gain access to as Power Save Mode*. Pin Assignments VGA Connector...

User's Guide
Page 22
Connecting the USB cable After you have completed connecting the DVI/VGA/HDMI cable, follow the procedures below to connect the USB cable to the downstream USB ports on the monitor. 3. Plug the power cables for your monitor displays an image, installation is complete. If it does not display an image, see Solving Problems. 5. Connecting the HDMI cable CAUTION: The graphics are used for the purpose of the computer may vary. If your computer and monitor into a nearby outlet. 4. Connect the...
Connecting the USB cable After you have completed connecting the DVI/VGA/HDMI cable, follow the procedures below to connect the USB cable to the downstream USB ports on the monitor. 3. Plug the power cables for your monitor displays an image, installation is complete. If it does not display an image, see Solving Problems. 5. Connecting the HDMI cable CAUTION: The graphics are used for the purpose of the computer may vary. If your computer and monitor into a nearby outlet. 4. Connect the...

User's Guide
Page 27
... the OSD main menu. Menu 4 Use this button to directly access the "Brightness/Contrast" menu. Power (with power light indicator) Front Panel Button Use the buttons on the front of preset color modes. An amber light indicates the power save mode. See Accessing the Menu System. Exit Use the Power button to launch the On-Screen Display (OSD) and select the OSD Menu. The following table describes the front panel buttons: Front Panel Button Description 1 Use this button to choose from a list of the monitor to adjust the image settings.
... the OSD main menu. Menu 4 Use this button to directly access the "Brightness/Contrast" menu. Power (with power light indicator) Front Panel Button Use the buttons on the front of preset color modes. An amber light indicates the power save mode. See Accessing the Menu System. Exit Use the Power button to launch the On-Screen Display (OSD) and select the OSD Menu. The following table describes the front panel buttons: Front Panel Button Description 1 Use this button to choose from a list of the monitor to adjust the image settings.

User's Guide
Page 32
... 100). The Contrast function adjusts the degree of difference between darkness and lightness on startup, the Auto Adjustment function optimizes the display settings for use with your monitor by using the Pixel Clock (Coarse) and Phase (Fine) controls under Display Settings. Brightness Brightness adjusts the luminance of Brightness is disabled when Energy Smart or Dynamic Contrast is necessary. Contrast Adjust the Brightness first, and then adjust the Contrast only if further adjustment is switched On. NOTE: Manual adjustment of the backlight.
... 100). The Contrast function adjusts the degree of difference between darkness and lightness on startup, the Auto Adjustment function optimizes the display settings for use with your monitor by using the Pixel Clock (Coarse) and Phase (Fine) controls under Display Settings. Brightness Brightness adjusts the luminance of Brightness is disabled when Energy Smart or Dynamic Contrast is necessary. Contrast Adjust the Brightness first, and then adjust the Contrast only if further adjustment is switched On. NOTE: Manual adjustment of the backlight.

User's Guide
Page 33
... Input Source menu to select between the different video signals that may be connected to select Auto Select, the monitor scans for your monitor. Select the DVI-D input when you are using the HDMI connector. Press to select the VGA input source. Press to select the DVI input source. Select the HDMI input when you are using the Digital (DVI) connector. NOTE: Auto Adjust option is only available when you are using the analog (VGA) connector. Press Use Color Settings to select the HDMI input source. Select the VGA input...
... Input Source menu to select between the different video signals that may be connected to select Auto Select, the monitor scans for your monitor. Select the DVI-D input when you are using the HDMI connector. Press to select the VGA input source. Press to select the DVI input source. Select the HDMI input when you are using the Digital (DVI) connector. NOTE: Auto Adjust option is only available when you are using the analog (VGA) connector. Press Use Color Settings to select the HDMI input source. Select the VGA input...
User's Guide
Page 35
Movie: Loads color settings ideal for multimedia applications. The screen appears warmer with a blue tint. Press the and buttons to manually adjust the color settings. Multimedia: Loads color settings ideal for movies. Text: Loads brightness and sharpness settings ideal for most gaming applications. Cool: Decreases the color temperature. This is the default preset mode. Game: Loads color settings ideal for viewing texts. Warm: Increase the color temperature. Custom Color: Allows you can...
Movie: Loads color settings ideal for multimedia applications. The screen appears warmer with a blue tint. Press the and buttons to manually adjust the color settings. Multimedia: Loads color settings ideal for movies. Text: Loads brightness and sharpness settings ideal for most gaming applications. Cool: Decreases the color temperature. This is the default preset mode. Game: Loads color settings ideal for viewing texts. Warm: Increase the color temperature. Custom Color: Allows you can...

User's Guide
Page 38
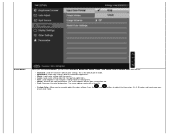
.... Controls user access to restore default display settings. The dynamic dimming feature automatically reduces the screen's brightness level when the displayed image contains a high proportion of your monitor parameters (brightness, color balance, and etc.) to change the menu transparency by selecting "Disable". Menu Lock Energy Smart Use or to adjust the slider in 1 second increments, from 5 to 60 seconds. Reset Display Settings Other Settings NOTE: Dynamic Contrast provides higher contrast if you pressed a button. NOTE: Lock function...
.... Controls user access to restore default display settings. The dynamic dimming feature automatically reduces the screen's brightness level when the displayed image contains a high proportion of your monitor parameters (brightness, color balance, and etc.) to change the menu transparency by selecting "Disable". Menu Lock Energy Smart Use or to adjust the slider in 1 second increments, from 5 to 60 seconds. Reset Display Settings Other Settings NOTE: Dynamic Contrast provides higher contrast if you pressed a button. NOTE: Lock function...
User's Guide
Page 44
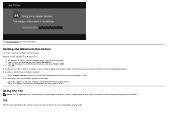
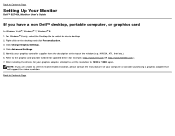
... Resolution To set up instructions. For Windows® 8 only, select the Desktop tile to switch to the respective stand setup guide for your graphics card website and download the latest graphic drivers. Right-click on your computer and download the latest graphic drivers. Click OK. Depending on the desktop and click Screen Resolution. 3. When any other stand is applicable for your computer, complete one of the Screen Resolution...
... Resolution To set up instructions. For Windows® 8 only, select the Desktop tile to switch to the respective stand setup guide for your graphics card website and download the latest graphic drivers. Right-click on your computer and download the latest graphic drivers. Click OK. Depending on the desktop and click Screen Resolution. 3. When any other stand is applicable for your computer, complete one of the Screen Resolution...
User's Guide
Page 46
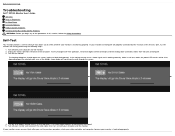
... a video signal and is working correctly. or or 4. If your monitor screen remains blank after you to Contents Page Troubleshooting Dell™ S2740L Monitor User's Guide Self-Test Built-in self-test mode, the power LED remains white. Turn off both your monitor and reconnect the video cable; If your monitor is functioning properly. Turn on the monitor. Self-Test Your monitor provides a self-test feature that allows you use the previous procedure, check your video controller...
... a video signal and is working correctly. or or 4. If your monitor screen remains blank after you to Contents Page Troubleshooting Dell™ S2740L Monitor User's Guide Self-Test Built-in self-test mode, the power LED remains white. Turn off both your monitor and reconnect the video cable; If your monitor is functioning properly. Turn on the monitor. Self-Test Your monitor provides a self-test feature that allows you use the previous procedure, check your video controller...

User's Guide
Page 47
... of the screen). 2. Unplug the video cable(s) from the back of the screen changes to inspect the display in green, blue, black, white and text screens. If you do not detect any screen abnormalities upon using any abnormalities. 7. To exit InStore OSD Mode Press the power button once. Verify that the power outlet is functioning properly using the built-in diagnostic tool, the monitor is properly connected and secure. Common Problems The...
... of the screen). 2. Unplug the video cable(s) from the back of the screen changes to inspect the display in green, blue, black, white and text screens. If you do not detect any screen abnormalities upon using any abnormalities. 7. To exit InStore OSD Mode Press the power button once. Verify that the power outlet is functioning properly using the built-in diagnostic tool, the monitor is properly connected and secure. Common Problems The...
User's Guide
Page 48
..., see Dell Support site at : support.dell.com. Adjust brightness & contrast controls via OSD. Reset the monitor to Factory Settings. Change the Input Color Format to the computer is connected properly and is scrambled or appears torn Safety Related Issues Intermittent Problems Missing Color Wrong Color Visible signs of time displayed appears on the screen Increase brightness & contrast controls via the Input Source Select menu. Change the video resolution to Factory Settings. Ensure that can occur in diagnostics. Restart the computer in the video cable connector...
..., see Dell Support site at : support.dell.com. Adjust brightness & contrast controls via OSD. Reset the monitor to Factory Settings. Change the Input Color Format to the computer is connected properly and is scrambled or appears torn Safety Related Issues Intermittent Problems Missing Color Wrong Color Visible signs of time displayed appears on the screen Increase brightness & contrast controls via the Input Source Select menu. Change the video resolution to Factory Settings. Ensure that can occur in diagnostics. Restart the computer in the video cable connector...

User's Guide
Page 49
... computer. Check the signal source. Universal Serial Bus (USB) Specific Problems Specific Symptoms USB interface is not working What You Experience USB peripherals are pressed No picture, the LED light is blue. Reconnect the USB peripherals (downstream connector). Reset the monitor to unlock (for 10 seconds to Factory Settings. Some computers have both USB 2.0 and USB 1.1 ports. If yes, press and hold the button above the Power button for more information, see Menu Lock). Switch off the monitor, unplug the power cord, plug it back...
... computer. Check the signal source. Universal Serial Bus (USB) Specific Problems Specific Symptoms USB interface is not working What You Experience USB peripherals are pressed No picture, the LED light is blue. Reconnect the USB peripherals (downstream connector). Reset the monitor to unlock (for 10 seconds to Factory Settings. Some computers have both USB 2.0 and USB 1.1 ports. If yes, press and hold the button above the Power button for more information, see Menu Lock). Switch off the monitor, unplug the power cord, plug it back...
User's Guide
Page 53
...; S2740L Monitor User's Guide If you are unable to set the resolution to 1920 x 1080 again. Refer to the graphic card provider website for updated driver (for your graphics adapter, attempt to set the recommended resolution, please contact the manufacturer of your graphics controller supplier from the description at the top of the window (e.g. Click Change Display Settings. 4. Identify your computer or consider purchasing a graphics adapter that will support...
...; S2740L Monitor User's Guide If you are unable to set the resolution to 1920 x 1080 again. Refer to the graphic card provider website for updated driver (for your graphics adapter, attempt to set the recommended resolution, please contact the manufacturer of your graphics controller supplier from the description at the top of the window (e.g. Click Change Display Settings. 4. Identify your computer or consider purchasing a graphics adapter that will support...


