
Monitor Users Guide
Page 3
Contents About your monitor 5 Contents of the box 5 Product features 6 Identifying parts and controls 7 Monitor specifications 11 Plug-and-play 17 LCD monitor quality and pixel policy 17 Setting up the monitor 18 Attaching the stand 18 Using the tilt, swivel, and vertical extension 19 Configuring the rotate feature from the Display Settings of your computer 20 Connecting your monitor 21 Organizing your cables 23 Removing the monitor stand 23 Wall mounting (Optional 24 Operating the monitor 25 Turning on the monitor 25 Using the front panel controls 25 Contents | 3
Contents About your monitor 5 Contents of the box 5 Product features 6 Identifying parts and controls 7 Monitor specifications 11 Plug-and-play 17 LCD monitor quality and pixel policy 17 Setting up the monitor 18 Attaching the stand 18 Using the tilt, swivel, and vertical extension 19 Configuring the rotate feature from the Display Settings of your computer 20 Connecting your monitor 21 Organizing your cables 23 Removing the monitor stand 23 Wall mounting (Optional 24 Operating the monitor 25 Turning on the monitor 25 Using the front panel controls 25 Contents | 3

Monitor Users Guide
Page 4
Using the On-Screen Display (OSD) menu 28 Troubleshooting 48 Self-test 48 Built-in diagnostics 50 Common problems 51 Product specific problems 53 Universal Serial Bus (USB) specific problems 53 Appendix 55 Safety instructions 55 FCC notices (U.S. only) and other regulatory information 55 Contacting Dell 55 Setting up your monitor 56 Maintenance guidelines 58 Pin assignments 59 4 | Contents
Using the On-Screen Display (OSD) menu 28 Troubleshooting 48 Self-test 48 Built-in diagnostics 50 Common problems 51 Product specific problems 53 Universal Serial Bus (USB) specific problems 53 Appendix 55 Safety instructions 55 FCC notices (U.S. only) and other regulatory information 55 Contacting Dell 55 Setting up your monitor 56 Maintenance guidelines 58 Pin assignments 59 4 | Contents

Monitor Users Guide
Page 5
Ensure that you have received all the components and see Contacting Dell if anything is missing. Monitor Stand riser Stand base Power cable (varies by country) USB 3.0 upstream cable (enables the USB ports on the monitor) About your monitor. Some features may not ship with the components shown below. NOTE: Some components may be optional and may not be available in certain countries. About your monitor Contents of the box Your monitor ships with your monitor | 5
Ensure that you have received all the components and see Contacting Dell if anything is missing. Monitor Stand riser Stand base Power cable (varies by country) USB 3.0 upstream cable (enables the USB ports on the monitor) About your monitor. Some features may not ship with the components shown below. NOTE: Some components may be optional and may not be available in certain countries. About your monitor Contents of the box Your monitor ships with your monitor | 5

Monitor Users Guide
Page 6
... power when in the sleep mode. • Optimize eye comfort with a flicker-free screen. The monitor features include: • S2319HS: 58.4 cm (23.0-inch) active area display, measured diagonally. • S2719HS: 68.6 cm (27-inch) active area display, measured diagonally. • Up to 1920 x ...USB downstream ports. • Plug and play capability if supported by your monitor HDMI cable • Quick Setup Guide • Safety,Environmental,and Regulatory Information Product features The Dell S2319HS/S2719HS monitor has an active matrix, Thin-Film Transistor (TFT), liquid crystal display (LCD...
... power when in the sleep mode. • Optimize eye comfort with a flicker-free screen. The monitor features include: • S2319HS: 58.4 cm (23.0-inch) active area display, measured diagonally. • S2719HS: 68.6 cm (27-inch) active area display, measured diagonally. • Up to 1920 x ...USB downstream ports. • Plug and play capability if supported by your monitor HDMI cable • Quick Setup Guide • Safety,Environmental,and Regulatory Information Product features The Dell S2319HS/S2719HS monitor has an active matrix, Thin-Film Transistor (TFT), liquid crystal display (LCD...

Monitor Users Guide
Page 7
About your monitor | 7 Identifying parts and controls Front view 1 2 Label 1 2 Description Function buttons Power on/off button (with LED indicator) Use Use the function buttons to adjust items in the OSD (For more information, see Using the front panel controls) Use the power button to turn the monitor On and Off.
About your monitor | 7 Identifying parts and controls Front view 1 2 Label 1 2 Description Function buttons Power on/off button (with LED indicator) Use Use the function buttons to adjust items in the OSD (For more information, see Using the front panel controls) Use the power button to turn the monitor On and Off.

Monitor Users Guide
Page 8
Back view 1 2 3 5 4 Label Description Use 1 VESA mounting holes (100 mm x 100 Wall mount monitor using VESA- mm-behind attached VESA cover) compatible wall mount kit (100 mm x 100 mm). 2 Stand release button Releases stand from monitor. 3 Security lock slot Secures monitor with security cable lock (sold separately). 4 Barcode, serial number, and Service Refer to this label if you need to contact Dell Tag label for technical support. 5 Cable management slot Use to organize cables by placing them through the slot. 8 | About your monitor
Back view 1 2 3 5 4 Label Description Use 1 VESA mounting holes (100 mm x 100 Wall mount monitor using VESA- mm-behind attached VESA cover) compatible wall mount kit (100 mm x 100 mm). 2 Stand release button Releases stand from monitor. 3 Security lock slot Secures monitor with security cable lock (sold separately). 4 Barcode, serial number, and Service Refer to this label if you need to contact Dell Tag label for technical support. 5 Cable management slot Use to organize cables by placing them through the slot. 8 | About your monitor

Monitor Users Guide
Page 9
NOTE: You can only use this connector after you have connected the USB cable to the computer and USB upstream connector on the monitor. About your USB device. Side view 1 Label 1 Description Use USB downstream ports (2) Connect your monitor | 9
NOTE: You can only use this connector after you have connected the USB cable to the computer and USB upstream connector on the monitor. About your USB device. Side view 1 Label 1 Description Use USB downstream ports (2) Connect your monitor | 9

Monitor Users Guide
Page 10
...your computer with HDMI cable. Once this cable is connected, you have connected the USB cable from the computer to the monitor. USB downstream ports (2) Connect your monitor Stand lock Secure the stand to the computer. USB upstream port Connect the USB cable that comes with VGA cable (optional...). You can use these ports only after you can use the USB downstream connectors on the monitor. DP connector Connect your computer with DP cable (optional). Bottom view 7 1 23 456 Label 1 2 3 4 5 6 7 Description Use AC power...
...your computer with HDMI cable. Once this cable is connected, you have connected the USB cable from the computer to the monitor. USB downstream ports (2) Connect your monitor Stand lock Secure the stand to the computer. USB upstream port Connect the USB cable that comes with VGA cable (optional...). You can use these ports only after you can use the USB downstream connectors on the monitor. DP connector Connect your computer with DP cable (optional). Bottom view 7 1 23 456 Label 1 2 3 4 5 6 7 Description Use AC power...

Monitor Users Guide
Page 11
...; one x USB 3.0 upstream port • two USB 2.0 downstream ports (rear) • two USB 3.0 downstream ports (side) Border width (edge of monitor to Gray) 5 ms (Fast mode) 8 ms (Normal mode) Color depth 16.7 million colors Color gamut 72% (CIE1931) NOTE: Color gamut (typical) is... based on CIE1976 (82%) and CIE1931 (72%) test standards. Monitor specifications Model S2319HS S2719HS Screen type Active matrix - TFT LCD Panel Type In-plane switching technology Aspect ratio 16:9 Viewable image dimensions Diagonal 58.4 cm ...
...; one x USB 3.0 upstream port • two USB 2.0 downstream ports (rear) • two USB 3.0 downstream ports (side) Border width (edge of monitor to Gray) 5 ms (Fast mode) 8 ms (Normal mode) Color depth 16.7 million colors Color gamut 72% (CIE1931) NOTE: Color gamut (typical) is... based on CIE1976 (82%) and CIE1931 (72%) test standards. Monitor specifications Model S2319HS S2719HS Screen type Active matrix - TFT LCD Panel Type In-plane switching technology Aspect ratio 16:9 Viewable image dimensions Diagonal 58.4 cm ...

Monitor Users Guide
Page 12
Adjustability Height adjustable stand Tilt Swivel Pivot Dell Display Manager (DDM)Compatibility Security 130 mm -5° to 21° -45° to 45° -90° to 90° Easy Arrange and other key features Security-lock slot (cable lock sold separately) Resolution specifications Model S2319HS/S2719HS Horizontal scan range 30 khz to....0 75.0 60.0 60.0 Pixel Clock (MHz) 25.2 31.5 28.3 40.0 49.5 65.0 78.8 108.0 108.0 135.0 108.0 148.5 Sync Polarity (Horizontal/ Vertical 12 | About your monitor
Adjustability Height adjustable stand Tilt Swivel Pivot Dell Display Manager (DDM)Compatibility Security 130 mm -5° to 21° -45° to 45° -90° to 90° Easy Arrange and other key features Security-lock slot (cable lock sold separately) Resolution specifications Model S2319HS/S2719HS Horizontal scan range 30 khz to....0 75.0 60.0 60.0 Pixel Clock (MHz) 25.2 31.5 28.3 40.0 49.5 65.0 78.8 108.0 108.0 135.0 108.0 148.5 Sync Polarity (Horizontal/ Vertical 12 | About your monitor

Monitor Users Guide
Page 13
... Dimensions (with stand) Height (extended) Height (compressed) Width Depth Dimensions (without stand) Height Width Depth Stand dimensions Height (extended) Height (compressed) Width Depth Base S2319HS S2719HS • Digital: DisplayPort, 20 pins • Digital: HDMI, 19 pins • Analog: D-Sub, 15 pins • Digital: USB, 9 pins 481.1 mm (18.... mm (15.78 in.) 353.4 mm (13.91 in.) 206.0 mm (8.11 in.) 166.0 mm (6.54 in.) 206.0 mm x 166.0 mm (8.11 in .) About your monitor | 13 x 7.28 in . x 6.54 in.) 418.4 mm (16.47 in.) 371.0 mm (14.61 in.) 245.0 mm (9.65 in.) 185.0 mm (7.28 in.)...
... Dimensions (with stand) Height (extended) Height (compressed) Width Depth Dimensions (without stand) Height Width Depth Stand dimensions Height (extended) Height (compressed) Width Depth Base S2319HS S2719HS • Digital: DisplayPort, 20 pins • Digital: HDMI, 19 pins • Analog: D-Sub, 15 pins • Digital: USB, 9 pins 481.1 mm (18.... mm (15.78 in.) 353.4 mm (13.91 in.) 206.0 mm (8.11 in.) 166.0 mm (6.54 in.) 206.0 mm x 166.0 mm (8.11 in .) About your monitor | 13 x 7.28 in . x 6.54 in.) 418.4 mm (16.47 in.) 371.0 mm (14.61 in.) 245.0 mm (9.65 in.) 185.0 mm (7.28 in.)...

Monitor Users Guide
Page 14
... 4.35 kg (9.59 lb) 1.93 kg (4.25 lb) Environmental characteristics Model S2319HS/S2719HS Compliant standards • ENERGY STAR Certified Monitor • TCO Certified Display • RoHS Compliant • BFR/PVC Free monitor (excluding external cables) • Arsenic-Free glass and Mercury-Free for the panel ...non-condensing) Altitude Operating 5,000 m (16,404 ft) (maximum) Non-operating 12,192 m (40,000 ft) (maximum) Thermal dissipation S2319HS S2719HS 131.37 BTU/hour (maximum) 51.18 BTU/hour (typical) 184.26 BTU/hour (maximum) 56.62 BTU/hour (typical) 14 | About your...
... 4.35 kg (9.59 lb) 1.93 kg (4.25 lb) Environmental characteristics Model S2319HS/S2719HS Compliant standards • ENERGY STAR Certified Monitor • TCO Certified Display • RoHS Compliant • BFR/PVC Free monitor (excluding external cables) • Arsenic-Free glass and Mercury-Free for the panel ...non-condensing) Altitude Operating 5,000 m (16,404 ft) (maximum) Non-operating 12,192 m (40,000 ft) (maximum) Thermal dissipation S2319HS S2719HS 131.37 BTU/hour (maximum) 51.18 BTU/hour (typical) 184.26 BTU/hour (maximum) 56.62 BTU/hour (typical) 14 | About your...
Monitor Users Guide
Page 15
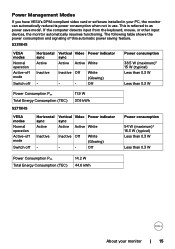
... reduce its power consumption when not in your monitor | 15 Inactive Off - - Inactive Off - - White (Glowing) Off Power consumption 54 W (maximum)2 16.3 W (typical) Less than 0.3 W Less than 0.3 W Power Consumption Pon Total Energy Consumption (TEC) S2719HS 11.9 W 37.6 kWh VESA modes Normal ... Active Active Active White Inactive - If the computer detects input from the keyboard, mouse, or other input devices, the monitor automatically resumes functioning. Power Management Modes If you have VESA's DPM-compliant video card or software installed in use. This ...
... reduce its power consumption when not in your monitor | 15 Inactive Off - - Inactive Off - - White (Glowing) Off Power consumption 54 W (maximum)2 16.3 W (typical) Less than 0.3 W Less than 0.3 W Power Consumption Pon Total Energy Consumption (TEC) S2719HS 11.9 W 37.6 kWh VESA modes Normal ... Active Active Active White Inactive - If the computer detects input from the keyboard, mouse, or other input devices, the monitor automatically resumes functioning. Power Management Modes If you have VESA's DPM-compliant video card or software installed in use. This ...

Monitor Users Guide
Page 16
... wake it up . S2719HS 1 Zero power consumption in OFF mode can be achieved by "Factory Reset" function in the OSD menu. Accordingly, the customer should not rely upon this information in the normal operation mode. Activate the computer and the monitor to gain access to ...any key on the software, components and peripherals you ordered and shall have no display, press the monitor button again to the OSD. S2719HS S2319HS Dell 27 Monitor No DP signal from the monitor. 2 Maximum power consumption with maximum luminance, and USB active. Press any button in the activeoff mode...
... wake it up . S2719HS 1 Zero power consumption in OFF mode can be achieved by "Factory Reset" function in the OSD menu. Accordingly, the customer should not rely upon this information in the normal operation mode. Activate the computer and the monitor to gain access to ...any key on the software, components and peripherals you ordered and shall have no display, press the monitor button again to the OSD. S2719HS S2319HS Dell 27 Monitor No DP signal from the monitor. 2 Maximum power consumption with maximum luminance, and USB active. Press any button in the activeoff mode...

Monitor Users Guide
Page 17
For more information on LCD Monitor Pixel Policy, see Dell support site at: www.dell.com/support/monitors. Most monitor installations are hard to see Operating the monitor. For more information about changing the monitor settings, see and do not affect the display quality or usability. About your monitor | 17 Plug-and-play You can select different settings if...
For more information on LCD Monitor Pixel Policy, see Dell support site at: www.dell.com/support/monitors. Most monitor installations are hard to see Operating the monitor. For more information about changing the monitor settings, see and do not affect the display quality or usability. About your monitor | 17 Plug-and-play You can select different settings if...

Monitor Users Guide
Page 18
...printed on the stand riser and slide the stand riser into the stand base. 3 Open the latch at the back of the monitor. 18 | Setting up the monitor Attaching the stand NOTE: The stand riser and stand base are connecting a third-party stand, see the documentation that shipped with...: The following procedure is shipped with the slots on the packaging box, remove the stand from the factory. Setting up the monitor If you are not attached when the monitor is shipped from the cushion that is applicable for the stand that secures it clockwise and then close the latch. 1 2 ...
...printed on the stand riser and slide the stand riser into the stand base. 3 Open the latch at the back of the monitor. 18 | Setting up the monitor Attaching the stand NOTE: The stand riser and stand base are connecting a third-party stand, see the documentation that shipped with...: The following procedure is shipped with the slots on the packaging box, remove the stand from the factory. Setting up the monitor If you are not attached when the monitor is shipped from the cushion that is applicable for the stand that secures it clockwise and then close the latch. 1 2 ...

Monitor Users Guide
Page 19
...For a third-party stand, see the documentation that shipped with your monitor. CAUTION: Lift the monitor carefully to prevent it in. With the stand attached to the monitor. Align and slide the tabs on the top of the monitor. Using the tilt, swivel, and vertical extension NOTE: The following ... applicable for the most comfortable viewing angle. 5° 45° 130 mm 45° 21° Setting up the monitor | 19 a. 5 Connect the stand assembly to the monitor, you can tilt the monitor for the stand that shipped with the stand and place it from slipping or falling.
...For a third-party stand, see the documentation that shipped with your monitor. CAUTION: Lift the monitor carefully to prevent it in. With the stand attached to the monitor. Align and slide the tabs on the top of the monitor. Using the tilt, swivel, and vertical extension NOTE: The following ... applicable for the most comfortable viewing angle. 5° 45° 130 mm 45° 21° Setting up the monitor | 19 a. 5 Connect the stand assembly to the monitor, you can tilt the monitor for the stand that shipped with the stand and place it from slipping or falling.

Monitor Users Guide
Page 20
... the Display Settings of your computer After you have rotated your monitor, you need to complete the procedure below to www.dell.com/support and see the manufacturer's website for your Dell computer, you are using the monitor with this monitor. NOTE: If you require an updated graphics driver that is... then select the preferred rotation. 5 If you do not see the rotation option or it is vertically extended and then tilt the monitor backwards to www.dell.com/support and download the latest driver for information on ). To adjust the Rotation Display Settings: 1 Right-click on the Desktop ...
... the Display Settings of your computer After you have rotated your monitor, you need to complete the procedure below to www.dell.com/support and see the manufacturer's website for your Dell computer, you are using the monitor with this monitor. NOTE: If you require an updated graphics driver that is... then select the preferred rotation. 5 If you do not see the rotation option or it is vertically extended and then tilt the monitor backwards to www.dell.com/support and download the latest driver for information on ). To adjust the Rotation Display Settings: 1 Right-click on the Desktop ...

Monitor Users Guide
Page 21
Connecting your computer. Connecting the HDMI cable HDMI HDMI Connecting the DP cable (Optional) DP DP Setting up the monitor | 21 To connect your monitor to the computer: 1 Turn off your computer. 2 Connect the VGA/HDMI/DP-DP/USB cable from your monitor to the computer. 3 Switch on your monitor. 4 Select the correct input source at monitor OSD Menu and turn on your monitor WARNING: Before you begin any of the procedures in this section, follow the Safety Instructions.
Connecting your computer. Connecting the HDMI cable HDMI HDMI Connecting the DP cable (Optional) DP DP Setting up the monitor | 21 To connect your monitor to the computer: 1 Turn off your computer. 2 Connect the VGA/HDMI/DP-DP/USB cable from your monitor to the computer. 3 Switch on your monitor. 4 Select the correct input source at monitor OSD Menu and turn on your monitor WARNING: Before you begin any of the procedures in this section, follow the Safety Instructions.

Monitor Users Guide
Page 22
Connecting the VGA cable (Optional) VGA VGA Connecting the USB cable USB USB 22 | Setting up the monitor
Connecting the VGA cable (Optional) VGA VGA Connecting the USB cable USB USB 22 | Setting up the monitor


