
Owner's Manual
Page 7
Contents Accessing your User's Guide 3 CAUTION: Safety instructions 5 1 Unpack the printer 2 Install the optional drawer 3 Prepare the printer Positioning the printer 16 Raising the paper rest 17 Attaching an operator panel overlay 18 4 Install optional memory cards Removing the side cover 20 Removing the shield 22 Installing a memory card 23 Reattaching the shield 24 Reattaching the side cover 25 Contents 7
Contents Accessing your User's Guide 3 CAUTION: Safety instructions 5 1 Unpack the printer 2 Install the optional drawer 3 Prepare the printer Positioning the printer 16 Raising the paper rest 17 Attaching an operator panel overlay 18 4 Install optional memory cards Removing the side cover 20 Removing the shield 22 Installing a memory card 23 Reattaching the shield 24 Reattaching the side cover 25 Contents 7

Owner's Manual
Page 8
... 43 Status Monitor 44 Printing Status window 44 Toner Re-order window 44 Dell Local Printer Setup Utility 45 Dell Printer Software Uninstall 45 Driver Profiler 46 Installing printer drivers 46 If you purchased your Dell printer and computer together . . . 46 If you purchased your Dell printer separately 46 Using Windows XP with a USB or parallel cable 47 Using...
... 43 Status Monitor 44 Printing Status window 44 Toner Re-order window 44 Dell Local Printer Setup Utility 45 Dell Printer Software Uninstall 45 Driver Profiler 46 Installing printer drivers 46 If you purchased your Dell printer and computer together . . . 46 If you purchased your Dell printer separately 46 Using Windows XP with a USB or parallel cable 47 Using...
Owner's Manual
Page 9
... Center 56 Printing Status window 57 Dell Toner Re-order Window 57 Dell Local Printer Setup Utility 57 Print Server TCP/IP Setup Utility 58 Dell Printer Software Uninstall 58 Driver Profiler 59 Dell Printer Configuration Web Tool 59 Connecting the printer to the network 59 Attaching directly ...Setting up for shared printing Point and print 83 Peer-to-peer 84 10 Configure paper trays Dell Workgroup Laser Printer S2500 86 Dell Workgroup Laser Printer S2500n 87 11 Verify printer setup Printing a menu settings page 90 Restoring factory defaults 92 Recommended method 92 Contents 9
... Center 56 Printing Status window 57 Dell Toner Re-order Window 57 Dell Local Printer Setup Utility 57 Print Server TCP/IP Setup Utility 58 Dell Printer Software Uninstall 58 Driver Profiler 59 Dell Printer Configuration Web Tool 59 Connecting the printer to the network 59 Attaching directly ...Setting up for shared printing Point and print 83 Peer-to-peer 84 10 Configure paper trays Dell Workgroup Laser Printer S2500 86 Dell Workgroup Laser Printer S2500n 87 11 Verify printer setup Printing a menu settings page 90 Restoring factory defaults 92 Recommended method 92 Contents 9

Owner's Manual
Page 11
1 SECTION 1 Unpack the printer
1 SECTION 1 Unpack the printer

Owner's Manual
Page 12
....) clearance on the right side of the printer for assistance. Make sure you need to function properly. www.dell.com/supplies | support.dell.com NOTICE: Allow at www.support.dell.com for the cooling fan to repack the printer. 12 Unpack the printer Select a well ventilated location for your printer that provides room for the trays, cover...
....) clearance on the right side of the printer for assistance. Make sure you need to function properly. www.dell.com/supplies | support.dell.com NOTICE: Allow at www.support.dell.com for the cooling fan to repack the printer. 12 Unpack the printer Select a well ventilated location for your printer that provides room for the trays, cover...

Owner's Manual
Page 14
... Remove all cables from the tray. 3 Grasp the base on each side at opposite corners and move it to install it fully into the printer. 14 Install the optional drawer To increase paper capacity, you ordered an optional drawer, follow the instructions below to the location selected for the...purchase one optional 250-sheet drawer or one optional 500-sheet drawer. www.dell.com/supplies | support.dell.com CAUTION: If you are adding an optional drawer sometime after setting up the printer, be sure to turn the printer off, unplug the power cord, and disconnect all packing material and tape ...
... Remove all cables from the tray. 3 Grasp the base on each side at opposite corners and move it to install it fully into the printer. 14 Install the optional drawer To increase paper capacity, you ordered an optional drawer, follow the instructions below to the location selected for the...purchase one optional 250-sheet drawer or one optional 500-sheet drawer. www.dell.com/supplies | support.dell.com CAUTION: If you are adding an optional drawer sometime after setting up the printer, be sure to turn the printer off, unplug the power cord, and disconnect all packing material and tape ...

Owner's Manual
Page 15
SECTION 3 Prepare the printer Positioning the printer Raising the paper rest Attaching an operator panel overlay 3
SECTION 3 Prepare the printer Positioning the printer Raising the paper rest Attaching an operator panel overlay 3

Owner's Manual
Page 16
...it is seated securely on the table or optional drawer. Handhold Tab Connector Slot 2 Lower the printer into place. Make sure it on the drawer. 16 Prepare the printer To position the printer on an optional drawer: 1 Align the tabs, slots, and connector on the drawer with the... underside of the printer. NOTE: If you have one), you have optional memory to position the printer. www.dell.com/supplies | support.dell.com Positioning the printer Once you have selected a location and positioned an optional drawer (if you are...
...it is seated securely on the table or optional drawer. Handhold Tab Connector Slot 2 Lower the printer into place. Make sure it on the drawer. 16 Prepare the printer To position the printer on an optional drawer: 1 Align the tabs, slots, and connector on the drawer with the... underside of the printer. NOTE: If you have one), you have optional memory to position the printer. www.dell.com/supplies | support.dell.com Positioning the printer Once you have selected a location and positioned an optional drawer (if you are...

Owner's Manual
Page 17
Pull the paper rest forward to keep them from sliding out of the output bin. Prepare the printer 17 Raising the paper rest The paper rest holds printed jobs at an angle to raise it.
Pull the paper rest forward to keep them from sliding out of the output bin. Prepare the printer 17 Raising the paper rest The paper rest holds printed jobs at an angle to raise it.

Owner's Manual
Page 18
www.dell.com/supplies | support.dell.com Attaching an operator panel overlay If English is not your preferred language and your printer shipped with an operator panel overlay, attach the overlay that has the appropriately translated light and button names: 1 Peel the protective backing off the overlay. 2 Align the holes in the overlay with the lights and buttons on the operator panel, and then press the overlay into place. 18 Prepare the printer
www.dell.com/supplies | support.dell.com Attaching an operator panel overlay If English is not your preferred language and your printer shipped with an operator panel overlay, attach the overlay that has the appropriately translated light and button names: 1 Peel the protective backing off the overlay. 2 Align the holes in the overlay with the lights and buttons on the operator panel, and then press the overlay into place. 18 Prepare the printer

Owner's Manual
Page 20
...and flash memory cards in the connectors. However, the printer only recognizes one flash memory card at a time. www.dell.com/supplies | support.dell.com CAUTION: If you are installing memory cards sometime after setting up the printer, turn the printer off and unplug the power cord before continuing. You need... upper front door and the multipurpose feeder door. 2 Firmly press on the two tabs simultaneously to install memory cards. Your printer has two memory connectors for other Dell printers may not work with your printer. NOTE: Memory options designed for optional memory cards.
...and flash memory cards in the connectors. However, the printer only recognizes one flash memory card at a time. www.dell.com/supplies | support.dell.com CAUTION: If you are installing memory cards sometime after setting up the printer, turn the printer off and unplug the power cord before continuing. You need... upper front door and the multipurpose feeder door. 2 Firmly press on the two tabs simultaneously to install memory cards. Your printer has two memory connectors for other Dell printers may not work with your printer. NOTE: Memory options designed for optional memory cards.

Owner's Manual
Page 21
Tab Tab 4 Set the cover aside. Install optional memory cards 21 3 Slide the side cover off of the back of the printer as you swing it out to remove it.
Tab Tab 4 Set the cover aside. Install optional memory cards 21 3 Slide the side cover off of the back of the printer as you swing it out to remove it.

Owner's Manual
Page 23
...connector snap into place. NOTICE: Memory cards are easily damaged by static electricity. Memory cards must have 100-pin connectors. Touch something metal on the printer before you want to use. 3 Align the notches on the card with the notches on the connector. 4 Push the memory card firmly into the... connector until the latches on either a printer memory card or a flash memory card. Save the packaging. 2 Push open the latches on both sides of the memory connector you touch a card. 1 ...
...connector snap into place. NOTICE: Memory cards are easily damaged by static electricity. Memory cards must have 100-pin connectors. Touch something metal on the printer before you want to use. 3 Align the notches on the card with the notches on the connector. 4 Push the memory card firmly into the... connector until the latches on either a printer memory card or a flash memory card. Save the packaging. 2 Push open the latches on both sides of the memory connector you touch a card. 1 ...

Owner's Manual
Page 25
Install optional memory cards 25 The top and front tabs snap into their corresponding slots. Make sure both sides. Reattaching the side cover 1 Align the three rear tabs on the side cover with the corresponding slots on the printer. 2 Guide the tabs on both doors snap closed on the top, bottom, and front of the cover into place. 3 Close the upper front door and the multipurpose feeder door.
Install optional memory cards 25 The top and front tabs snap into their corresponding slots. Make sure both sides. Reattaching the side cover 1 Align the three rear tabs on the side cover with the corresponding slots on the printer. 2 Guide the tabs on both doors snap closed on the top, bottom, and front of the cover into place. 3 Close the upper front door and the multipurpose feeder door.

Owner's Manual
Page 27
SECTION 5 Install printer supplies Removing the packaging Installing the print cartridge 5
SECTION 5 Install printer supplies Removing the packaging Installing the print cartridge 5

Owner's Manual
Page 28
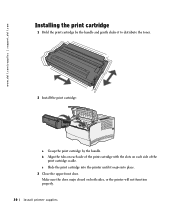
Handle 28 Install printer supplies www.dell.com/supplies | support.dell.com Removing the packaging 1 Open the upper front door. Lift the cartridge out of the printer. Finger grips 2 Grasp the print cartridge by the handle.
Handle 28 Install printer supplies www.dell.com/supplies | support.dell.com Removing the packaging 1 Open the upper front door. Lift the cartridge out of the printer. Finger grips 2 Grasp the print cartridge by the handle.

Owner's Manual
Page 29
3 Remove the packaging material from the cartridge. NOTICE: Do not touch the photoconductor drum on the bottom of the print cartridge. Install printer supplies 29 Retain the packaging material.
3 Remove the packaging material from the cartridge. NOTICE: Do not touch the photoconductor drum on the bottom of the print cartridge. Install printer supplies 29 Retain the packaging material.
Owner's Manual
Page 30
c Slide the print cartridge into the printer until it to distribute the toner. 2 Install the print cartridge: a Grasp the print cartridge by the handle and gently shake it snaps into place. 3 Close the upper front door. www.dell.com/supplies | support.dell.com Installing the print cartridge 1 Hold the print cartridge by the handle. Make sure the door snaps closed on each side of the print cartridge with the slots on both sides, or the printer will not function properly. 30 Install printer supplies b Align the tabs on each side of the print cartridge cradle.
c Slide the print cartridge into the printer until it to distribute the toner. 2 Install the print cartridge: a Grasp the print cartridge by the handle and gently shake it snaps into place. 3 Close the upper front door. www.dell.com/supplies | support.dell.com Installing the print cartridge 1 Hold the print cartridge by the handle. Make sure the door snaps closed on each side of the print cartridge with the slots on both sides, or the printer will not function properly. 30 Install printer supplies b Align the tabs on each side of the print cartridge cradle.

Owner's Manual
Page 32
... labels, transparencies Paper only Paper only Paper, envelopes, labels, transparencies, card stock Go to either 600 or 850 sheets if you can increase the total printer sheet capacity (including the multipurpose feeder) to page... 33 33 33 37 32 Load paper You can find loading instructions. www...
... labels, transparencies Paper only Paper only Paper, envelopes, labels, transparencies, card stock Go to either 600 or 850 sheets if you can increase the total printer sheet capacity (including the multipurpose feeder) to page... 33 33 33 37 32 Load paper You can find loading instructions. www...

Owner's Manual
Page 36
Push it fully into the printer. 36 Load paper www.dell.com/supplies | support.dell.com 9 Squeeze the width guide tab and the width guide together, and then slide the guide to the edge of the print media. 10 Squeeze the length guide tab and the length guide together, and then slide the guide to the edge of the print media. 11 If you are loading an optional 500-sheet tray, close the cover. 12 Reinstall the tray.
Push it fully into the printer. 36 Load paper www.dell.com/supplies | support.dell.com 9 Squeeze the width guide tab and the width guide together, and then slide the guide to the edge of the print media. 10 Squeeze the length guide tab and the length guide together, and then slide the guide to the edge of the print media. 11 If you are loading an optional 500-sheet tray, close the cover. 12 Reinstall the tray.


