
Monitor Users Guide
Page 3
Contents .About your monitor 5 Package contents 5 Product features 6 Identifying parts and controls 7 Monitor specifications 10 Plug and play capability 19 LCD monitor quality and pixel policy 19 Maintenance guidelines 19 .Setting up the monitor 20 Connecting the stand 20 Connecting your monitor 22 Organizing cables 23 Removing the stand 23 .Operating your monitor 25 Power on the monitor 25 Using the control buttons 25 Using the on-screen display (OSD) menu 27 Setting up your monitor 36 Using tilt 38 Contents | 3
Contents .About your monitor 5 Package contents 5 Product features 6 Identifying parts and controls 7 Monitor specifications 10 Plug and play capability 19 LCD monitor quality and pixel policy 19 Maintenance guidelines 19 .Setting up the monitor 20 Connecting the stand 20 Connecting your monitor 22 Organizing cables 23 Removing the stand 23 .Operating your monitor 25 Power on the monitor 25 Using the control buttons 25 Using the on-screen display (OSD) menu 27 Setting up your monitor 36 Using tilt 38 Contents | 3
Monitor Users Guide
Page 5
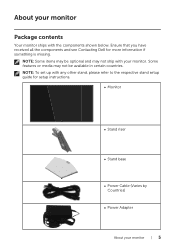
... received all the components and see Contacting Dell for setup instructions. ∞∞ Monitor ∞∞ Stand riser ∞∞ Stand base ∞∞ Power Cable (Varies by Countries) ∞∞ Power Adapter About your monitor | 5 NOTE: Some items may not ship with your monitor Package contents Your monitor ships with any other stand, please...
... received all the components and see Contacting Dell for setup instructions. ∞∞ Monitor ∞∞ Stand riser ∞∞ Stand base ∞∞ Power Cable (Varies by Countries) ∞∞ Power Adapter About your monitor | 5 NOTE: Some items may not ship with your monitor Package contents Your monitor ships with any other stand, please...

Monitor Users Guide
Page 6
... eye comfort with a flicker-free screen and ComfortView feature which minimizes blue light emission. 6 | About your monitor ∞∞ HDMI Cable ∞∞ Quick Setup Guide ∞∞ Safety and Regulatory Information Product features The Dell S2419H/S2419HN/S2419NX/S2719H/S2719HN/S2719NX flat panel display has an active matrix, Thin-Film Transistor (TFT...
... eye comfort with a flicker-free screen and ComfortView feature which minimizes blue light emission. 6 | About your monitor ∞∞ HDMI Cable ∞∞ Quick Setup Guide ∞∞ Safety and Regulatory Information Product features The Dell S2419H/S2419HN/S2419NX/S2719H/S2719HN/S2719NX flat panel display has an active matrix, Thin-Film Transistor (TFT...

Monitor Users Guide
Page 7
Identifying parts and controls Front view 1 2 Control buttons Label Description 1 Function buttons (For more information, see Operating your monitor) 2 Power On/Off button About your monitor | 7
Identifying parts and controls Front view 1 2 Control buttons Label Description 1 Function buttons (For more information, see Operating your monitor) 2 Power On/Off button About your monitor | 7
Monitor Users Guide
Page 8
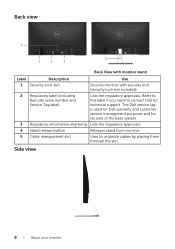
...service management purposes and for technical support. Lists the regulatory approvals. 4 Stand release button Releases stand from monitor. 5 Cable management slot Uses to contact Dell for records of the base system. 3 Regulatory information engraving. Consumo de energía: XX Wh 080-...1042;т/см² X.X Вт X.XВт Q40G024N-700-14A 12V 3.33A S2419Hc S2419H CAN ICES-3 (B)/NMB-3(B) For applicable power supplies see user manual. 3 5 S2419H 12V 3.33A SVC Tag: 1234567 Express Service Code: 123 456 789 0 S/N: CN-12MWYTV100-7B1-001L -...
...service management purposes and for technical support. Lists the regulatory approvals. 4 Stand release button Releases stand from monitor. 5 Cable management slot Uses to contact Dell for records of the base system. 3 Regulatory information engraving. Consumo de energía: XX Wh 080-...1042;т/см² X.X Вт X.XВт Q40G024N-700-14A 12V 3.33A S2419Hc S2419H CAN ICES-3 (B)/NMB-3(B) For applicable power supplies see user manual. 3 5 S2419H 12V 3.33A SVC Tag: 1234567 Express Service Code: 123 456 789 0 S/N: CN-12MWYTV100-7B1-001L -...

Monitor Users Guide
Page 9
Bottom view 1 2 345 1 Bottom view without monitor stand (S2419H/S2719H) 2 345 Bottom view without monitor stand (S2419HN/S2419NX/S2719HN//S2719NX) Label Description Use 1 Speakers Speakers 2 Power-adapter port To connect the monitor power cable using a 12V DC adapter. 3 HDMI1 port Connect your computer with HDMI cable. 4 HDMI2 port Connect your monitor | 9 About your computer with HDMI cable. 5 Audio Line out port Connect to external speakers (Optional Purchase)* *Headphone usage is not supported for the audio line out port.
Bottom view 1 2 345 1 Bottom view without monitor stand (S2419H/S2719H) 2 345 Bottom view without monitor stand (S2419HN/S2419NX/S2719HN//S2719NX) Label Description Use 1 Speakers Speakers 2 Power-adapter port To connect the monitor power cable using a 12V DC adapter. 3 HDMI1 port Connect your computer with HDMI cable. 4 HDMI2 port Connect your monitor | 9 About your computer with HDMI cable. 5 Audio Line out port Connect to external speakers (Optional Purchase)* *Headphone usage is not supported for the audio line out port.
Monitor Users Guide
Page 10
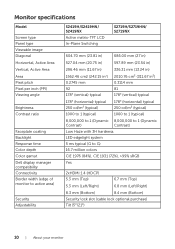
... pitch Pixel per inch (PPI) Viewing angle Brightness Contrast ratio Faceplate coating Backlight Response time Color depth Color gamut Dell display manager compatibility Connectivity Border width (edge of monitor to active area) Security Adjustability S2419H/S2419HN/ S2419NX Active matrix-TFT LCD In-Plane Switching S2719H/S2719HN/ S2719NX 604.70 mm (23.81 in... (Top) 5.3 mm (Left/Right) 6.8 mm (Left/Right) 8.3 mm (Bottom) 8.4 mm (Bottom) Security lock slot (cable lock optional purchase) Tilt (5°/21°) 10 | About your monitor
... pitch Pixel per inch (PPI) Viewing angle Brightness Contrast ratio Faceplate coating Backlight Response time Color depth Color gamut Dell display manager compatibility Connectivity Border width (edge of monitor to active area) Security Adjustability S2419H/S2419HN/ S2419NX Active matrix-TFT LCD In-Plane Switching S2719H/S2719HN/ S2719NX 604.70 mm (23.81 in... (Top) 5.3 mm (Left/Right) 6.8 mm (Left/Right) 8.3 mm (Bottom) 8.4 mm (Bottom) Security lock slot (cable lock optional purchase) Tilt (5°/21°) 10 | About your monitor

Monitor Users Guide
Page 12
...specifications Model Video input signals AC/DC Input voltage/ Adapter frequency/current S2419H/S2419HN/S2419NX/S2719H/S2719HN/ S2719NX HDMI 1.4 (HDCP), 600mV for each ...3 Hz/1.5 A (Max.). Output: 12VDC/3.33A No damage when cold start at 100 VAC~240 VAC Physical characteristics Model S2419H/S2419HN/S2419NX Signal cable type Digital: detachable, HDMI, 19 pins Front-frame gloss (minimum) Black frame - 85 gloss...21.22 in) 47.4 mm (1.87 in) 171.6 mm (6.76 in) 249.0 mm (9.80 in) 152.8 mm (6.01 in) S2419H 6.02 kg (13.27 lb) 4.08 kg (8.99 lb) 3.09 kg (6.81 lb) 0.52 kg (1.15 lb) S2419HN/S2419NX...
...specifications Model Video input signals AC/DC Input voltage/ Adapter frequency/current S2419H/S2419HN/S2419NX/S2719H/S2719HN/ S2719NX HDMI 1.4 (HDCP), 600mV for each ...3 Hz/1.5 A (Max.). Output: 12VDC/3.33A No damage when cold start at 100 VAC~240 VAC Physical characteristics Model S2419H/S2419HN/S2419NX Signal cable type Digital: detachable, HDMI, 19 pins Front-frame gloss (minimum) Black frame - 85 gloss...21.22 in) 47.4 mm (1.87 in) 171.6 mm (6.76 in) 249.0 mm (9.80 in) 152.8 mm (6.01 in) S2419H 6.02 kg (13.27 lb) 4.08 kg (8.99 lb) 3.09 kg (6.81 lb) 0.52 kg (1.15 lb) S2419HN/S2419NX...

Monitor Users Guide
Page 13
... kg (1.46 lb) S2719HN/S2719NX 7.65 kg (16.87 lb) 4.96 kg (10.93 lb) 3.84 kg (8.47 lb) 0.66 kg (1.46 lb) About your monitor | 13
... kg (1.46 lb) S2719HN/S2719NX 7.65 kg (16.87 lb) 4.96 kg (10.93 lb) 3.84 kg (8.47 lb) 0.66 kg (1.46 lb) About your monitor | 13

Monitor Users Guide
Page 14
Environmental characteristics Model Temperature Operating Non-operating Humidity Operating Non-operating Altitude Operating (maximum) Non-operating (maximum) Thermal dissipation S2419H S2419HN/ S2419NX S2719H S2719HN/ S2719NX 0°C to 40°C (32°F to 104°F) ∞∞ Storage: -20°C to 60°C (-4°F to 140&#...;∞ 61.42 BTU/ ∞∞ 88.72 BTU/ ∞∞ 68.24 BTU/ hour (typical) hour (typical) hour (typical) hour (typical) 14 | About your monitor
Environmental characteristics Model Temperature Operating Non-operating Humidity Operating Non-operating Altitude Operating (maximum) Non-operating (maximum) Thermal dissipation S2419H S2419HN/ S2419NX S2719H S2719HN/ S2719NX 0°C to 40°C (32°F to 104°F) ∞∞ Storage: -20°C to 60°C (-4°F to 140&#...;∞ 61.42 BTU/ ∞∞ 88.72 BTU/ ∞∞ 68.24 BTU/ hour (typical) hour (typical) hour (typical) hour (typical) 14 | About your monitor

Monitor Users Guide
Page 15
Power management modes If you have VESA's DPM compliance display card or software installed in your monitor | 15 Power Consumption PON Total Energy Consumption (TEC) Blanked - Power Indicator White White (Glowing ) Off 17 W 53.83 kWh Power Consumption 21 W... be achieved by disconnecting the power cable from the keyboard, mouse or other input devices, the monitor automatically resumes functioning. If the computer detects input from the monitor. S2419H VESA Modes Normal operation Horizontal Vertical Sync Sync Active Active Video Active Active-off mode Switch off ...
Power management modes If you have VESA's DPM compliance display card or software installed in your monitor | 15 Power Consumption PON Total Energy Consumption (TEC) Blanked - Power Indicator White White (Glowing ) Off 17 W 53.83 kWh Power Consumption 21 W... be achieved by disconnecting the power cable from the keyboard, mouse or other input devices, the monitor automatically resumes functioning. If the computer detects input from the monitor. S2419H VESA Modes Normal operation Horizontal Vertical Sync Sync Active Active Video Active Active-off mode Switch off ...

Monitor Users Guide
Page 16
... otherwise. Inactive - Inactive - Accordingly, the customer should not rely upon this information in kWh measured with reference to Energy Star test method. 16 | About your monitor S2719H VESA Modes Normal operation Horizontal Vertical Sync Sync Active Active Video Active Active-off mode Switch off Horizontal Vertical Sync Sync Active Active Video...
... otherwise. Inactive - Inactive - Accordingly, the customer should not rely upon this information in kWh measured with reference to Energy Star test method. 16 | About your monitor S2719H VESA Modes Normal operation Horizontal Vertical Sync Sync Active Active Video Active Active-off mode Switch off Horizontal Vertical Sync Sync Active Active Video...

Monitor Users Guide
Page 17
...mouse to wake it up . If there is pressed in the normal operation mode. S2719H Activate the computer and the monitor to gain access to select the correct input source. Press any key on the keyboard or move the mouse to ...monitor button again to wake it up . The OSD functions only in the Active-off mode, one of the following messages will be displayed: Dell P2418HZ Dell 24 Monitor ? No HDMI1 signal from your device. If there is no display, press the monitor button again to the OSD. Dell P2418HZ Dell 27 Monitor S2419H ? No HDMI1 signal from your monitor...
...mouse to wake it up . If there is pressed in the normal operation mode. S2719H Activate the computer and the monitor to gain access to select the correct input source. Press any key on the keyboard or move the mouse to ...monitor button again to wake it up . The OSD functions only in the Active-off mode, one of the following messages will be displayed: Dell P2418HZ Dell 24 Monitor ? No HDMI1 signal from your device. If there is no display, press the monitor button again to the OSD. Dell P2418HZ Dell 27 Monitor S2419H ? No HDMI1 signal from your monitor...

Monitor Users Guide
Page 18
on device) DDC CLOCK (SCL) DDC DATA (SDA) DDC/CEC Ground +5V POWER HOT PLUG DETECT 18 | About your monitor Pin assignments HDMI connector Pin Number 1 2 3 4 5 6 7 8 9 10 11 12 13 14 15 16 17 18 19 19-pin Side of the Connected Signal Cable TMDS DATA 2+ TMDS DATA 2 SHIELD TMDS DATA 2TMDS DATA 1+ TMDS DATA 1 SHIELD TMDS DATA 1TMDS DATA 0+ TMDS DATA 0 SHIELD TMDS DATA 0TMDS CLOCK+ TMDS CLOCK SHIELD TMDS CLOCKCEC Reserved (N.C.
on device) DDC CLOCK (SCL) DDC DATA (SDA) DDC/CEC Ground +5V POWER HOT PLUG DETECT 18 | About your monitor Pin assignments HDMI connector Pin Number 1 2 3 4 5 6 7 8 9 10 11 12 13 14 15 16 17 18 19 19-pin Side of the Connected Signal Cable TMDS DATA 2+ TMDS DATA 2 SHIELD TMDS DATA 2TMDS DATA 1+ TMDS DATA 1 SHIELD TMDS DATA 1TMDS DATA 0+ TMDS DATA 0 SHIELD TMDS DATA 0TMDS CLOCK+ TMDS CLOCK SHIELD TMDS CLOCKCEC Reserved (N.C.

Monitor Users Guide
Page 19
... the instructions in use. About your monitor WARNING: Before cleaning the monitor, unplug the monitor power cable from the electrical outlet. Most monitor installations are hard to see Dell Support site at www.dell.com/support/monitors. For more pixels to clean the monitor. If possible, use benzene, thinner,...lightly-dampened cloth to become fixed in any kind as the black-colored monitor may get scratched and show white scuff marks. ∞∞ To help maintain the best image quality on Dell Monitor Quality and Pixel Policy, see and do not affect the display quality...
... the instructions in use. About your monitor WARNING: Before cleaning the monitor, unplug the monitor power cable from the electrical outlet. Most monitor installations are hard to see Dell Support site at www.dell.com/support/monitors. For more pixels to clean the monitor. If possible, use benzene, thinner,...lightly-dampened cloth to become fixed in any kind as the black-colored monitor may get scratched and show white scuff marks. ∞∞ To help maintain the best image quality on Dell Monitor Quality and Pixel Policy, see and do not affect the display quality...

Monitor Users Guide
Page 20
Press the stand until it snaps into place. 20 | Setting up instructions. To attach the monitor stand: 1. Place the monitor on the upper part of the monitor. Fit the stand riser and stand base together, and then turn the screw in the stand base. 3. When any other stand is shipped from the ...factory. Setting up the monitor Connecting the stand NOTE: The stand is detached when the monitor is bought, please refer to the groove on the back of the stand to the respective stand setup guide for...
Press the stand until it snaps into place. 20 | Setting up instructions. To attach the monitor stand: 1. Place the monitor on the upper part of the monitor. Fit the stand riser and stand base together, and then turn the screw in the stand base. 3. When any other stand is shipped from the ...factory. Setting up the monitor Connecting the stand NOTE: The stand is detached when the monitor is bought, please refer to the groove on the back of the stand to the respective stand setup guide for...

Monitor Users Guide
Page 21
4. Inserting the stand until the snap locked. Setting up the monitor | 21
4. Inserting the stand until the snap locked. Setting up the monitor | 21

Monitor Users Guide
Page 22
It is recommend to route the cables through the cable-management slot before you begin any of the procedures in this section, follow the Safety Instructions. NOTE: Do not connect all cables to the monitor. Turn Off your monitor to the computer. Connecting your monitor WARNING: Before you connect them to the computer at the same time. Connect the audio or HDMI cable from your monitor to the computer: 1. Connecting the HDMI cable 22 | Setting up the monitor To connect your computer and disconnect the power cable. 2.
It is recommend to route the cables through the cable-management slot before you begin any of the procedures in this section, follow the Safety Instructions. NOTE: Do not connect all cables to the monitor. Turn Off your monitor to the computer. Connecting your monitor WARNING: Before you connect them to the computer at the same time. Connect the audio or HDMI cable from your monitor to the computer: 1. Connecting the HDMI cable 22 | Setting up the monitor To connect your computer and disconnect the power cable. 2.

Monitor Users Guide
Page 23
...any other stand is placed on a soft and clean surface. Place the monitor on the LCD screen while removing the stand, ensure that the monitor is bought, please refer to the respective stand setup guide for a monitor with a stand. Removing the stand NOTE: To prevent scratches on a ...soft cloth or cushion along the desk. 2. To remove the stand: 1. Setting up instructions. Tilt the stand downwards to access to your monitor. Organizing cables Use the cable-management ...
...any other stand is placed on a soft and clean surface. Place the monitor on the LCD screen while removing the stand, ensure that the monitor is bought, please refer to the respective stand setup guide for a monitor with a stand. Removing the stand NOTE: To prevent scratches on a ...soft cloth or cushion along the desk. 2. To remove the stand: 1. Setting up instructions. Tilt the stand downwards to access to your monitor. Organizing cables Use the cable-management ...

Monitor Users Guide
Page 24
While pressing on the release button. 4. Use a long screwdriver to press on the release button, pull the stand out. 24 | Setting up the monitor 3.
While pressing on the release button. 4. Use a long screwdriver to press on the release button, pull the stand out. 24 | Setting up the monitor 3.


