
Low Blue Light Monitor - Important Information
Page 1
...risk of blue light emission from the monitor may cause damage to moisten your eyes or wet your monitor and gaze at a distant object at least 20 seconds during the breaks. Blink frequently to the eyes, including eye fatigue, digital eye strain, and so on DELL low blue light model • ...Optimize eye comfort with water after prolonged usage of time, we suggest you to optimize eye comfort. Look away from the monitor to : 1. A00 Set the distance of the screen between 20 inches...
...risk of blue light emission from the monitor may cause damage to moisten your eyes or wet your monitor and gaze at a distant object at least 20 seconds during the breaks. Blink frequently to the eyes, including eye fatigue, digital eye strain, and so on DELL low blue light model • ...Optimize eye comfort with water after prolonged usage of time, we suggest you to optimize eye comfort. Look away from the monitor to : 1. A00 Set the distance of the screen between 20 inches...
S2418H/S2418HX Quick Start Guide
Page 1
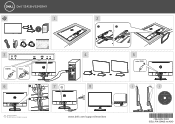
...; 2017 Dell Inc. Dell S2418H/S2418HX S2418HX Drivers and Documentation Dell™ S2418H/S2418HX Monitor Contents: • Device drivers • Quick Setup Guide • User's Guide • Dell Display Manager Software P/N XWGVT Rev. All rights reserved. All rights reserved. 4 HDMI HDMI 7 8 HDMI www.dell.com/support/monitors 5 mini DIN HDMI i 5° 21° i Drivers and Documentation Dell™ S2418H/S2418HX Monitor Contents...
...; 2017 Dell Inc. Dell S2418H/S2418HX S2418HX Drivers and Documentation Dell™ S2418H/S2418HX Monitor Contents: • Device drivers • Quick Setup Guide • User's Guide • Dell Display Manager Software P/N XWGVT Rev. All rights reserved. All rights reserved. 4 HDMI HDMI 7 8 HDMI www.dell.com/support/monitors 5 mini DIN HDMI i 5° 21° i Drivers and Documentation Dell™ S2418H/S2418HX Monitor Contents...
S2418H/S2418HX Users Guide
Page 3
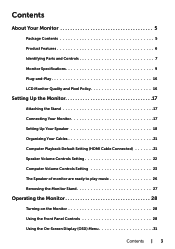
... Contents 5 Product Features 6 Identifying Parts and Controls 7 Monitor Specifications 9 Plug-and-Play 16 LCD Monitor Quality and Pixel Policy 16 Setting Up the Monitor 17 Attaching the Stand 17 Connecting Your Monitor 17 Setting Up Your Speaker 18 Organizing Your Cables 21 Computer Playback Default Setting...21 Speaker Volume Controls Setting 22 Computer Volume Controls Setting 23 The Speaker of monitor are ready to play music 26 Removing the Monitor Stand 27 Operating the Monitor 28 Turning on the Monitor 28 Using the Front Panel Controls 28 Using the On-Screen Display (OSD) ...
... Contents 5 Product Features 6 Identifying Parts and Controls 7 Monitor Specifications 9 Plug-and-Play 16 LCD Monitor Quality and Pixel Policy 16 Setting Up the Monitor 17 Attaching the Stand 17 Connecting Your Monitor 17 Setting Up Your Speaker 18 Organizing Your Cables 21 Computer Playback Default Setting...21 Speaker Volume Controls Setting 22 Computer Volume Controls Setting 23 The Speaker of monitor are ready to play music 26 Removing the Monitor Stand 27 Operating the Monitor 28 Turning on the Monitor 28 Using the Front Panel Controls 28 Using the On-Screen Display (OSD) ...

S2418H/S2418HX Users Guide
Page 4
only) and Other Regulatory Information 51 Contacting Dell 51 Setting Up Your Monitor 52 Maintenance Guidelines 54 4 | Contents Troubleshooting 45 Self-Test 45 Built-in Diagnostics 46 Speaker Quick Troubleshooting Guide 47 Common Problems 49 Product Specific Problems 50 Appendix 51 Safety Instructions 51 FCC Notices (U.S.
only) and Other Regulatory Information 51 Contacting Dell 51 Setting Up Your Monitor 52 Maintenance Guidelines 54 4 | Contents Troubleshooting 45 Self-Test 45 Built-in Diagnostics 46 Speaker Quick Troubleshooting Guide 47 Common Problems 49 Product Specific Problems 50 Appendix 51 Safety Instructions 51 FCC Notices (U.S.

S2418H/S2418HX Users Guide
Page 5
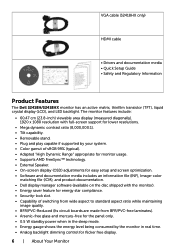
Monitor Stand Speaker Power cable (varies by country) Power adapter About Your Monitor | 5 Some features or media may not be optional and may be available in certain countries. About Your Monitor Package Contents Your monitor ships with your monitor. NOTE: Some items may not ship with the components shown below. Make sure that you have received all the components and contact Dell if something is missing.
Monitor Stand Speaker Power cable (varies by country) Power adapter About Your Monitor | 5 Some features or media may not be optional and may be available in certain countries. About Your Monitor Package Contents Your monitor ships with your monitor. NOTE: Some items may not ship with the components shown below. Make sure that you have received all the components and contact Dell if something is missing.
S2418H/S2418HX Users Guide
Page 6
... an information file (INF), Image‑color matching file (ICM), and product documentation. • Dell display manager software (available on the disc shipped with the monitor). • Energy saver feature for energy star compliance. • Security-lock slot. • Capability... control for flicker free display. 6 | About Your Monitor VGA cable (S2418HX only) HDMI cable • Drivers and documentation media • Quick Setup Guide • Safety and Regulatory Information Product Features The Dell S2418H/S2418HX monitor has an active matrix, thinfilm transistor (TFT), liquid ...
... an information file (INF), Image‑color matching file (ICM), and product documentation. • Dell display manager software (available on the disc shipped with the monitor). • Energy saver feature for energy star compliance. • Security-lock slot. • Capability... control for flicker free display. 6 | About Your Monitor VGA cable (S2418HX only) HDMI cable • Drivers and documentation media • Quick Setup Guide • Safety and Regulatory Information Product Features The Dell S2418H/S2418HX monitor has an active matrix, thinfilm transistor (TFT), liquid ...

S2418H/S2418HX Users Guide
Page 7
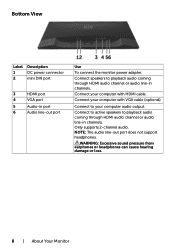
Refer to this label if you need to organize cables by placing them through the slot. Use to contact Dell for technical support. Lists the regulatory approvals. About Your Monitor | 7 Identifying Parts and Controls Front view Label 1 2 Description Function buttons (For more information, see Operating the Monitor) Power on/off button (with LED indicator) Back View Label Description 1 Security-lock slot 2 Barcode, serial number, and Service Tag label 3 Letter etching 4 Cable-management slot Use Secures monitor with security lock (sold separately).
Refer to this label if you need to organize cables by placing them through the slot. Use to contact Dell for technical support. Lists the regulatory approvals. About Your Monitor | 7 Identifying Parts and Controls Front view Label 1 2 Description Function buttons (For more information, see Operating the Monitor) Power on/off button (with LED indicator) Back View Label Description 1 Security-lock slot 2 Barcode, serial number, and Service Tag label 3 Letter etching 4 Cable-management slot Use Secures monitor with security lock (sold separately).
S2418H/S2418HX Users Guide
Page 8
... not support headphones. Connect to playback audio coming through HDMI audio channel or audio line-in port 6 Audio line-out port Use To connect the monitor power adapter. Only supports 2-channel audio. Connect your computer with HDMI cable. WARNING: Excessive sound pressure from earphones or headphones can cause hearing damage or...
... not support headphones. Connect to playback audio coming through HDMI audio channel or audio line-in port 6 Audio line-out port Use To connect the monitor power adapter. Only supports 2-channel audio. Connect your computer with HDMI cable. WARNING: Excessive sound pressure from earphones or headphones can cause hearing damage or...

S2418H/S2418HX Users Guide
Page 9
... to 75 Hz (HDMI2.0) 1920 x 1080 at 60 Hz(VGA/HDMI1.4) 3840 x 2160 at 60 Hz (HDMI2.0) 480p, 576p, 720p, 1080p,2160p (HDMI2.0) About Your Monitor | 9 Monitor Specifications Flat Panel Specifications Screen type Panel type Viewable image Diagonal Active Area Horizontal Vertical Area Pixel pitch Viewing angle (CR>10) Horizontal Vertical Luminance...
... to 75 Hz (HDMI2.0) 1920 x 1080 at 60 Hz(VGA/HDMI1.4) 3840 x 2160 at 60 Hz (HDMI2.0) 480p, 576p, 720p, 1080p,2160p (HDMI2.0) About Your Monitor | 9 Monitor Specifications Flat Panel Specifications Screen type Panel type Viewable image Diagonal Active Area Horizontal Vertical Area Pixel pitch Viewing angle (CR>10) Horizontal Vertical Luminance...
S2418H/S2418HX Users Guide
Page 11
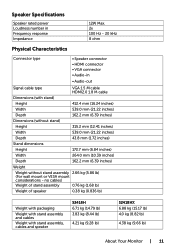
...; HDMI connector • VGA connector • Audio-in • Audio-out Signal cable type VGA 1.5 M cable HDMI2.0 1.8 M cable Dimensions (with stand assembly, cables and speaker S2418H 6.71 kg (14.79 lb) 3.83 kg (8.44 lb) 4.21 kg (9.28 lb) S2418HX 6.88 kg (15.17 lb) 4.0 kg (8.82 lb) 4.38 kg (9.66...
...; HDMI connector • VGA connector • Audio-in • Audio-out Signal cable type VGA 1.5 M cable HDMI2.0 1.8 M cable Dimensions (with stand assembly, cables and speaker S2418H 6.71 kg (14.79 lb) 3.83 kg (8.44 lb) 4.21 kg (9.28 lb) S2418HX 6.88 kg (15.17 lb) 4.0 kg (8.82 lb) 4.38 kg (9.66...

S2418H/S2418HX Users Guide
Page 12
Environmental Characteristics Temperature Operating Non-operating Humidity Operating Non-operating Altitude Operating Non-operating Thermal dissipation 0°C to 40°C (32°F to 104°F) -20°C to 60°C (-4°F to 140°F) 10% to 80% (non-condensing) 5% to 90% (non-condensing) 5,000 m (16,404 ft) (maximum) 12,192 m (40,000 ft) (maximum) 153.6 BTU/hour (maximum) 88.7 BTU/hour (typical) 12 | About Your Monitor
Environmental Characteristics Temperature Operating Non-operating Humidity Operating Non-operating Altitude Operating Non-operating Thermal dissipation 0°C to 40°C (32°F to 104°F) -20°C to 60°C (-4°F to 140°F) 10% to 80% (non-condensing) 5% to 90% (non-condensing) 5,000 m (16,404 ft) (maximum) 12,192 m (40,000 ft) (maximum) 153.6 BTU/hour (maximum) 88.7 BTU/hour (typical) 12 | About Your Monitor
S2418H/S2418HX Users Guide
Page 13
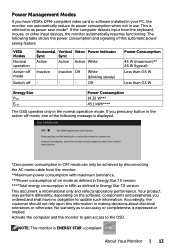
...Energy Star 7.0 version. ****Total energy consumption in kWh as defined in the normal operation mode. Activate the computer and the monitor to gain access to accuracy or completeness is referred to as to the OSD. Inactive Off - - No warranty as power save... customer should not rely upon this automatic power saving feature. This is expressed or implied. If the computer detects input from the monitor. **Maximum power consumption with maximum luminance. ***Power consumption of this information in making decisions about electrical tolerances or otherwise. White (...
...Energy Star 7.0 version. ****Total energy consumption in kWh as defined in the normal operation mode. Activate the computer and the monitor to gain access to accuracy or completeness is referred to as to the OSD. Inactive Off - - No warranty as power save... customer should not rely upon this automatic power saving feature. This is expressed or implied. If the computer detects input from the monitor. **Maximum power consumption with maximum luminance. ***Power consumption of this information in making decisions about electrical tolerances or otherwise. White (...

S2418H/S2418HX Users Guide
Page 14
Pin Assignments VGA connector Pin number 15-pin side of the connected signal cable 1 Video-Red 2 Video-Green 3 Video-Blue 4 GND 5 Self-test 6 GND-R 7 GND-G 8 GND-B 9 Computer 5 V / 3.3 V 10 DDC-GND 11 GND 12 DDC data 13 H-sync 14 V-sync 15 DDC clock 14 | About Your Monitor
Pin Assignments VGA connector Pin number 15-pin side of the connected signal cable 1 Video-Red 2 Video-Green 3 Video-Blue 4 GND 5 Self-test 6 GND-R 7 GND-G 8 GND-B 9 Computer 5 V / 3.3 V 10 DDC-GND 11 GND 12 DDC data 13 H-sync 14 V-sync 15 DDC clock 14 | About Your Monitor

S2418H/S2418HX Users Guide
Page 15
on device) DDC CLOCK (SCL) DDC DATA (SDA) DDC/CEC Ground +5 V POWER HOT PLUG DETECT About Your Monitor | 15 HDMI connector Pin number 1 2 3 4 5 6 7 8 9 10 11 12 13 14 15 16 17 18 19 19-pin side of the connected signal cable TMDS DATA 2+ TMDS DATA 2 SHIELD TMDS DATA 2TMDS DATA 1+ TMDS DATA 1 SHIELD TMDS DATA 1TMDS DATA 0+ TMDS DATA 0 SHIELD TMDS DATA 0TMDS CLOCK+ TMDS CLOCK SHIELD TMDS CLOCKCEC Reserved (N.C.
on device) DDC CLOCK (SCL) DDC DATA (SDA) DDC/CEC Ground +5 V POWER HOT PLUG DETECT About Your Monitor | 15 HDMI connector Pin number 1 2 3 4 5 6 7 8 9 10 11 12 13 14 15 16 17 18 19 19-pin side of the connected signal cable TMDS DATA 2+ TMDS DATA 2 SHIELD TMDS DATA 2TMDS DATA 1+ TMDS DATA 1 SHIELD TMDS DATA 1TMDS DATA 0+ TMDS DATA 0 SHIELD TMDS DATA 0TMDS CLOCK+ TMDS CLOCK SHIELD TMDS CLOCKCEC Reserved (N.C.

S2418H/S2418HX Users Guide
Page 16
... to see Dell support site at: http://www.dell.com/support/monitors. 16 | About Your Monitor LCD Monitor Quality and Pixel Policy During the LCD monitor manufacturing process, it is not uncommon for one or more information about changing the monitor settings, see Operating the Monitor. The monitor automatically provides ...data (EDID) using display data channel (DDC) protocols so the computer can install the monitor in an unchanging state which are automatic; For more information on LCD Monitor Pixel Policy, see and do not affect the display quality or usability. Plug-and-Play...
... to see Dell support site at: http://www.dell.com/support/monitors. 16 | About Your Monitor LCD Monitor Quality and Pixel Policy During the LCD monitor manufacturing process, it is not uncommon for one or more information about changing the monitor settings, see Operating the Monitor. The monitor automatically provides ...data (EDID) using display data channel (DDC) protocols so the computer can install the monitor in an unchanging state which are automatic; For more information on LCD Monitor Pixel Policy, see and do not affect the display quality or usability. Plug-and-Play...
S2418H/S2418HX Users Guide
Page 17
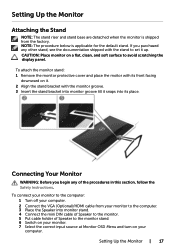
...section, follow the Safety Instructions. CAUTION: Place monitor on your computer. Setting Up the Monitor | 17 If you begin any other stand, see the documentation shipped with the monitor groove. 3 Insert the stand bracket into monitor groove till it snaps into monitor stand. 4 Connect the mini DIN cable of... to avoid scratching the display panel. NOTE: The procedure below is shipped from your monitor to the computer. 3 Place the Speaker into its front facing downward on it up. To connect your monitor to set it . 2 Align the stand bracket with the stand to the computer:...
...section, follow the Safety Instructions. CAUTION: Place monitor on your computer. Setting Up the Monitor | 17 If you begin any other stand, see the documentation shipped with the monitor groove. 3 Insert the stand bracket into monitor groove till it snaps into monitor stand. 4 Connect the mini DIN cable of... to avoid scratching the display panel. NOTE: The procedure below is shipped from your monitor to the computer. 3 Place the Speaker into its front facing downward on it up. To connect your monitor to set it . 2 Align the stand bracket with the stand to the computer:...

S2418H/S2418HX Users Guide
Page 18
Connecting the VGA cable (Optional) Connecting the HDMI cable Setting Up Your Speaker Identify the parts of the speaker and Setting Up Your Speaker 1 Speaker System consists of the cables connected to the system, Right side of the speaker has 2 buttons: volume + (Up) and Volume - (Down). 2 Place the monitor on a stable surface. 18 | Setting Up the Monitor
Connecting the VGA cable (Optional) Connecting the HDMI cable Setting Up Your Speaker Identify the parts of the speaker and Setting Up Your Speaker 1 Speaker System consists of the cables connected to the system, Right side of the speaker has 2 buttons: volume + (Up) and Volume - (Down). 2 Place the monitor on a stable surface. 18 | Setting Up the Monitor

S2418H/S2418HX Users Guide
Page 19
Setting Up the Monitor | 19 3 While holding the speaker above the base, insert the speaker cable through the stand slot. 4 Insert the speaker in a inclined angle onto the hollow space of stand base. 5 Ensure the speaker fully inserted and seated stably on the stand base.
Setting Up the Monitor | 19 3 While holding the speaker above the base, insert the speaker cable through the stand slot. 4 Insert the speaker in a inclined angle onto the hollow space of stand base. 5 Ensure the speaker fully inserted and seated stably on the stand base.

S2418H/S2418HX Users Guide
Page 20
6 Plug in the mini DIN cable to mini DIN connector located at the back of the Dell monitor, as shown below. 7 Insert the cable holder attached on the speaker cable into the stand slot. Adjust the cable holder position along the slot accordingly. 20 | Setting Up the Monitor
6 Plug in the mini DIN cable to mini DIN connector located at the back of the Dell monitor, as shown below. 7 Insert the cable holder attached on the speaker cable into the stand slot. Adjust the cable holder position along the slot accordingly. 20 | Setting Up the Monitor

S2418H/S2418HX Users Guide
Page 21
Organizing Your Cables After attaching all necessary cables to your monitor and computer, (see Connecting Your Monitor for cable attachment) organize all cables as shown above. Setting Up the Monitor | 21 Computer Playback Default Setting (HDMI Cable Connected) Playback Setting 1 Right Click the speaker icon. 2 Select Playback devices.
Organizing Your Cables After attaching all necessary cables to your monitor and computer, (see Connecting Your Monitor for cable attachment) organize all cables as shown above. Setting Up the Monitor | 21 Computer Playback Default Setting (HDMI Cable Connected) Playback Setting 1 Right Click the speaker icon. 2 Select Playback devices.


