
User's Guide
Page 1
.... A01 Environmental Protection Agency. NOTICE: A NOTICE indicates either the entities claiming the marks and names or their products. Dell™ S2409W Flat Panel Monitor User's Guide About Your Monitor Setting Up the Monitor Operating the Monitor Solving Problems Appendix Notes, Notices, and Cautions NOTE: A NOTE indicates important information that this product meets the ENERGY STAR...
.... A01 Environmental Protection Agency. NOTICE: A NOTICE indicates either the entities claiming the marks and names or their products. Dell™ S2409W Flat Panel Monitor User's Guide About Your Monitor Setting Up the Monitor Operating the Monitor Solving Problems Appendix Notes, Notices, and Cautions NOTE: A NOTE indicates important information that this product meets the ENERGY STAR...
User's Guide
Page 2
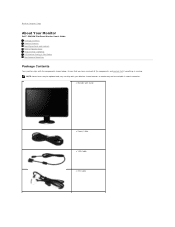
... features or media may not ship with your Monitor. Back to Contents Page About Your Monitor Dell™ S2409W Flat Panel Monitor User's Guide Package Contents Product Features Identifying Parts and Controls Monitor Specifications Plug and Play Capability LCD Monitor Quality & Pixel Policy Maintenance Guidelines Package Contents Your monitor ships with stand l Power Cable l VGA Cable l DVI...
... features or media may not ship with your Monitor. Back to Contents Page About Your Monitor Dell™ S2409W Flat Panel Monitor User's Guide Package Contents Product Features Identifying Parts and Controls Monitor Specifications Plug and Play Capability LCD Monitor Quality & Pixel Policy Maintenance Guidelines Package Contents Your monitor ships with stand l Power Cable l VGA Cable l DVI...
User's Guide
Page 3
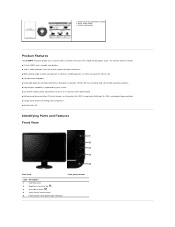
The monitor features include: ■ 24-inch (609.6 mm) viewable area display. ■ 1920 x 1080 resolution, plus full-screen support for lower resolutions. ■ Wide viewing angle ...
The monitor features include: ■ 24-inch (609.6 mm) viewable area display. ■ 1920 x 1080 resolution, plus full-screen support for lower resolutions. ■ Wide viewing angle ...

User's Guide
Page 4
To help secure your monitor. Lists the regulatory approvals. Side View Right side Bottom View Left side Back View Back view Back View with monitor stand Label VESA mounting holes (100mm) 1 (Behind attached base plate) 2 Barcode serial number label 3 Security lock slot 4 Dell Soundbar mounting brackets 5 Regulatory rating label 6 Cable management slot Description/Use To mount the monitor. To organize cables by placing them through the slot. To attach the optional Dell Soundbar. To contact Dell for technical support.
To help secure your monitor. Lists the regulatory approvals. Side View Right side Bottom View Left side Back View Back view Back View with monitor stand Label VESA mounting holes (100mm) 1 (Behind attached base plate) 2 Barcode serial number label 3 Security lock slot 4 Dell Soundbar mounting brackets 5 Regulatory rating label 6 Cable management slot Description/Use To mount the monitor. To organize cables by placing them through the slot. To attach the optional Dell Soundbar. To contact Dell for technical support.

User's Guide
Page 5
... Consumption 45 W (maximum) 31 W (normal)* Less than 2 W Less than 1 W Activate the computer and the monitor to gain access to as Power Save Mode. NOTE: This monitor is detected by disconnecting the main cable from a keyboard, mouse or other input devices is ENERGY STAR®-compliant. Bottom...view Label Description 1 AC power cord connector 2 Audio PC jack 3 Audio line out 4 DVI connector 5 HDMI connector 6 VGA connector Monitor Specifications Power Management Modes If you have VESA's DPMS™ compliance display card or software installed in your PC, the...
... Consumption 45 W (maximum) 31 W (normal)* Less than 2 W Less than 1 W Activate the computer and the monitor to gain access to as Power Save Mode. NOTE: This monitor is detected by disconnecting the main cable from a keyboard, mouse or other input devices is ENERGY STAR®-compliant. Bottom...view Label Description 1 AC power cord connector 2 Audio PC jack 3 Audio line out 4 DVI connector 5 HDMI connector 6 VGA connector Monitor Specifications Power Management Modes If you have VESA's DPMS™ compliance display card or software installed in your PC, the...

User's Guide
Page 9
...a "dark dot." When the pixel remains permanently lit, it is a fixed pixel that the system can configure itself and optimize the monitor settings. The monitor automatically provides the computer system with stand assembly and cables 8.55 kg ( 18.83 lb) 8.09 kg ( 17.82 lb) Weight...5% to 90% (non-condensing) Shipping: 5% to become fixed in any Plug and Play-compatible system. If required, the user can install the monitor in an unchanging state. The visible result is known as a "bright dot." When the pixel remains black, it is automatic. Physical Characteristics Connector ...
...a "dark dot." When the pixel remains permanently lit, it is a fixed pixel that the system can configure itself and optimize the monitor settings. The monitor automatically provides the computer system with stand assembly and cables 8.55 kg ( 18.83 lb) 8.09 kg ( 17.82 lb) Weight...5% to 90% (non-condensing) Shipping: 5% to become fixed in any Plug and Play-compatible system. If required, the user can install the monitor in an unchanging state. The visible result is known as a "bright dot." When the pixel remains black, it is automatic. Physical Characteristics Connector ...

User's Guide
Page 10
In almost every case, these fixed pixels are hard to see Dell Support site at: support.dell.com. CAUTION: Before cleaning the monitor, unplug the monitor from display quality or usability. Do not use a dynamically changing screen saver and turn off with 1 to 5 fixed pixels is considered normal and within competitive ...
In almost every case, these fixed pixels are hard to see Dell Support site at: support.dell.com. CAUTION: Before cleaning the monitor, unplug the monitor from display quality or usability. Do not use a dynamically changing screen saver and turn off with 1 to 5 fixed pixels is considered normal and within competitive ...
User's Guide
Page 11
..., and some services may result in exposure to shock, electrical hazards, and/or mechanical hazards. Verify your area. Back to Contents Page Appendix Dell™ S2409W Flat Panel Monitor User's Guide Safety Instructions FCC Notice (U.S. NOTE: If you do not have an active Internet connection, you . Only) and Other Regulatory Information Contacting...
..., and some services may result in exposure to shock, electrical hazards, and/or mechanical hazards. Verify your area. Back to Contents Page Appendix Dell™ S2409W Flat Panel Monitor User's Guide Safety Instructions FCC Notice (U.S. NOTE: If you do not have an active Internet connection, you . Only) and Other Regulatory Information Contacting...
User's Guide
Page 12
NOTE: If you have a Dell™ desktop or a Dell™ portable computer with internet access 1. Back to http://support.dell.com, enter your service tag, and download the latest driver for your graphics card. 2. Go to Contents Page Back to Contents Page Setting Up Your Monitor Dell™ S2409W Flat Panel Monitor If you are unable to set the resolution to 1920x1080 again. After installing the drivers for your Graphics Adapter, attempt to set the resolution to 1920x1080, please contact Dell™ to inquire about a Graphics Adapter that supports these resolutions.
NOTE: If you have a Dell™ desktop or a Dell™ portable computer with internet access 1. Back to http://support.dell.com, enter your service tag, and download the latest driver for your graphics card. 2. Go to Contents Page Back to Contents Page Setting Up Your Monitor Dell™ S2409W Flat Panel Monitor If you are unable to set the resolution to 1920x1080 again. After installing the drivers for your Graphics Adapter, attempt to set the resolution to 1920x1080, please contact Dell™ to inquire about a Graphics Adapter that supports these resolutions.
User's Guide
Page 13
... the graphic card provider website for updated driver (for your Graphics Adapter, attempt to set the resolution to Contents Page Setting Up Your Monitor Dell™ S2409W Flat Panel Monitor If you are unable to set the resolution to 1920x1080, please contact the manufacturer of your graphics controller supplier from the description at... Advanced. 4. After installing the drivers for example, http://www.ATI.com OR http://www.NVIDIA.com ). 6. Back to 1920x1080 again. NOTE: If you have a non Dell™ desktop, portable computer, or graphic card 1. Select the Settings tab. 3.
... the graphic card provider website for updated driver (for your Graphics Adapter, attempt to set the resolution to Contents Page Setting Up Your Monitor Dell™ S2409W Flat Panel Monitor If you are unable to set the resolution to 1920x1080, please contact the manufacturer of your graphics controller supplier from the description at... Advanced. 4. After installing the drivers for example, http://www.ATI.com OR http://www.NVIDIA.com ). 6. Back to 1920x1080 again. NOTE: If you have a non Dell™ desktop, portable computer, or graphic card 1. Select the Settings tab. 3.
User's Guide
Page 14
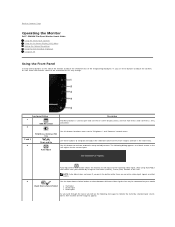
... OSD Menu/Exit 2 Description The Menu button is used to activate automatic setup and adjustment. Back to Contents Page Operating the Monitor Dell™ S2409W Flat Panel Monitor User's Guide Using the Front Panel Controls Using the On-Screen Display (OSD) Menu Setting the Optimal Resolution Using the... Dell Soundbar (Optional) Using the Tilt Using the Front Panel Use the control buttons on the side of the monitor to adjust the characteristics of the characteristics as the monitor self-adjusts to the current input: Auto Adjustment button...
... OSD Menu/Exit 2 Description The Menu button is used to activate automatic setup and adjustment. Back to Contents Page Operating the Monitor Dell™ S2409W Flat Panel Monitor User's Guide Using the Front Panel Controls Using the On-Screen Display (OSD) Menu Setting the Optimal Resolution Using the... Dell Soundbar (Optional) Using the Tilt Using the Front Panel Use the control buttons on the side of the monitor to adjust the characteristics of the characteristics as the monitor self-adjusts to the current input: Auto Adjustment button...

User's Guide
Page 15
...a floating dialog box as shown below appears. Push to another menu, or exit the OSD menu, the monitor automatically saves the changes. Using the On-Screen display (OSD) Menu NOTE: If you change the settings .... Main Menu for Analog (VGA) Input Or Main Menu for the OSD menu to turn the monitor on and fully functional. or or If either proceed to launch the OSD menu and display the ...main menu. Power button (with power light indicator) The green light indicates that the monitor is selected and both VGA and DVI-D cables are also saved if you change the settings and ...
...a floating dialog box as shown below appears. Push to another menu, or exit the OSD menu, the monitor automatically saves the changes. Using the On-Screen display (OSD) Menu NOTE: If you change the settings .... Main Menu for Analog (VGA) Input Or Main Menu for the OSD menu to turn the monitor on and fully functional. or or If either proceed to launch the OSD menu and display the ...main menu. Power button (with power light indicator) The green light indicates that the monitor is selected and both VGA and DVI-D cables are also saved if you change the settings and ...

User's Guide
Page 16
...to increase contrast and Push the button to select the desired parameter. 5. Brightness Brightness adjusts the luminance of all the options available for the monitor. 3. Push the button to increase the brightness and push the button to or exit the main menu. Back Push to go back to decrease... only if further adjustment is highlighted. Push to enter the slide bar and then use the and buttons, according to the indicators on the monitor screen. As you move between the darkest and lightest areas on the menu, to another, the option name is necessary. The Contrast function ...
...to increase contrast and Push the button to select the desired parameter. 5. Brightness Brightness adjusts the luminance of all the options available for the monitor. 3. Push the button to increase the brightness and push the button to or exit the main menu. Back Push to go back to decrease... only if further adjustment is highlighted. Push to enter the slide bar and then use the and buttons, according to the indicators on the monitor screen. As you move between the darkest and lightest areas on the menu, to another, the option name is necessary. The Contrast function ...

User's Guide
Page 17
... analog (VGA) connector. The Input Source menu is only available when you are using the Digital (DVI) connector. Push to your monitor. Auto Adjust Even though your computer recognizes your monitor on startup, the Auto Adjustment function optimizes the display settings for use with your particu Input Source NOTE: In most cases...
... analog (VGA) connector. The Input Source menu is only available when you are using the Digital (DVI) connector. Push to your monitor. Auto Adjust Even though your computer recognizes your monitor on startup, the Auto Adjustment function optimizes the display settings for use with your particu Input Source NOTE: In most cases...

User's Guide
Page 18
... for color-intensive applications (photograph image editing, multimedia, movi Cool Select cool mode to obtain a red tint. Game Mode suitable for sports scenes. If your monitor, choose Graphics. Game Mode suitable for multimedia applications, eg video playback. or NOTE: Image modes are different between the VGA/DVI-D and Video inputs Input...
... for color-intensive applications (photograph image editing, multimedia, movi Cool Select cool mode to obtain a red tint. Game Mode suitable for sports scenes. If your monitor, choose Graphics. Game Mode suitable for multimedia applications, eg video playback. or NOTE: Image modes are different between the VGA/DVI-D and Video inputs Input...

User's Guide
Page 19
...image increases the purple hue in the image NOTE: Hue adjustment is only available for best image quality. Reset Color Settings Returns your monitor color settings to those that were set at the time of the video image. Back Push to go back to adjust the skin ... to adjust the color saturation of manufacture. Maximum is '0' (-). These settings are only available for "VGA" input. Use the and buttons to your monitor to adjust for video input. Saturation Allows you to adjust your preference. Minimum is '100' (+). Use or to adjust the sharpness from '0' to the...
...image increases the purple hue in the image NOTE: Hue adjustment is only available for best image quality. Reset Color Settings Returns your monitor color settings to those that were set at the time of the video image. Back Push to go back to adjust the skin ... to adjust the color saturation of manufacture. Maximum is '0' (-). These settings are only available for "VGA" input. Use the and buttons to your monitor to adjust for video input. Saturation Allows you to adjust your preference. Minimum is '100' (+). Use or to adjust the sharpness from '0' to the...

User's Guide
Page 21
...unlock and allow user access to all OSD settings to the factory preset values. If an image appears to be adjustable via software on the monitor, select LCD Conditioning to adjustments. pushing the menu button for best user experience and optimum performance of image retention are allowed. Severe cases ... (brightness, color balance etc) to or exit the main menu. Reset all applicable settings. Back OSD Warning Messages When the monitor does not support a particular resolution mode you will activate the Menu Lock function. Menu Lock Controls user access to help eliminate any image ...
...unlock and allow user access to all OSD settings to the factory preset values. If an image appears to be adjustable via software on the monitor, select LCD Conditioning to adjustments. pushing the menu button for best user experience and optimum performance of image retention are allowed. Severe cases ... (brightness, color balance etc) to or exit the main menu. Reset all applicable settings. Back OSD Warning Messages When the monitor does not support a particular resolution mode you will activate the Menu Lock function. Menu Lock Controls user access to help eliminate any image ...

User's Guide
Page 22
... all VGA, DVI-D, and HDMI cables are not connected, a floating dialog box as shown below appears. When monitor enters Power Save mode, the following message appears : or Activate the computer and wake up the monitor to gain access to the OSD If you push any button other than the power button one... the selected input: VGA/DVI-D/HDMI input or If either VGA, DVI-D, or HDMI input is 1920 X 1080. or or or This means that the monitor cannot synchronize with the signal that it is receiving from the computer.
... all VGA, DVI-D, and HDMI cables are not connected, a floating dialog box as shown below appears. When monitor enters Power Save mode, the following message appears : or Activate the computer and wake up the monitor to gain access to the OSD If you push any button other than the power button one... the selected input: VGA/DVI-D/HDMI input or If either VGA, DVI-D, or HDMI input is 1920 X 1080. or or or This means that the monitor cannot synchronize with the signal that it is receiving from the computer.
User's Guide
Page 23
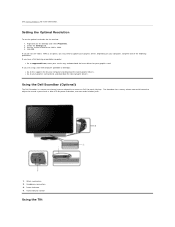
..., complete one of the following procedures. If you may need to the support site for the monitor. 1. If you do not see 1920 x 1080 as an option, you are using a non-Dell computer (portable or desktop): ¡ Go to update your graphics driver. Attach mechanism 2. Headphone... connectors 3. See Solving Problems for your graphics card. If you have a Dell desktop or portable computer: ¡ Go to your service tag, and download the latest driver for more information. Setting the Optimal Resolution To...
..., complete one of the following procedures. If you may need to the support site for the monitor. 1. If you do not see 1920 x 1080 as an option, you are using a non-Dell computer (portable or desktop): ¡ Go to update your graphics driver. Attach mechanism 2. Headphone... connectors 3. See Solving Problems for your graphics card. If you have a Dell desktop or portable computer: ¡ Go to your service tag, and download the latest driver for more information. Setting the Optimal Resolution To...

User's Guide
Page 24
Back to Contents Page NOTE: The stand is attached when the monitor is shipped from the factory. Tilt With the built-in pedestal, you can tilt the monitor for the most comfortable viewing angle.
Back to Contents Page NOTE: The stand is attached when the monitor is shipped from the factory. Tilt With the built-in pedestal, you can tilt the monitor for the most comfortable viewing angle.


