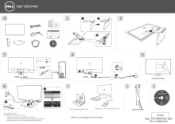
Monitor Setup Diagram
Page 1
AOO) P/N: 4J.30W01.001 All rights reserved. Android and Google Play are either trademarks or registered trademarks of Google Inc. Microsoft and Windows are trademarks of Microsoft Corporation in China. © 2016 Dell Inc. I • ... DelLcom/wirelessmonitors Google Play'" c) Dell Wireless Monitor Dell.com/support/monitors Barcode (DELL P/N: 24MJW Rev. I Y~t, . . L.J ..C) Printed in the United States and/or other countries. ~ l§J ~ 0 3 4 ,e; (e , ~ '-r----t' 0 2 5 6 I• 0 Dell S2317HW1 I • s· 21· At" ....
AOO) P/N: 4J.30W01.001 All rights reserved. Android and Google Play are either trademarks or registered trademarks of Google Inc. Microsoft and Windows are trademarks of Microsoft Corporation in China. © 2016 Dell Inc. I • ... DelLcom/wirelessmonitors Google Play'" c) Dell Wireless Monitor Dell.com/support/monitors Barcode (DELL P/N: 24MJW Rev. I Y~t, . . L.J ..C) Printed in the United States and/or other countries. ~ l§J ~ 0 3 4 ,e; (e , ~ '-r----t' 0 2 5 6 I• 0 Dell S2317HW1 I • s· 21· At" ....

Monitor Users Guide
Page 3
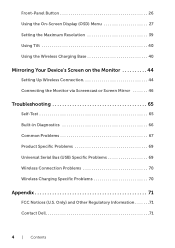
Contents About Your Monitor 5 Introduction 5 Package Contents 5 Product Features 7 Identifying Parts and Controls 8 Monitor Specifications 12 Plug and Play Capability 17 Universal Serial Bus (USB) Interface 18 LCD Monitor Quality and Pixel Policy 18 Maintenance Guidelines 19 Setting Up the Monitor 20 Attaching the Stand 20 Connecting Your Monitor 21 Organizing Your Cables 22 Removing the Monitor Stand 22 Operating the Monitor 24 Power On the Monitor 24 Power Off the Monitor 24 Using the Front-Panel Controls 25 Contents | 3
Contents About Your Monitor 5 Introduction 5 Package Contents 5 Product Features 7 Identifying Parts and Controls 8 Monitor Specifications 12 Plug and Play Capability 17 Universal Serial Bus (USB) Interface 18 LCD Monitor Quality and Pixel Policy 18 Maintenance Guidelines 19 Setting Up the Monitor 20 Attaching the Stand 20 Connecting Your Monitor 21 Organizing Your Cables 22 Removing the Monitor Stand 22 Operating the Monitor 24 Power On the Monitor 24 Power Off the Monitor 24 Using the Front-Panel Controls 25 Contents | 3
Monitor Users Guide
Page 4
...40 Using the Wireless Charging Base 40 Mirroring Your Device's Screen on the Monitor 44 Setting Up Wireless Connection 44 Connecting the Monitor via Screencast or Screen Mirror 46 Troubleshooting 65 Self-Test 65 Built-in Diagnostics... 66 Common Problems 67 Product Specific Problems 69 Universal Serial Bus (USB) Specific Problems 69 Wireless Connection Problems 70 Wireless Charging Specific Problems 70 Appendix 71 FCC Notices (U.S. Only) and Other Regulatory Information 71 Contact Dell...
...40 Using the Wireless Charging Base 40 Mirroring Your Device's Screen on the Monitor 44 Setting Up Wireless Connection 44 Connecting the Monitor via Screencast or Screen Mirror 46 Troubleshooting 65 Self-Test 65 Built-in Diagnostics... 66 Common Problems 67 Product Specific Problems 69 Universal Serial Bus (USB) Specific Problems 69 Wireless Connection Problems 70 Wireless Charging Specific Problems 70 Appendix 71 FCC Notices (U.S. Only) and Other Regulatory Information 71 Contact Dell...

Monitor Users Guide
Page 5
... features or media may not ship with the components shown below. Monitor Stand Arm About Your Monitor | 5 Package Contents Your monitor ships with your monitor. When you connect the Laptop, Tablet & Mobile Phone to the Dell Wireless Monitor, you . The Laptop displayed in certain countries. Dell Wireless Monitor also enables your Laptop & Mobile Phone to be displayed as...
... features or media may not ship with the components shown below. Monitor Stand Arm About Your Monitor | 5 Package Contents Your monitor ships with your monitor. When you connect the Laptop, Tablet & Mobile Phone to the Dell Wireless Monitor, you . The Laptop displayed in certain countries. Dell Wireless Monitor also enables your Laptop & Mobile Phone to be displayed as...
Monitor Users Guide
Page 6
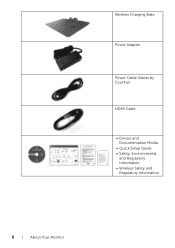
Wireless Charging Base Power Adapter Power Cable (Varies by Country) HDMI Cable • Drivers and Documentation Media • Quick Setup Guide • Safety, Environmental, and Regulatory Information • Wireless Safety and Regulatory Information 6 | About Your Monitor
Wireless Charging Base Power Adapter Power Cable (Varies by Country) HDMI Cable • Drivers and Documentation Media • Quick Setup Guide • Safety, Environmental, and Regulatory Information • Wireless Safety and Regulatory Information 6 | About Your Monitor
Monitor Users Guide
Page 7
Product Features The Dell S2317HWi flat panel display has an active matrix, Thin-Film Transistor (TFT), Liquid Crystal Display (LCD) and LED backlight. the PMA logo is a trademark of the Wireless Power Consortium; About Your Monitor | 7 Reduced. • High Dynamic Contrast Ratio (8,000,000:1). &#...lock slot. • Capability to standard aspect ratio while maintaining the image quality. • TCO-Certified Displays. • BFR/PVC- The monitor features include: • 58.42 cm (23-inch) viewable area display (measured diagonally). 1920 x 1080 resolution, plus full-screen support ...
Product Features The Dell S2317HWi flat panel display has an active matrix, Thin-Film Transistor (TFT), Liquid Crystal Display (LCD) and LED backlight. the PMA logo is a trademark of the Wireless Power Consortium; About Your Monitor | 7 Reduced. • High Dynamic Contrast Ratio (8,000,000:1). &#...lock slot. • Capability to standard aspect ratio while maintaining the image quality. • TCO-Certified Displays. • BFR/PVC- The monitor features include: • 58.42 cm (23-inch) viewable area display (measured diagonally). 1920 x 1080 resolution, plus full-screen support ...

Monitor Users Guide
Page 8
Identifying Parts and Controls Front View Front panel controls Label 1 2 Description Function buttons (For more information, see Operating the Monitor) Power On/Off button (with LED indicator) 8 | About Your Monitor
Identifying Parts and Controls Front View Front panel controls Label 1 2 Description Function buttons (For more information, see Operating the Monitor) Power On/Off button (with LED indicator) 8 | About Your Monitor

Monitor Users Guide
Page 9
... the power cable of the wireless charging stand, with security lock (optional purchase). Secures monitor with a 19.5 V DC power supply. Plugs to contact Dell for technical support. Use to push. Back View Back view with monitor stand Label Description 1 Stand release latch 2 Security-cable slot 3 Barcode serial number label 4 Cable management slot 5 DC...
... the power cable of the wireless charging stand, with security lock (optional purchase). Secures monitor with a 19.5 V DC power supply. Plugs to contact Dell for technical support. Use to push. Back View Back view with monitor stand Label Description 1 Stand release latch 2 Security-cable slot 3 Barcode serial number label 4 Cable management slot 5 DC...

Monitor Users Guide
Page 10
Side View 45-degree side view Label Description 1 Wireless charging LED 2 Wireless charging pad Use Notifies the charging status of your Qi/PMA device. (For more information, see Charge Status LED Behavior) • Charge your Qi (WPC) or PMA compliance devices. • Align your device to the pad to get max charging. 10 | About Your Monitor
Side View 45-degree side view Label Description 1 Wireless charging LED 2 Wireless charging pad Use Notifies the charging status of your Qi/PMA device. (For more information, see Charge Status LED Behavior) • Charge your Qi (WPC) or PMA compliance devices. • Align your device to the pad to get max charging. 10 | About Your Monitor

Monitor Users Guide
Page 11
Other USB devices are restricted to USB Ethernet, USB Thumbdrive or USB 2.0 Hubs. Bottom View Bottom view without monitor stand Label Description 1 Power-adapter port 2 Line-out port 3 HDMI port 4 Micro-B port 5 USB downstream port 6 Regulatory label Use Connects the DC out cable of ... port does not support headphones. This port is for service or debugging only. (NOT for end-user) Connect your USB keyboard and mouse. About Your Monitor | 11
Other USB devices are restricted to USB Ethernet, USB Thumbdrive or USB 2.0 Hubs. Bottom View Bottom view without monitor stand Label Description 1 Power-adapter port 2 Line-out port 3 HDMI port 4 Micro-B port 5 USB downstream port 6 Regulatory label Use Connects the DC out cable of ... port does not support headphones. This port is for service or debugging only. (NOT for end-user) Connect your USB keyboard and mouse. About Your Monitor | 11

Monitor Users Guide
Page 12
... to gray (typical) 16.78 million colors 82% (typical)* * Color gamut (typical) is based on CIE1976 (82%) and CIE1931 (72%) test standards. 12 | About Your Monitor Monitor Specifications Flat Panel Specifications Model Screen type Panel technology Viewable image Diagonal Horizontal, Active Area Vertical, Active Area Area Pixel pitch Viewing angle Luminance output...
... to gray (typical) 16.78 million colors 82% (typical)* * Color gamut (typical) is based on CIE1976 (82%) and CIE1931 (72%) test standards. 12 | About Your Monitor Monitor Specifications Flat Panel Specifications Model Screen type Panel technology Viewable image Diagonal Horizontal, Active Area Vertical, Active Area Area Pixel pitch Viewing angle Luminance output...

Monitor Users Guide
Page 14
Electrical Specifications Model S2317HWi Video input signals HDMI 1.4, 600 mV for each differential line, 100 ohm input impedance per differential pair Inrush current 120 V: 30 A (Max... Dimensions (without stand) Height Width Depth Stand dimensions Height Width Depth Weight Weight with packaging Weight with stand assembly and cables Weight without stand assembly S2317HWi Digital: HDMI, 19 pins 408.1 mm (16.07 inches) 520.7 mm (20.50 inches) 196.1 mm (7.72 inches) 311.6 mm ...(10.33 inches) 196.1 mm (7.72 inches) 6.11 kg (13.47 lbs) 4.5 kg (9.92 lbs) 3.2 kg (7.05 lbs) 14 | About Your Monitor
Electrical Specifications Model S2317HWi Video input signals HDMI 1.4, 600 mV for each differential line, 100 ohm input impedance per differential pair Inrush current 120 V: 30 A (Max... Dimensions (without stand) Height Width Depth Stand dimensions Height Width Depth Weight Weight with packaging Weight with stand assembly and cables Weight without stand assembly S2317HWi Digital: HDMI, 19 pins 408.1 mm (16.07 inches) 520.7 mm (20.50 inches) 196.1 mm (7.72 inches) 311.6 mm ...(10.33 inches) 196.1 mm (7.72 inches) 6.11 kg (13.47 lbs) 4.5 kg (9.92 lbs) 3.2 kg (7.05 lbs) 14 | About Your Monitor

Monitor Users Guide
Page 15
Concurrent WiFi Direct, Screencast WPA, WPA2 HDCP 2.2 Environmental Characteristics Model Temperature Operating Non-operating Humidity Operating Non-operating Altitude Operating S2317HWi 0 °C to 40 °C (32 °F to 104 °F) • Storage: -20 °C to 60 °C (-4 °F to ...; Storage: 5% to 90% (non-condensing) • Shipping: 5% to 90% (non-condensing) 5,000 m (16,404 ft) (maximum) About Your Monitor | 15 Weight of stand assembly Front frame gloss Speaker Specifications 0.82 kg (1.81 lbs) Black frame - 85% gloss unit Model Speaker rated power Frequency Response...
Concurrent WiFi Direct, Screencast WPA, WPA2 HDCP 2.2 Environmental Characteristics Model Temperature Operating Non-operating Humidity Operating Non-operating Altitude Operating S2317HWi 0 °C to 40 °C (32 °F to 104 °F) • Storage: -20 °C to 60 °C (-4 °F to ...; Storage: 5% to 90% (non-condensing) • Shipping: 5% to 90% (non-condensing) 5,000 m (16,404 ft) (maximum) About Your Monitor | 15 Weight of stand assembly Front frame gloss Speaker Specifications 0.82 kg (1.81 lbs) Black frame - 85% gloss unit Model Speaker rated power Frequency Response...

Monitor Users Guide
Page 16
... accuracy or completeness is informational only and reflects laboratory performance. The following message will be displayed: Activate the computer and the monitor to gain access to the OSD. 16 | About Your Monitor VESA Modes Horizontal Vertical Video Sync Sync Power Indicator Power Consumption Normal operation Active Active Active White 55 W (maximum)* 24... BTU/hour (typical) Power Management Modes If you ordered and shall have VESA's DPM™ compliance display card or software installed in your PC, the monitor can automatically reduce its power consumption when not in use.
... accuracy or completeness is informational only and reflects laboratory performance. The following message will be displayed: Activate the computer and the monitor to gain access to the OSD. 16 | About Your Monitor VESA Modes Horizontal Vertical Video Sync Sync Power Indicator Power Consumption Normal operation Active Active Active White 55 W (maximum)* 24... BTU/hour (typical) Power Management Modes If you ordered and shall have VESA's DPM™ compliance display card or software installed in your PC, the monitor can automatically reduce its power consumption when not in use.

Monitor Users Guide
Page 17
... +5V POWER 19 HOT PLUG DETECT Plug and Play Capability You can configure itself and optimize the monitor settings. Most monitor installations are automatic; About Your Monitor | 17 The monitor automatically provides the computer system with its Extended Display Identification Data (EDID) using Display Data Channel (DDC...) protocols so the system can install the monitor in any Plug and Play-compatible system. you can select different settings if desired. Pin Assignments HDMI Connector Pin 19-pin...
... +5V POWER 19 HOT PLUG DETECT Plug and Play Capability You can configure itself and optimize the monitor settings. Most monitor installations are automatic; About Your Monitor | 17 The monitor automatically provides the computer system with its Extended Display Identification Data (EDID) using Display Data Channel (DDC...) protocols so the system can install the monitor in any Plug and Play-compatible system. you can select different settings if desired. Pin Assignments HDMI Connector Pin 19-pin...

Monitor Users Guide
Page 18
... more pixels to become fixed in power-save mode. LCD Monitor Quality and Pixel Policy During the LCD Monitor manufacturing process, it On, the attached peripherals may take a few seconds to see Dell Support site at: http://www.dell.com/support/monitors. 18 | About Your Monitor bottom NOTE: USB 2.0 Ports are hard to resume normal functionality...
... more pixels to become fixed in power-save mode. LCD Monitor Quality and Pixel Policy During the LCD Monitor manufacturing process, it On, the attached peripherals may take a few seconds to see Dell Support site at: http://www.dell.com/support/monitors. 18 | About Your Monitor bottom NOTE: USB 2.0 Ports are hard to resume normal functionality...

Monitor Users Guide
Page 19
... as some detergents leave a milky film on the monitor. • If you notice white powder when you unpack your monitor, wipe it off with a cloth. • Handle your monitor with care as a darker-colored monitor may get scratched and show white scuff marks more ... practices, follow the Safety Instructions before cleaning the monitor. Maintenance Guidelines Cleaning Your Monitor CAUTION: Read and follow the instructions in use. WARNING: Before cleaning the monitor, unplug the monitor power cable from the electrical outlet. About Your Monitor | 19 If possible, use benzene, thinner, ammonia...
... as some detergents leave a milky film on the monitor. • If you notice white powder when you unpack your monitor, wipe it off with a cloth. • Handle your monitor with care as a darker-colored monitor may get scratched and show white scuff marks more ... practices, follow the Safety Instructions before cleaning the monitor. Maintenance Guidelines Cleaning Your Monitor CAUTION: Read and follow the instructions in use. WARNING: Before cleaning the monitor, unplug the monitor power cable from the electrical outlet. About Your Monitor | 19 If possible, use benzene, thinner, ammonia...

Monitor Users Guide
Page 20
... screw handle flat within the recess. 4 Insert the tabs on the upper part of the stand arm into the grooves on the back of the monitor. 5 Press down the stand till it . For setting up any other stand, see the documentation that shipped with it snaps into the stand arm. 3 ...Using the screw handle, tighten the captive screw on a soft cloth or cushion. 2 Insert the wireless charging base into place. 20 | Setting Up the Monitor To attach the monitor stand: 1 Place the monitor on the base. NOTE: The following steps are applicable for connecting the stand that shipped with your...
... screw handle flat within the recess. 4 Insert the tabs on the upper part of the stand arm into the grooves on the back of the monitor. 5 Press down the stand till it . For setting up any other stand, see the documentation that shipped with it snaps into the stand arm. 3 ...Using the screw handle, tighten the captive screw on a soft cloth or cushion. 2 Insert the wireless charging base into place. 20 | Setting Up the Monitor To attach the monitor stand: 1 Place the monitor on the base. NOTE: The following steps are applicable for connecting the stand that shipped with your...

Monitor Users Guide
Page 21
...the same time. NOTE: Route the cables through the cable-management slot before connecting them. To connect your monitor to the computer: 1 Turn Off your monitor to the power adapter port on the monitor. 3 Connect the HDMI cable from your computer and disconnect the power cable. 2 Connect the DC out ... The graphics are used for the purpose of the wireless charging base to the computer at least between the monitor and you perform any of the computer may vary. Setting Up the Monitor | 21 NOTE: Do not connect all cables to the power adapter port on the wireless charging base. ...
...the same time. NOTE: Route the cables through the cable-management slot before connecting them. To connect your monitor to the computer: 1 Turn Off your monitor to the power adapter port on the monitor. 3 Connect the HDMI cable from your computer and disconnect the power cable. 2 Connect the DC out ... The graphics are used for the purpose of the wireless charging base to the computer at least between the monitor and you perform any of the computer may vary. Setting Up the Monitor | 21 NOTE: Do not connect all cables to the power adapter port on the wireless charging base. ...

Monitor Users Guide
Page 22
To remove the stand: 1 Place the monitor on a soft, clean surface. Removing the Monitor Stand NOTE: To prevent scratches on the LCD screen while removing the stand, ensure that the monitor is placed on a soft cloth or cushion. 2 Use a long and thin screwdriver to push the release latch. 22 | Setting Up the Monitor NOTE: After the cables are connected, they will have to be disconnected again to your monitor. Organizing Your Cables Use the cable-management slot to organize the cables connected to route them through the hole.
To remove the stand: 1 Place the monitor on a soft, clean surface. Removing the Monitor Stand NOTE: To prevent scratches on the LCD screen while removing the stand, ensure that the monitor is placed on a soft cloth or cushion. 2 Use a long and thin screwdriver to push the release latch. 22 | Setting Up the Monitor NOTE: After the cables are connected, they will have to be disconnected again to your monitor. Organizing Your Cables Use the cable-management slot to organize the cables connected to route them through the hole.


