Quick Reference Guide
Page 18
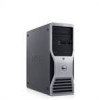
... a device such as digital video cameras and external storage devices. 18 Quick Reference Guide You can use this bay for an optional third hard drive (SATA or SAS), a floppy drive or a Media Card Reader.
... a device such as digital video cameras and external storage devices. 18 Quick Reference Guide You can use this bay for an optional third hard drive (SATA or SAS), a floppy drive or a Media Card Reader.
Quick Reference Guide
Page 23
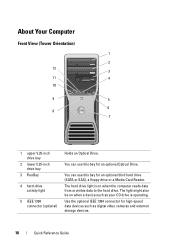
You can use the back USB connectors for an optional Optical Drive or a SATA hard drive. Quick Reference Guide 23 Use the front USB connectors for devices that you use the bay for high-speed data devices such as ... USB devices. (For more information on when the computer reads data from or writes data to a USB device, see "System Setup" in your User's Guide.) Dell recommends that you connect occasionally, such as printers and keyboards. Use the optional IEEE 1394 connector for a floppy drive or a Media Card Reader. Front View...
You can use the back USB connectors for an optional Optical Drive or a SATA hard drive. Quick Reference Guide 23 Use the front USB connectors for devices that you use the bay for high-speed data devices such as ... USB devices. (For more information on when the computer reads data from or writes data to a USB device, see "System Setup" in your User's Guide.) Dell recommends that you connect occasionally, such as printers and keyboards. Use the optional IEEE 1394 connector for a floppy drive or a Media Card Reader. Front View...

User's Guide
Page 19
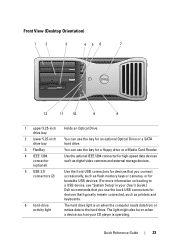
2 About Your Computer Front View of the Computer (Tower Orientation) 1 2 12 3 11 4 10 9 5 6 8 7 1 upper 5.25-inch drive bay 2 lower 5.25-inch drive bay 3 FlexBay 4 hard-drive activity light Use this bay for an optional third hard drive (SATA or SAS), a floppy drive, or a Media Card Reader. Use this bay for an optional optical drive. The light might also be on when the computer reads data from or writes data to the hard drive. The hard drive light is on when a device, such as your CD drive, is operating. About Your Computer 19 Use this bay for an optical drive.
2 About Your Computer Front View of the Computer (Tower Orientation) 1 2 12 3 11 4 10 9 5 6 8 7 1 upper 5.25-inch drive bay 2 lower 5.25-inch drive bay 3 FlexBay 4 hard-drive activity light Use this bay for an optional third hard drive (SATA or SAS), a floppy drive, or a Media Card Reader. Use this bay for an optional optical drive. The light might also be on when the computer reads data from or writes data to the hard drive. The hard drive light is on when a device, such as your CD drive, is operating. About Your Computer 19 Use this bay for an optical drive.

User's Guide
Page 24
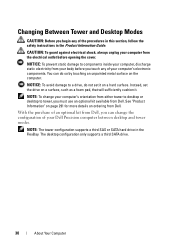
...-inch drive bay Use this bay for an an optical drive. 2 lower 5.25-inch drive bay Use this bay for an optional optical drive or a SATA hard drive. 3 FlexBay Use this bay for a floppy drive or a Media Card Reader. 4 IEEE 1394 connector (optional) Use the optional IEEE 1394 connector for high...
...-inch drive bay Use this bay for an an optical drive. 2 lower 5.25-inch drive bay Use this bay for an optional optical drive or a SATA hard drive. 3 FlexBay Use this bay for a floppy drive or a Media Card Reader. 4 IEEE 1394 connector (optional) Use the optional IEEE 1394 connector for high...

User's Guide
Page 29
... power LED (AUX_PWR) (AUX_LED) 11 RTC reset jumper (RTCRST) 12 battery socket (BATTERY) 13 main power connector (POWER1) 14 SATA connectors (SATA_2, SATA_3, and SATA_4) 15 SATA connectors (SATA_0, SATA_1) 16 floppy drive (DSKT) 17 front panel connector (FRONTPANEL) 18 PCI-X card slot (SLOT6_PCIX) 19 PCI-X...hard drive fan connector (FAN_HDD) (SLOT1_PCIE) 27 memory module connectors (DIMM_1-8) 28 memory fan connector (FAN_MEM) Cable Colors Device SATA hard drive floppy drive optical drive front panel Color blue cable black pull tab orange cable yellow pull tab About Your Computer 29
... power LED (AUX_PWR) (AUX_LED) 11 RTC reset jumper (RTCRST) 12 battery socket (BATTERY) 13 main power connector (POWER1) 14 SATA connectors (SATA_2, SATA_3, and SATA_4) 15 SATA connectors (SATA_0, SATA_1) 16 floppy drive (DSKT) 17 front panel connector (FRONTPANEL) 18 PCI-X card slot (SLOT6_PCIX) 19 PCI-X...hard drive fan connector (FAN_HDD) (SLOT1_PCIE) 27 memory module connectors (DIMM_1-8) 28 memory fan connector (FAN_MEM) Cable Colors Device SATA hard drive floppy drive optical drive front panel Color blue cable black pull tab orange cable yellow pull tab About Your Computer 29
User's Guide
Page 30
... it on ordering from your body before opening the cover. With the purchase of your computer's orientation from Dell. The desktop configuration only supports a third SATA drive. 30 About Your Computer You can change your Dell Precision computer between desktop and tower modes. NOTICE: To prevent static damage to components inside your computer's electronic...
... it on ordering from your body before opening the cover. With the purchase of your computer's orientation from Dell. The desktop configuration only supports a third SATA drive. 30 About Your Computer You can change your Dell Precision computer between desktop and tower modes. NOTICE: To prevent static damage to components inside your computer's electronic...

User's Guide
Page 50
... and reading the next block. If you have two 120-GB drives installed, you have three drives and two are in a RAID array. SAS and SATA drives cannot be mixed in a RAID level 1 configuration, the third drive can be the same size to ensure that you perform regular backups when you...
... and reading the next block. If you have two 120-GB drives installed, you have three drives and two are in a RAID array. SAS and SATA drives cannot be mixed in a RAID level 1 configuration, the third drive can be the same size to ensure that you perform regular backups when you...
User's Guide
Page 53
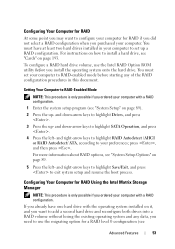
... up - To configure a RAID hard drive volume, use the migrating option for RAID if you did not select a RAID configuration when you need to highlight SATA Operation, and press . 4 Press the left - and down -arrow keys to exit system setup and resume the boot process. You must have one hard drive...
... up - To configure a RAID hard drive volume, use the migrating option for RAID if you did not select a RAID configuration when you need to highlight SATA Operation, and press . 4 Press the left - and down -arrow keys to exit system setup and resume the boot process. You must have one hard drive...
User's Guide
Page 91
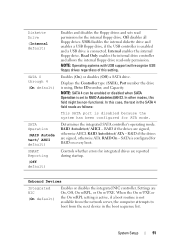
...are signed, otherwise AHCI. Enables (On) or disables (Off) a SATA drive. Determines the integrated SATA controller's operating mode. RAID Autodetect/ ATA - RAID On - Diskette Drive (Internal default) SATA 0 through 4 (On default) SATA Operation (RAID Autode tect/ AHCI default) SMART Reporting (Off default) ... permission for RAID on every boot. Onboard Devices Integrated NIC (On default) Enables or disables the integrated NIC controller. NOTE: SATA 4 can be non-functional. Settings are signed, otherwise ATA. RAID if the drives are reported during startup. When the On...
...are signed, otherwise AHCI. Enables (On) or disables (Off) a SATA drive. Determines the integrated SATA controller's operating mode. RAID Autodetect/ ATA - RAID On - Diskette Drive (Internal default) SATA 0 through 4 (On default) SATA Operation (RAID Autode tect/ AHCI default) SMART Reporting (Off default) ... permission for RAID on every boot. Onboard Devices Integrated NIC (On default) Enables or disables the integrated NIC controller. NOTE: SATA 4 can be non-functional. Settings are signed, otherwise ATA. RAID if the drives are reported during startup. When the On...
User's Guide
Page 94
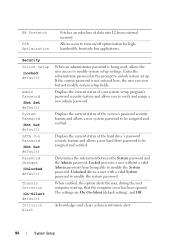
... applications. Acknowledges and clears a chassis intrusion alert. 94 System Setup Security Unlock Setup (Locked default) Admin Password (Not Set default) System Password (Not Set default) SATA 0-n Password (Not Set default) Password Changes (Unlocked default) Chassis Intrusion (On-Silent default) Intrusion Alert When an administrator password is not entered here, the user...
... applications. Acknowledges and clears a chassis intrusion alert. 94 System Setup Security Unlock Setup (Locked default) Admin Password (Not Set default) System Password (Not Set default) SATA 0-n Password (Not Set default) Password Changes (Unlocked default) Chassis Intrusion (On-Silent default) Intrusion Alert When an administrator password is not entered here, the user...

User's Guide
Page 173
Pin Number 1 2 3 4 Signal name 5 V COM COM 12 VC 18-AWG Wire Red Black Black Blue/White DC Power Connector Bay 1 (PATA) Pin Number 1 2 3 4 Signal name 12 VC COM COM 5 V 18-AWG Wire Blue/White Black Black Red DC Power Connectors Bays 1, 2, and 3 (SATA) 5 432 1 Pin Number 1 2 3 4 5 Signal name 3.3 V COM 5V COM 12 VC 18-AWG Wire Orange Black Red Black Blue/White Adding and Replacing Parts 173
Pin Number 1 2 3 4 Signal name 5 V COM COM 12 VC 18-AWG Wire Red Black Black Blue/White DC Power Connector Bay 1 (PATA) Pin Number 1 2 3 4 Signal name 12 VC COM COM 5 V 18-AWG Wire Blue/White Black Black Red DC Power Connectors Bays 1, 2, and 3 (SATA) 5 432 1 Pin Number 1 2 3 4 5 Signal name 3.3 V COM 5V COM 12 VC 18-AWG Wire Orange Black Red Black Blue/White Adding and Replacing Parts 173
User's Guide
Page 205
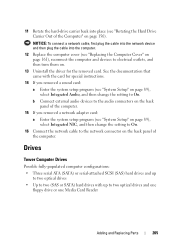
... Card Reader Adding and Replacing Parts 205 See the documentation that came with up to two optical drives • Up to two (SAS or SATA) hard drives with the card for the removed card. Drives Tower Computer Drives Possible fully-populated computer configurations: • Three serial ATA... (SATA) or serial-attached SCSI (SAS) hard drives and up to electrical outlets, and then turn them on. 13 Uninstall the driver for special instructions. ...
... Card Reader Adding and Replacing Parts 205 See the documentation that came with up to two optical drives • Up to two (SAS or SATA) hard drives with the card for the removed card. Drives Tower Computer Drives Possible fully-populated computer configurations: • Three serial ATA... (SATA) or serial-attached SCSI (SAS) hard drives and up to electrical outlets, and then turn them on. 13 Uninstall the driver for special instructions. ...

User's Guide
Page 206
... drive bay (holds optional optical drive) 4 rotatable hard-drive carrier (holds two SAS or SATA drives) Desktop Computer Drives Possible fully-populated computer configurations: • Up to three SATA hard drives or two (internal) SAS and one SATA hard drive, one optical drive, and one floppy drive or Media Card Reader • Up...
... drive bay (holds optional optical drive) 4 rotatable hard-drive carrier (holds two SAS or SATA drives) Desktop Computer Drives Possible fully-populated computer configurations: • Up to three SATA hard drives or two (internal) SAS and one SATA hard drive, one optical drive, and one floppy drive or Media Card Reader • Up...

User's Guide
Page 207
...-inch drive bay (holds an optical drive) 2 lower 5.25-inch drive bay (holds optional optical drive or SATA hard drive) 3 rotatable hard-drive carrier (holds two 4 FlexBay (holds optional floppy drive or SAS or SATA drives) Media Card Reader) About the Metal Shields Present in Some Drive Configurations In certain computer configurations...
...-inch drive bay (holds an optical drive) 2 lower 5.25-inch drive bay (holds optional optical drive or SATA hard drive) 3 rotatable hard-drive carrier (holds two 4 FlexBay (holds optional floppy drive or SAS or SATA drives) Media Card Reader) About the Metal Shields Present in Some Drive Configurations In certain computer configurations...

User's Guide
Page 210
SATA Data Cable Connectors 4 1 2 3 1 SATA data cable 3 SATA drive 2 SATA connector on system board SATA data cable 210 Adding and Replacing Parts
SATA Data Cable Connectors 4 1 2 3 1 SATA data cable 3 SATA drive 2 SATA connector on system board SATA data cable 210 Adding and Replacing Parts

User's Guide
Page 216
1 2 1 drive 2 hard-drive bracket NOTICE: SAS drives and SATA drives cannot be either SATA or SAS hard drives. 9 Slide the hard drive into the hard-drive bay until it clicks securely into place. 10 Connect a power cable to the hard drive. 11 If you are installing a SATA hard drive, connect the data cable to the hard drive. 216 Adding and Replacing Parts The drives in the hard-drive carrier must both be mixed in the rotatable hard-drive carrier.
1 2 1 drive 2 hard-drive bracket NOTICE: SAS drives and SATA drives cannot be either SATA or SAS hard drives. 9 Slide the hard drive into the hard-drive bay until it clicks securely into place. 10 Connect a power cable to the hard drive. 11 If you are installing a SATA hard drive, connect the data cable to the hard drive. 216 Adding and Replacing Parts The drives in the hard-drive carrier must both be mixed in the rotatable hard-drive carrier.

User's Guide
Page 217
... connector on the system board. 12 Ensure that came with the drive for instructions on installing any software required for drive operation. 1 2 3 4 1 P3 power connector 2 SATA data cable 3 hard-drive power cable 4 hard drive NOTICE: If only one hard drive is to be connected to electrical outlets, and turn them on.
... connector on the system board. 12 Ensure that came with the drive for instructions on installing any software required for drive operation. 1 2 3 4 1 P3 power connector 2 SATA data cable 3 hard-drive power cable 4 hard drive NOTICE: If only one hard drive is to be connected to electrical outlets, and turn them on.

User's Guide
Page 218
...instructions. 20 Test the hard drive. See the documentation for instructions. 21 If the drive you begin any of two SAS drives and one SATA drive, the SATA drive must be the boot (primary) drive and must go in the FlexBay. 16 If the drive you just installed is the primary drive... is the primary drive, insert bootable media into drive A. 17 Enter the system setup program (see "Removing the Drive Panel" on a hard surface. See "Dell Diagnostics" on page 136 for your computer from your body before you touch any of the procedures in this procedure. 2 Follow the procedures in the...
...instructions. 20 Test the hard drive. See the documentation for instructions. 21 If the drive you begin any of two SAS drives and one SATA drive, the SATA drive must be the boot (primary) drive and must go in the FlexBay. 16 If the drive you just installed is the primary drive... is the primary drive, insert bootable media into drive A. 17 Enter the system setup program (see "Removing the Drive Panel" on a hard surface. See "Dell Diagnostics" on page 136 for your computer from your body before you touch any of the procedures in this procedure. 2 Follow the procedures in the...
User's Guide
Page 220
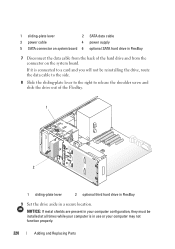
... 9 Set the drive aside in FlexBay 7 Disconnect the data cable from the back of the hard drive and from the connector on system board 6 optional SATA hard drive in a secure location. If it is in use or your computer may not function properly. 220 Adding and Replacing Parts 1 sliding-plate lever...
... 9 Set the drive aside in FlexBay 7 Disconnect the data cable from the back of the hard drive and from the connector on system board 6 optional SATA hard drive in a secure location. If it is in use or your computer may not function properly. 220 Adding and Replacing Parts 1 sliding-plate lever...

User's Guide
Page 223
1 2 1 sliding-plate lever 2 optional third hard drive in FlexBay 10 Connect a power cable to the back of the hard drive. 11 Connect a data cable to the back of the hard drive and, if it is a SATA drive, connect the other end to the SATA_2 connector on the system board. Adding and Replacing Parts 223
1 2 1 sliding-plate lever 2 optional third hard drive in FlexBay 10 Connect a power cable to the back of the hard drive. 11 Connect a data cable to the back of the hard drive and, if it is a SATA drive, connect the other end to the SATA_2 connector on the system board. Adding and Replacing Parts 223


