
System Information Guide
Page 8
... pass the YMARK2000 test, provided the appropriate BIOS upgrade is properly loaded. Year 2000 Statement of Dell's warranty, see the product's documentation. Although these precautions: NOTICE: See "Protecting Against Electrostatic Discharge" in managing the year 2000 rollover. 1-4 Dell Precision WorkStations System Information Guide Previous Products For Dell-branded hardware products shipped prior to the normal...
... pass the YMARK2000 test, provided the appropriate BIOS upgrade is properly loaded. Year 2000 Statement of Dell's warranty, see the product's documentation. Although these precautions: NOTICE: See "Protecting Against Electrostatic Discharge" in managing the year 2000 rollover. 1-4 Dell Precision WorkStations System Information Guide Previous Products For Dell-branded hardware products shipped prior to the normal...

System Documentation Update (Memory Upgrade)
Page 5
... BIOS: 1. Download the BIOS update utility for the computer to http://support.dell.com. Go to be accessed from the Dell support website. Dell Precision™ WorkStation 620 System Memory Upgrade support.dell.com This document provides instructions for upgrading the Rambus inline memory modules (RIMMs) on your current desktop if you have not reinstalled the operating system. Dell Precision 620...
... BIOS: 1. Download the BIOS update utility for the computer to http://support.dell.com. Go to be accessed from the Dell support website. Dell Precision™ WorkStation 620 System Memory Upgrade support.dell.com This document provides instructions for upgrading the Rambus inline memory modules (RIMMs) on your current desktop if you have not reinstalled the operating system. Dell Precision 620...

System Documentation Update (Memory Upgrade)
Page 6
... discharge (ESD). Select FlashBIOS Updates for your personal safety and to prevent damage to be updated. NOTE: For some Dell systems, you are given a choice to create a diskette containing the BIOS update files or to download a file you may need to wait 15 to 30 seconds for it is on page... 1 for the computer to the system from the diskette again. NOTICE: To help avoid possible damage to restart and the Dell logo screen appears, remove the...
... discharge (ESD). Select FlashBIOS Updates for your personal safety and to prevent damage to be updated. NOTE: For some Dell systems, you are given a choice to create a diskette containing the BIOS update files or to download a file you may need to wait 15 to 30 seconds for it is on page... 1 for the computer to the system from the diskette again. NOTICE: To help avoid possible damage to restart and the Dell logo screen appears, remove the...

System Documentation Update (Memory Upgrade)
Page 7
...components and cards with locking tabs; See "Upgrading the BIOS" on the chassis, such as a RIMM by its edges, not by its metal mounting bracket. This computer has two memory expansion cards (MECs), both connectors are disconnecting this operation. Dell Precision 620 systems support a maximum of eight RIMMs (four RIMMs ...connector pins. While you work, periodically touch an unpainted metal surface on the locking tabs before you must upgrade the BIOS. support.dell.com System Memory Upgrade 3 to go out (see the internal system board label that might harm internal components.
...components and cards with locking tabs; See "Upgrading the BIOS" on the chassis, such as a RIMM by its edges, not by its metal mounting bracket. This computer has two memory expansion cards (MECs), both connectors are disconnecting this operation. Dell Precision 620 systems support a maximum of eight RIMMs (four RIMMs ...connector pins. While you work, periodically touch an unpainted metal surface on the locking tabs before you must upgrade the BIOS. support.dell.com System Memory Upgrade 3 to go out (see the internal system board label that might harm internal components.
System Documentation Update (Memory Upgrade)
Page 10
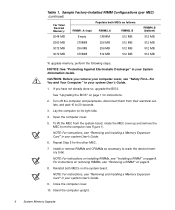
NOTICE: See "Protecting Against Electrostatic Discharge" in your System Information Guide. See "Upgrading the BIOS" on page 9. 8. Turn off the computer and peripherals, disconnect them from the computer (see "Removing and Installing a Memory Expansion Card" in your system User's Guide. ... board. Reinstall both MECs as necessary to 20 seconds. 3. Close the computer cover. 10. CAUTION: Before you have not already done so, upgrade the BIOS. Open the computer cover. 5. To lift the MEC from the system board, rotate the MEC cover up and remove the MEC from their electrical outlets...
NOTICE: See "Protecting Against Electrostatic Discharge" in your System Information Guide. See "Upgrading the BIOS" on page 9. 8. Turn off the computer and peripherals, disconnect them from the computer (see "Removing and Installing a Memory Expansion Card" in your system User's Guide. ... board. Reinstall both MECs as necessary to 20 seconds. 3. Close the computer cover. 10. CAUTION: Before you have not already done so, upgrade the BIOS. Open the computer cover. 5. To lift the MEC from the system board, rotate the MEC cover up and remove the MEC from their electrical outlets...

System Documentation Update (Memory Upgrade)
Page 12
...memory module straight into the socket until they snap open. Installing a RIMM 8 System Memory Upgrade socket NOTE: For information on troubleshooting and running the Dell Diagnostics, see Figure 2): 1. If a RIMM is already installed in the User's Guide. To install a RIMM, perform the following steps (see... to use, you must remove it. securing clips (2) Figure 2. Installing a RIMM NOTICE: Before you upgrade RIMMs, you must upgrade the BIOS. For instructions, see "Removing a RIMM" on page 1 for instructions. NOTICE: To avoid damage to verify that the memory modules are operating properly...
...memory module straight into the socket until they snap open. Installing a RIMM 8 System Memory Upgrade socket NOTE: For information on troubleshooting and running the Dell Diagnostics, see Figure 2): 1. If a RIMM is already installed in the User's Guide. To install a RIMM, perform the following steps (see... to use, you must remove it. securing clips (2) Figure 2. Installing a RIMM NOTICE: Before you upgrade RIMMs, you must upgrade the BIOS. For instructions, see "Removing a RIMM" on page 1 for instructions. NOTICE: To avoid damage to verify that the memory modules are operating properly...


