User Manual
Page 27
...from the middle pane of Share and Storage Management. 2 Right-click and select Properties. 3 Select different tabs to individual users and groups. Review Settings and Create Share allows you to revise the share settings before you want to create the share. 7 Close the confirmation screen. The ...Share and Storage Management. 2 On the right pane, select Provision Share. 3 Browse and select the volume that you actually create it. 6 After reviewing the share settings, click Create to enable as an SMB share and run the wizard. 4 Select SMB as share name followed by granting permissions ...
...from the middle pane of Share and Storage Management. 2 Right-click and select Properties. 3 Select different tabs to individual users and groups. Review Settings and Create Share allows you to revise the share settings before you want to create the share. 7 Close the confirmation screen. The ...Share and Storage Management. 2 On the right pane, select Provision Share. 3 Browse and select the volume that you actually create it. 6 After reviewing the share settings, click Create to enable as an SMB share and run the wizard. 4 Select SMB as share name followed by granting permissions ...
User Manual
Page 32
...exit the wizard. Click Add Required Features to continue, and then click Next. 5 On the Active Directory Lightweight Services window, review the summary information, and then click Next. 6 On the Confirm Installation Selections window, read any informational messages, and then click Install.... 7 Review the Installation Results window to verify that the installation succeeded. 8 Click Close to the Active Directory Lightweight Directory Services Setup Wizard window...
...exit the wizard. Click Add Required Features to continue, and then click Next. 5 On the Active Directory Lightweight Services window, review the summary information, and then click Next. 6 On the Confirm Installation Selections window, read any informational messages, and then click Install.... 7 Review the Installation Results window to verify that the installation succeeded. 8 Click Close to the Active Directory Lightweight Directory Services Setup Wizard window...

User Manual
Page 33
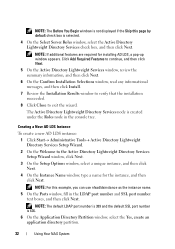
NOTE: MS-InetOrgPerson.LDF and MS-User.LDF are required. 14 On the Ready to Install window, under Selections, review the listed selections, and then click Next. 15 Click Finish to exit the wizard. It warns you that this AD LDS instance cannot replicate data ...
NOTE: MS-InetOrgPerson.LDF and MS-User.LDF are required. 14 On the Ready to Install window, under Selections, review the listed selections, and then click Next. 15 Click Finish to exit the wizard. It warns you that this AD LDS instance cannot replicate data ...
User Manual
Page 40
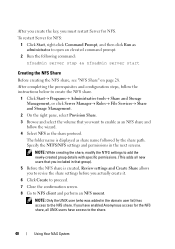
... that you have enabled Anonymous access for NFS. NOTE: Only the UNIX user (who was added in the next screens. The folder name is created, Review settings and Create Share allows you to revise the share settings before you must restart Server for the NFS share, all UNIX users have access...
... that you have enabled Anonymous access for NFS. NOTE: Only the UNIX user (who was added in the next screens. The folder name is created, Review settings and Create Share allows you to revise the share settings before you must restart Server for the NFS share, all UNIX users have access...

User Manual
Page 41
... to the File Screen Policy screen. 4 Select the Apply File Screen check box and select an option for your preferred Quota Properties and click Create. Review settings and Create Share lists the Quota Policy and File Screen Policy details. 5 To make changes, click the Previous button otherwise click Create. Creating Quotas...
... to the File Screen Policy screen. 4 Select the Apply File Screen check box and select an option for your preferred Quota Properties and click Create. Review settings and Create Share lists the Quota Policy and File Screen Policy details. 5 To make changes, click the Previous button otherwise click Create. Creating Quotas...

Getting Started Guide
Page 5
Unpacking the System Unpack your system. Getting Started With Your System 3 Installation and Configuration WARNING: Before performing the following the safety instructions and the rack installation instructions provided with the system. Installing the Rails and System in a Rack Assemble the rails and install the system in the rack following procedure, review the safety instructions that came with your system and identify each item.
Unpacking the System Unpack your system. Getting Started With Your System 3 Installation and Configuration WARNING: Before performing the following the safety instructions and the rack installation instructions provided with the system. Installing the Rails and System in a Rack Assemble the rails and install the system in the rack following procedure, review the safety instructions that came with your system and identify each item.

Hardware Owner's Manual
Page 29
...PCIe expansion cards. Remove and reseat the PCIe expansion cards. About Your System 29 reported an I /O channel The system BIOS has check error. Review & clear SEL. Remove and reseat the PCIe expansion cards. LCD Status Messages (Optional) (continued) Code Text Causes E1710 I /O channel... Review & clear check. Table 1-2. E1711 PCI parity error on Bus ## Device ## Function ## The system BIOS has reported a PCI parity error on a component that ...
...PCIe expansion cards. Remove and reseat the PCIe expansion cards. About Your System 29 reported an I /O channel The system BIOS has check error. Review & clear SEL. Remove and reseat the PCIe expansion cards. LCD Status Messages (Optional) (continued) Code Text Causes E1710 I /O channel... Review & clear check. Table 1-2. E1711 PCI parity error on Bus ## Device ## Function ## The system BIOS has reported a PCI parity error on a component that ...

Hardware Owner's Manual
Page 30
Review has experienced a fault. & clear SEL. from the system. connection. If the problem persists, see "Getting Help" on page 161. See "Troubleshooting Expansion Cards" on page ... cable A SAS cable A is unable to the system for more information and then clear the SEL. Information only. Reseat the cable. The system BIOS has Review & clear determined there has SEL. been an error in PCI configuration space at bus ##, device ##, function ##. Corrective Actions Check the SEL for 10 seconds and...
Review has experienced a fault. & clear SEL. from the system. connection. If the problem persists, see "Getting Help" on page 161. See "Troubleshooting Expansion Cards" on page ... cable A SAS cable A is unable to the system for more information and then clear the SEL. Information only. Reseat the cable. The system BIOS has Review & clear determined there has SEL. been an error in PCI configuration space at bus ##, device ##, function ##. Corrective Actions Check the SEL for 10 seconds and...

Hardware Owner's Manual
Page 34
..." on page 154. configuration. the memory had a Reseat DIMM. not enable memory Check DIMMs. mirroring because of a faulty memory module or an invalid memory configuration. Review User Guide. The system BIOS has Remove AC power to the spared the memory system for 10 seconds and restart the system.
..." on page 154. configuration. the memory had a Reseat DIMM. not enable memory Check DIMMs. mirroring because of a faulty memory module or an invalid memory configuration. Review User Guide. The system BIOS has Remove AC power to the spared the memory system for 10 seconds and restart the system.

Hardware Owner's Manual
Page 35
Power cycle AC The system BIOS has Remove AC power to review all Errors. memory-module pair implicated by the BIOS. Information only. I1911 LCD Log Full. I1912 SEL full. more. About Your System 35 I1910 Intrusion ... events, then clear log. The SEL is full of charge left. System cover has been removed. Check SEL to the disabled memory system for details Review & clear and is unable to greater than 24 hours of events Check the SEL for 10 seconds and mirroring because it has restart the system...
Power cycle AC The system BIOS has Remove AC power to review all Errors. memory-module pair implicated by the BIOS. Information only. I1911 LCD Log Full. I1912 SEL full. more. About Your System 35 I1910 Intrusion ... events, then clear log. The SEL is full of charge left. System cover has been removed. Check SEL to the disabled memory system for details Review & clear and is unable to greater than 24 hours of events Check the SEL for 10 seconds and mirroring because it has restart the system...

Hardware Owner's Manual
Page 43
... is loose or improperly connected. See "Using the System Setup Program and UEFI Boot Manager" on a dual-processor system. Run the System Setup program and review the current settings. Error 8602 Auxiliary Device Failure. Defective mouse or keyboard. Ensure that mouse and keyboard are installed in a valid configuration. See "Getting Help...
... is loose or improperly connected. See "Using the System Setup Program and UEFI Boot Manager" on a dual-processor system. Run the System Setup program and review the current settings. Error 8602 Auxiliary Device Failure. Defective mouse or keyboard. Ensure that mouse and keyboard are installed in a valid configuration. See "Getting Help...
Setting Up Your Dell PowerVault NAS Solution
Page 1
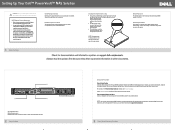
...use the optional iDRAC interface for remote administration. For customers outside the United States, visit support.dell.com, specify your country or region in other documents. 1 PowerVault NX300 storage system 3 2 1. Install the System in this document are available. Default System Name ...CD, DVD, or diskette set up and operate your Dell PowerVault system, review the safety instructions that all documentation and accessories. Setting Up Your Dell™ PowerVault™ NAS Solution WARNING: Before you set of Dell installed software as BACKUP copies of the software installed on...
...use the optional iDRAC interface for remote administration. For customers outside the United States, visit support.dell.com, specify your country or region in other documents. 1 PowerVault NX300 storage system 3 2 1. Install the System in this document are available. Default System Name ...CD, DVD, or diskette set up and operate your Dell PowerVault system, review the safety instructions that all documentation and accessories. Setting Up Your Dell™ PowerVault™ NAS Solution WARNING: Before you set of Dell installed software as BACKUP copies of the software installed on...
