User Manual
Page 27
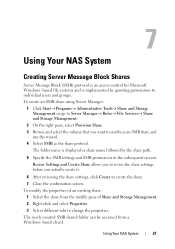
...from the middle pane of Share and Storage Management. 2 Right-click and select Properties. 3 Select different tabs to individual users and groups. Review Settings and Create Share allows you to revise the share settings before you want to create the share. 7 Close the confirmation screen. based ... and Storage Management. 2 On the right pane, select Provision Share. 3 Browse and select the volume that you actually create it. 6 After reviewing the share settings, click Create to enable as an SMB share and run the wizard. 4 Select SMB as share name followed by granting permissions ...
...from the middle pane of Share and Storage Management. 2 Right-click and select Properties. 3 Select different tabs to individual users and groups. Review Settings and Create Share allows you to revise the share settings before you want to create the share. 7 Close the confirmation screen. based ... and Storage Management. 2 On the right pane, select Provision Share. 3 Browse and select the volume that you actually create it. 6 After reviewing the share settings, click Create to enable as an SMB share and run the wizard. 4 Select SMB as share name followed by granting permissions ...
User Manual
Page 32
... click Next. Click Add Required Features to continue, and then click Next. 5 On the Active Directory Lightweight Services window, review the summary information, and then click Next. 6 On the Confirm Installation Selections window, read any informational messages, and then click Install.... 7 Review the Installation Results window to verify that the installation succeeded. 8 Click Close to the Active Directory Lightweight Directory Services Setup Wizard window...
... click Next. Click Add Required Features to continue, and then click Next. 5 On the Active Directory Lightweight Services window, review the summary information, and then click Next. 6 On the Confirm Installation Selections window, read any informational messages, and then click Install.... 7 Review the Installation Results window to verify that the installation succeeded. 8 Click Close to the Active Directory Lightweight Directory Services Setup Wizard window...

User Manual
Page 33
... following format to exit the wizard. NOTE: MS-InetOrgPerson.LDF and MS-User.LDF are required. 14 On the Ready to Install window, under Selections, review the listed selections, and then click Next. 15 Click Finish to type a partition name that AD LDS is based on user: option, and then click...
... following format to exit the wizard. NOTE: MS-InetOrgPerson.LDF and MS-User.LDF are required. 14 On the Ready to Install window, under Selections, review the listed selections, and then click Next. 15 Click Finish to type a partition name that AD LDS is based on user: option, and then click...
User Manual
Page 40
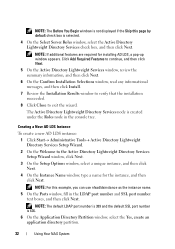
After completing the prerequisites and configuration steps, follow the wizard. 4 Select NFS as the share protocol. The folder name is created, Review settings and Create Share allows you to revise the share settings before you actually create it. 6 Click Create to proceed. 7 Close the confirmation screen. 8 Go ...
After completing the prerequisites and configuration steps, follow the wizard. 4 Select NFS as the share protocol. The folder name is created, Review settings and Create Share allows you to revise the share settings before you actually create it. 6 Click Create to proceed. 7 Close the confirmation screen. 8 Go ...

User Manual
Page 41
... the existing quotas and right-click or use the options in which you want to create the quota), set your Quotas and File Screen operations. Review settings and Create Share lists the Quota Policy and File Screen Policy details. 5 To make changes, click the Previous button otherwise click Create. Option 1: Share...
... the existing quotas and right-click or use the options in which you want to create the quota), set your Quotas and File Screen operations. Review settings and Create Share lists the Quota Policy and File Screen Policy details. 5 To make changes, click the Previous button otherwise click Create. Option 1: Share...

Getting Started Guide
Page 5
Getting Started With Your System 3 Ensure to tighten the screws (if any) on the back of your system have icons indicating which cable to plug into each connector. Installation and Configuration WARNING: Before performing the following procedure, review the safety instructions that came with the system. The connectors on the monitor's cable connector. Optional-Connecting the Keyboard, Mouse, and Monitor Connect the keyboard, mouse, and monitor (optional).
Getting Started With Your System 3 Ensure to tighten the screws (if any) on the back of your system have icons indicating which cable to plug into each connector. Installation and Configuration WARNING: Before performing the following procedure, review the safety instructions that came with the system. The connectors on the monitor's cable connector. Optional-Connecting the Keyboard, Mouse, and Monitor Connect the keyboard, mouse, and monitor (optional).

Hardware Owner's Manual
Page 28
... and then clear the SEL. see "Troubleshooting the Power Supply" on bus ##, device ##, page 143. Check the AC power source for the specified power supply. Review & clear SEL. The system BIOS has reported an I /O channel check error. PCI parity The system BIOS has Remove and reseat the error on page 143... or Check PSU and provide, even with install higher-wattage config. If the problem persists, see "Troubleshooting configuration space at Expansion Cards" on page 135. Review & on a component that If the problem persists, resides in the specified slot.
... and then clear the SEL. see "Troubleshooting the Power Supply" on bus ##, device ##, page 143. Check the AC power source for the specified power supply. Review & clear SEL. The system BIOS has reported an I /O channel check error. PCI parity The system BIOS has Remove and reseat the error on page 143... or Check PSU and provide, even with install higher-wattage config. If the problem persists, see "Troubleshooting configuration space at Expansion Cards" on page 135. Review & on a component that If the problem persists, resides in the specified slot.

Hardware Owner's Manual
Page 29
E1715 Fatal I/O The system BIOS has Error. Remove AC power to the system for 10 seconds, and restart the system. Review determined there has & clear SEL. E1716 Chipset IERR Bus ## Dev ## Function ##. Check the SEL for 10 seconds, and restart the system.... page 157. If the problem persists, see "Troubleshooting Expansion Cards" on page 143. Table 1-1. E1714 Unknown The system BIOS has error. Review determined there & clear SEL. Review & clear SEL. If the problem persists, see "Getting Help" on a component that resides in the system, but is unable to the...
E1715 Fatal I/O The system BIOS has Error. Remove AC power to the system for 10 seconds, and restart the system. Review determined there has & clear SEL. E1716 Chipset IERR Bus ## Dev ## Function ##. Check the SEL for 10 seconds, and restart the system.... page 157. If the problem persists, see "Troubleshooting Expansion Cards" on page 143. Table 1-1. E1714 Unknown The system BIOS has error. Review determined there & clear SEL. Review & clear SEL. If the problem persists, see "Getting Help" on a component that resides in the system, but is unable to the...

Hardware Owner's Manual
Page 30
...system BIOS has internal determined that If the problem persists, resides in the system. Check the SEL for 10 seconds, and restart the system. Review has experienced a fault. & clear SEL. missing or bad. E1812 Hard drive ## The specified hard drive removed. E1A1D Control panel USB ...cable to the system for more information, and then clear the SEL. Install memory or reseat the memory modules. Review processor has had an & clear SEL. E2010 Memory not detected. If the problem persists, see "Getting Help" on bus ##, device ##, ...
...system BIOS has internal determined that If the problem persists, resides in the system. Check the SEL for 10 seconds, and restart the system. Review has experienced a fault. & clear SEL. missing or bad. E1812 Hard drive ## The specified hard drive removed. E1A1D Control panel USB ...cable to the system for more information, and then clear the SEL. Install memory or reseat the memory modules. Review processor has had an & clear SEL. E2010 Memory not detected. If the problem persists, see "Getting Help" on bus ##, device ##, ...

Hardware Owner's Manual
Page 33
.... See "Troubleshooting System Memory" on failure. Check screen message. General failure after video. Check screen for specific error messages. Power cycle AC. Processor configuration failure. Review User Guide. E2022 General failure during POST. LCD Status Messages (continued) Code Text Causes Corrective Actions E201C SMI initializati on page 137. E201E POST memory...
.... See "Troubleshooting System Memory" on failure. Check screen message. General failure after video. Check screen for specific error messages. Power cycle AC. Processor configuration failure. Review User Guide. E2022 General failure during POST. LCD Status Messages (continued) Code Text Causes Corrective Actions E201C SMI initializati on page 137. E201E POST memory...

Hardware Owner's Manual
Page 35
... supply, and then config. Remove AC power to the system, reduce the hardware configuration or install higher-wattage power supply, and then restart the system. Review & clear log. requires more information and then clear the SEL. boot if throttled. The eleventh message instructs the user to log any more power than... LCD. NOTE: For the full name of events and is full of an abbreviation or acronym used in this table, see the Glossary at support.dell.com/manuals. LCD Status Messages (continued) Code Text Causes Corrective Actions I1911 LCD Log Full. provide.
... supply, and then config. Remove AC power to the system, reduce the hardware configuration or install higher-wattage power supply, and then restart the system. Review & clear log. requires more information and then clear the SEL. boot if throttled. The eleventh message instructs the user to log any more power than... LCD. NOTE: For the full name of events and is full of an abbreviation or acronym used in this table, see the Glossary at support.dell.com/manuals. LCD Status Messages (continued) Code Text Causes Corrective Actions I1911 LCD Log Full. provide.

Hardware Owner's Manual
Page 40
Run the System Setup program and review the current settings. Keyboard controller failure Faulty keyboard controller; The USB ports are disabled. Keyboard data line failure Keyboard stuck key failure Keyboard cable connector ...
Run the System Setup program and review the current settings. Keyboard controller failure Faulty keyboard controller; The USB ports are disabled. Keyboard data line failure Keyboard stuck key failure Keyboard cable connector ...

Hardware Owner's Manual
Page 153
... cleared at system boot (pins 3-5) The configuration settings are authorized to disable a password, see "Disabling a Forgotten Password" on page 156. Before you begin this procedure, review the safety instructions that came with the system. System Board Jumpers For information on resetting the password jumper to remove the system cover and access...
... cleared at system boot (pins 3-5) The configuration settings are authorized to disable a password, see "Disabling a Forgotten Password" on page 156. Before you begin this procedure, review the safety instructions that came with the system. System Board Jumpers For information on resetting the password jumper to remove the system cover and access...

Placemat
Page 1
...default password for documentation and information updates on your network, your country/region at support.dell.com/manuals. 3 Power-Up and Connection Procedure For example, in other documents. 1 2 PowerVault NX200 storage system 1. NOTE: You can launch Remote Desktop from the Support menu. Verify Package...You must consider any CD, DVD, or diskette set up and operate your Dell PowerVault system, review the safety instructions that you do not accept the terms of the agreement, please call 800-WWW-DELL (800-999-3355). For information about initial setup, configuring iDRAC, and ...
...default password for documentation and information updates on your network, your country/region at support.dell.com/manuals. 3 Power-Up and Connection Procedure For example, in other documents. 1 2 PowerVault NX200 storage system 1. NOTE: You can launch Remote Desktop from the Support menu. Verify Package...You must consider any CD, DVD, or diskette set up and operate your Dell PowerVault system, review the safety instructions that you do not accept the terms of the agreement, please call 800-WWW-DELL (800-999-3355). For information about initial setup, configuring iDRAC, and ...
