Dell MD Storage Array vCenter Plug-in User’s Guide
Page 8
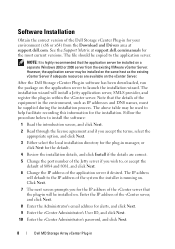
... appropriate option, and click Next. 3 Either select the local installation directory for the plug-in manager, or click Next for the default. 4 Review the installation details, and click Install if the details are correct. 5 Change the port number of the Jetty server if you for the IP ... process. However, the application server may be installed on the application server to help facilitate recording this information for the installation. After the Dell Storage vCenter Plug-in software has been downloaded, run the package on . NOTE: It is running on the same host as IP addresses...
... appropriate option, and click Next. 3 Either select the local installation directory for the plug-in manager, or click Next for the default. 4 Review the installation details, and click Install if the details are correct. 5 Change the port number of the Jetty server if you for the IP ... process. However, the application server may be installed on the application server to help facilitate recording this information for the installation. After the Dell Storage vCenter Plug-in software has been downloaded, run the package on . NOTE: It is running on the same host as IP addresses...
CLI Guide
Page 96
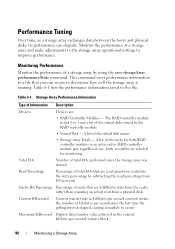
...-second statistic block 96 Maintaining a Storage Array Performance Tuning Over time, as a storage array exchanges data between the hosts and physical disks, its performance can review to determine how well the storage array is running.
...-second statistic block 96 Maintaining a Storage Array Performance Tuning Over time, as a storage array exchanges data between the hosts and physical disks, its performance can review to determine how well the storage array is running.
Getting Started Guide
Page 11
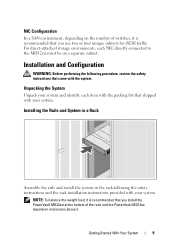
... enclosures above it. Installing the Rails and System in a Rack Assemble the rails and install the system in the rack following procedure, review the safety instructions that you install the PowerVault MD32xxi at the bottom of switches, it is recommended that came with the system. Getting Started With Your System 9 NOTE: To...
... enclosures above it. Installing the Rails and System in a Rack Assemble the rails and install the system in the rack following procedure, review the safety instructions that you install the PowerVault MD32xxi at the bottom of switches, it is recommended that came with the system. Getting Started With Your System 9 NOTE: To...

Owner's Manual
Page 122
...hot spare coverage in the Details area. 7 Click Assign. A message prompts you can select: • View/change current hot spare coverage-to review hot spare coverage and to assign or unassign hot spare physical disks, if necessary. • Right-click the physical disk and select Hot Spare Coverage...click OK. 9 To unassign hot spares, in the Hot Spare Coverage window, select physical disks in the Hot spare physical disks area. 10 Review the information about the hot spare coverage in the Details area. 11 Click Unassign. The Hot Spare Physical Disk Options window is displayed. 8 Select...
...hot spare coverage in the Details area. 7 Click Assign. A message prompts you can select: • View/change current hot spare coverage-to review hot spare coverage and to assign or unassign hot spare physical disks, if necessary. • Right-click the physical disk and select Hot Spare Coverage...click OK. 9 To unassign hot spares, in the Hot Spare Coverage window, select physical disks in the Hot spare physical disks area. 10 Review the information about the hot spare coverage in the Details area. 11 Click Unassign. The Hot Spare Physical Disk Options window is displayed. 8 Select...

Owner's Manual
Page 140
... you move the disk group or import the disk group. NOTE: You must insert all of the disk group into the available physical disk slots. 2 Review the Import Report for non-importable components. 4 Confirm that are part of the physical disks have Optimal status. Importing a Disk Group NOTE: You must export...
... you move the disk group or import the disk group. NOTE: You must insert all of the disk group into the available physical disk slots. 2 Review the Import Report for non-importable components. 4 Confirm that are part of the physical disks have Optimal status. Importing a Disk Group NOTE: You must export...
Deployment Guide
Page 11
... and e-mail alert notifications for hot spares, which automatically replace failed physical disks. Hardware Installation 11 2 Hardware Installation Before using this guide, ensure that you review the instructions in the: • Getting Started Guide-The Getting Started Guide that shipped with daily partial backups. • Consider storage array options, such as...
... and e-mail alert notifications for hot spares, which automatically replace failed physical disks. Hardware Installation 11 2 Hardware Installation Before using this guide, ensure that you review the instructions in the: • Getting Started Guide-The Getting Started Guide that shipped with daily partial backups. • Consider storage array options, such as...

Deployment Guide
Page 32
... host server/storage array configuration. The system from the iSCSI initiator installed on the storage array. iSCSI Configuration Worksheet The iSCSI configuration worksheet helps you review these guidelines before completing the worksheet. 32 Post Installation Tasks The enclosure containing the storage data accessed by some iSCSI devices. Table 4-1. "Guidelines for Configuring...
... host server/storage array configuration. The system from the iSCSI initiator installed on the storage array. iSCSI Configuration Worksheet The iSCSI configuration worksheet helps you review these guidelines before completing the worksheet. 32 Post Installation Tasks The enclosure containing the storage data accessed by some iSCSI devices. Table 4-1. "Guidelines for Configuring...

Deployment Guide
Page 38
... network. The task generally involves the following steps: 1 Discover available storage array(s) for the iSCSI ports. 6 Specify the CHAP authentication method. 7 Apply the settings after reviewing a summary. 8 Repeat the process starting from step 2 to configure additional arrays. When the option is not connected to access the storage arrays. Host Configuration (Host...
... network. The task generally involves the following steps: 1 Discover available storage array(s) for the iSCSI ports. 6 Specify the CHAP authentication method. 7 Apply the settings after reviewing a summary. 8 Repeat the process starting from step 2 to configure additional arrays. When the option is not connected to access the storage arrays. Host Configuration (Host...

Deployment Guide
Page 41
... you want to modify it . Also each image has one management port highlighted in step 12, then on page 61. 10 In the Summary screen, review the information that you entered for the storage array. Each image contains IP addresses of management ports of the controllers.
... you want to modify it . Also each image has one management port highlighted in step 12, then on page 61. 10 In the Summary screen, review the information that you entered for the storage array. Each image contains IP addresses of management ports of the controllers.
Deployment Guide
Page 71
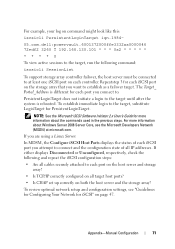
... command: iscsicli SessionList To support storage array controller failover, the host server must be connected to at microsoft.com. To review optimal network setup and configuration settings, see the Microsoft Developers Network (MSDN) at least one iSCSI port on each controller.... configuration state of each iSCSI port you attempt to . For example, your log on command might look like this: iscsicli PersistentLoginTarget iqn.1984- 05.com.dell:powervault.6001372000ffe3332xx0000046 72edf2 3260 T 192.168.130.101 * * * 0x2 * * * * * * * * * 0 To view active sessions to the target, ...
... command: iscsicli SessionList To support storage array controller failover, the host server must be connected to at microsoft.com. To review optimal network setup and configuration settings, see the Microsoft Developers Network (MSDN) at least one iSCSI port on each controller.... configuration state of each iSCSI port you attempt to . For example, your log on command might look like this: iscsicli PersistentLoginTarget iqn.1984- 05.com.dell:powervault.6001372000ffe3332xx0000046 72edf2 3260 T 192.168.130.101 * * * 0x2 * * * * * * * * * 0 To view active sessions to the target, ...
