Hardware Owners Manual
Page 19
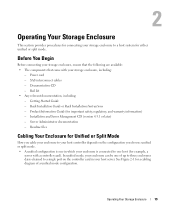
SAS interconnect cables - Rail kit • Any relevant documentation, including: - See Figure 2-1 for either unified or split mode. Readme files Cabling Your Enclosure for Unified or Split Mode How ...
SAS interconnect cables - Rail kit • Any relevant documentation, including: - See Figure 2-1 for either unified or split mode. Readme files Cabling Your Enclosure for Unified or Split Mode How ...

Hardware Owners Manual
Page 31
... must be installed in the Carrier 1 2 3 1 screws (4) 2 drive carrier 3 drive 5 With the drive carrier handle open, carefully align the channel on the drive carrier guide rail with the appropriate drive slot keying feature on the chassis face plate, and insert the drive (see "Troubleshooting SAS and SATA Drives." If the indicator...
... must be installed in the Carrier 1 2 3 1 screws (4) 2 drive carrier 3 drive 5 With the drive carrier handle open, carefully align the channel on the drive carrier guide rail with the appropriate drive slot keying feature on the chassis face plate, and insert the drive (see "Troubleshooting SAS and SATA Drives." If the indicator...

Hardware Owners Manual
Page 33
... in the Carrier 2 1 4 3 1 screws (4) 2 physical disk carrier 3 physical disk 4 interposer 5 With the drive carrier handle open, carefully align the channel on the drive carrier guide rail with the appropriate drive slot keying feature on the chassis face plate, and insert the drive (see "Troubleshooting SAS and SATA Drives." Installing the Drive...
... in the Carrier 2 1 4 3 1 screws (4) 2 physical disk carrier 3 physical disk 4 interposer 5 With the drive carrier handle open, carefully align the channel on the drive carrier guide rail with the appropriate drive slot keying feature on the chassis face plate, and insert the drive (see "Troubleshooting SAS and SATA Drives." Installing the Drive...

Getting Started Guide: (English, Brazilian Portuguese, and Spanish)
Page 7
Getting Started With Your System 5 Installing the Rails and System in a Rack Once you need them later. Keep all shipping materials in case you have read the "Safety Instructions" located in the rack installation documentation for instructions on installing your system in a rack. Unpacking the System Unpack your system, install the rails and the system in the rack. See your rack installation documentation for your system and identify each item.
Getting Started With Your System 5 Installing the Rails and System in a Rack Once you need them later. Keep all shipping materials in case you have read the "Safety Instructions" located in the rack installation documentation for instructions on installing your system in a rack. Unpacking the System Unpack your system, install the rails and the system in the rack. See your rack installation documentation for your system and identify each item.

Getting Started Guide: (English, Simplified Chinese, French, German, Greek, Hebrew, Polish, Russian, Turkish and Spanish)
Page 7
Keep all shipping materials in case you have read the "Safety Instructions" located in the rack installation documentation for instructions on installing your system and identify each item. Unpacking the System Unpack your system in a rack. See your rack installation documentation for your system, install the rails and the system in the rack. Getting Started With Your System 5 Installing the Rails and System in a Rack Once you need them later.
Keep all shipping materials in case you have read the "Safety Instructions" located in the rack installation documentation for instructions on installing your system and identify each item. Unpacking the System Unpack your system in a rack. See your rack installation documentation for your system, install the rails and the system in the rack. Getting Started With Your System 5 Installing the Rails and System in a Rack Once you need them later.

Getting Started Guide (English, Japanese, Korean, Simplified Chinese, and Traditional Chinese)
Page 7
Keep all shipping materials in a rack. See your rack installation documentation for your system, install the rails and the system in the rack. Getting Started With Your System 5 Installing the Rails and System in a Rack Once you have read the "Safety Instructions" located in the rack installation documentation for instructions on installing your system and identify each item. Unpacking the System Unpack your system in case you need them later.
Keep all shipping materials in a rack. See your rack installation documentation for your system, install the rails and the system in the rack. Getting Started With Your System 5 Installing the Rails and System in a Rack Once you have read the "Safety Instructions" located in the rack installation documentation for instructions on installing your system and identify each item. Unpacking the System Unpack your system in case you need them later.

Rack Installation Guide
Page 5
Contents Safety Instructions 5 SAFETY: Rack Mounting of Systems 5 Installation Instructions 6 Before You Begin 6 Important Safety Information 6 Rack Requirements for VersaRails 6 Four-Post Rack Installation 7 Rack Stabilizer Feet 7 Recommended Tools and Supplies 7 RapidRails Rack Kit Contents 8 VersaRails Rack Kit Contents 8 Installation Tasks 9 Removing the Rack Doors 10 Marking the Rack 10 Installing the Mounting Rails in the Rack 12 Installing the System in the Rack 15 Removing the System from the Rack 16 Replacing the Rack Doors 17 Contents 3
Contents Safety Instructions 5 SAFETY: Rack Mounting of Systems 5 Installation Instructions 6 Before You Begin 6 Important Safety Information 6 Rack Requirements for VersaRails 6 Four-Post Rack Installation 7 Rack Stabilizer Feet 7 Recommended Tools and Supplies 7 RapidRails Rack Kit Contents 8 VersaRails Rack Kit Contents 8 Installation Tasks 9 Removing the Rack Doors 10 Marking the Rack 10 Installing the Mounting Rails in the Rack 12 Installing the System in the Rack 15 Removing the System from the Rack 16 Replacing the Rack Doors 17 Contents 3
Rack Installation Guide
Page 7
... under certain circumstances. NOTE: Your system is provided to ensure that the final combination of a rack; Dell disclaims all applicable safety standards and local electric code requirements. the slide rails can pinch your fingers. • After a component is your responsibility to components in a rack, never...8226; Before working environment from the bottom up, and load the heaviest item in a Dell rack cabinet using the customer rack kit. It is inserted into the rack, carefully extend the rail into a locking position, and then slide the component into or out of system and ...
... under certain circumstances. NOTE: Your system is provided to ensure that the final combination of a rack; Dell disclaims all applicable safety standards and local electric code requirements. the slide rails can pinch your fingers. • After a component is your responsibility to components in a rack, never...8226; Before working environment from the bottom up, and load the heaviest item in a Dell rack cabinet using the customer rack kit. It is inserted into the rack, carefully extend the rail into a locking position, and then slide the component into or out of system and ...
Rack Installation Guide
Page 10
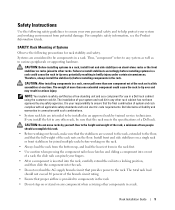
...32 threads per inch. RapidRails Rack Kit Contents The RapidRails rack kit contains the following : • One pair of VersaRails mounting rails • 10-32 x 0.5-inch flange-head Phillips screws (8) NOTE: The nonmetric screws described in illustrations and in procedural steps are... identified by size and number of RapidRails mounting rails Figure 1-1. RapidRails Rack Kit Contents 1 1 Mounting rails (2) VersaRails Rack Kit Contents The VersaRails rack kit contains the following : • One pair of threads per...
...32 threads per inch. RapidRails Rack Kit Contents The RapidRails rack kit contains the following : • One pair of VersaRails mounting rails • 10-32 x 0.5-inch flange-head Phillips screws (8) NOTE: The nonmetric screws described in illustrations and in procedural steps are... identified by size and number of RapidRails mounting rails Figure 1-1. RapidRails Rack Kit Contents 1 1 Mounting rails (2) VersaRails Rack Kit Contents The VersaRails rack kit contains the following : • One pair of threads per...

Rack Installation Guide
Page 11
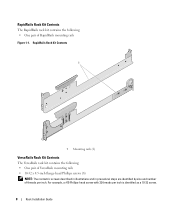
VersaRails Rack Kit Contents 1 2 1 Mounting rails (2) 2 10-32 x 0.5-inch flange-head Phillips screws (8) Installation Tasks Installing a rack kit involves performing the following tasks (described in detail in subsequent sections) in their numbered order: 1 Removing the rack doors 2 Marking the rack 3 Installing the mounting rails in the rack • RapidRails installation • VersaRails installation 4 Installing the system in the rack 5 Replacing the rack doors Rack Installation Guide 9 Figure 1-2.
VersaRails Rack Kit Contents 1 2 1 Mounting rails (2) 2 10-32 x 0.5-inch flange-head Phillips screws (8) Installation Tasks Installing a rack kit involves performing the following tasks (described in detail in subsequent sections) in their numbered order: 1 Removing the rack doors 2 Marking the rack 3 Installing the mounting rails in the rack • RapidRails installation • VersaRails installation 4 Installing the system in the rack 5 Replacing the rack doors Rack Installation Guide 9 Figure 1-2.

Rack Installation Guide
Page 12
... you can make a note of vertical space for removing doors in the documentation provided with center-to mark or place tape on the rack's vertical rail. It is installed in the lowest available position in the rack. 10 Rack Installation Guide Figure 1-3. CAUTION: Store the doors where they will not injure...mm (0.5 inch) 15.9 mm (0.625 inch) 15.9 mm (0.625 inch) 12.7 mm (0.5 inch) CAUTION: If you are installing more than one system, install the mounting rails so that meet EIA-310 standards have round or square holes. CAUTION: Because of the size and weight of 15.9 mm, 15.9 mm, and 12...
... you can make a note of vertical space for removing doors in the documentation provided with center-to mark or place tape on the rack's vertical rail. It is installed in the lowest available position in the rack. 10 Rack Installation Guide Figure 1-3. CAUTION: Store the doors where they will not injure...mm (0.5 inch) 15.9 mm (0.625 inch) 15.9 mm (0.625 inch) 12.7 mm (0.5 inch) CAUTION: If you are installing more than one system, install the mounting rails so that meet EIA-310 standards have round or square holes. CAUTION: Because of the size and weight of 15.9 mm, 15.9 mm, and 12...

Rack Installation Guide
Page 13
Marking the Vertical Rails 1 1 Tape on the vertical rails (see Figure 1-3). 2 Place a second mark 132 mm (5.25 inches) above the first mark you are installing in a rack that meets EIA-310 standards). Figure 1-4. The ... the system you made (or count up nine holes in the rack to be located. This mark should indicates the system's upper edge on vertical rail Rack Installation Guide 11 To mark the rack, perform the following steps: 1 Using a felt-tip pen or masking tape, place a mark on the rack's front...
Marking the Vertical Rails 1 1 Tape on the vertical rails (see Figure 1-3). 2 Place a second mark 132 mm (5.25 inches) above the first mark you are installing in a rack that meets EIA-310 standards). Figure 1-4. The ... the system you made (or count up nine holes in the rack to be located. This mark should indicates the system's upper edge on vertical rail Rack Installation Guide 11 To mark the rack, perform the following steps: 1 Using a felt-tip pen or masking tape, place a mark on the rack's front...
Rack Installation Guide
Page 14
...other side of the rack. 5 Ensure that its mountingbracket flange fits between the marks you placed (or numbered location) on the vertical rails. 2 Push the mounting rail forward until the mounting hooks seat and the blue tab on the top mounting hook pops out and clicks (see Figure 1-5). Then, push... the top hole between the marks or tape you made on the vertical rails (see Figure 1-5). 3 At the back of the cabinet, pull back on both sides of the RapidRails mounting rails so that the mounting rails are mounted at the same vertical position on the mounting-bracket flange until ...
...other side of the rack. 5 Ensure that its mountingbracket flange fits between the marks you placed (or numbered location) on the vertical rails. 2 Push the mounting rail forward until the mounting hooks seat and the blue tab on the top mounting hook pops out and clicks (see Figure 1-5). Then, push... the top hole between the marks or tape you made on the vertical rails (see Figure 1-5). 3 At the back of the cabinet, pull back on both sides of the RapidRails mounting rails so that the mounting rails are mounted at the same vertical position on the mounting-bracket flange until ...

Rack Installation Guide
Page 15
... the marks (or numbered location) on the front vertical rail. 2 Install two 10-32 x 0.5-inch flange-head Phillips screws in the mounting-bracket flange's topand bottom-holes to secure the mounting rail to the front vertical rail. The six holes on the front of the VersaRails mounting... rails so that its mountingbracket flange fits between the marks you made on the vertical rails (see Figure 1-6). Rack Installation Guide 13 Figure 1-5.
... the marks (or numbered location) on the front vertical rail. 2 Install two 10-32 x 0.5-inch flange-head Phillips screws in the mounting-bracket flange's topand bottom-holes to secure the mounting rail to the front vertical rail. The six holes on the front of the VersaRails mounting... rails so that its mountingbracket flange fits between the marks you made on the vertical rails (see Figure 1-6). Rack Installation Guide 13 Figure 1-5.

Rack Installation Guide
Page 16
... of the cabinet, pull back on the mounting-bracket flange until the mounting holes align with their respective holes on the back vertical rail. 4 Install two 10-32 x 0.5-inch flange-head Phillips screws in the back mounting-bracket flange's topand bottom-holes to secure the mounting... rail to the back vertical rail. 5 Repeat step 1 through step 4 for the mounting rail on the other side of the rack. 6 Ensure that the mounting rails are mounted at the same position on the vertical...
... of the cabinet, pull back on the mounting-bracket flange until the mounting holes align with their respective holes on the back vertical rail. 4 Install two 10-32 x 0.5-inch flange-head Phillips screws in the back mounting-bracket flange's topand bottom-holes to secure the mounting... rail to the back vertical rail. 5 Repeat step 1 through step 4 for the mounting rail on the other side of the rack. 6 Ensure that the mounting rails are mounted at the same position on the vertical...

Rack Installation Guide
Page 17
...If you installed in the rack cabinet. Installing the System in the Rack 1 2 1 Mounting rails (2) 2 Thumbscrews (2) 2 Slide the system fully into the rack until the system front panel is touching the vertical rails (see Figure 1-7). 3 Tighten the captive thumbscrews on the rack, perform the following procedure: 1... From the front of the rack, position the system in the mounting rails by yourself. CAUTION: Because of the size and weight of the system, never attempt to install the system in front of the system's...
...If you installed in the rack cabinet. Installing the System in the Rack 1 2 1 Mounting rails (2) 2 Thumbscrews (2) 2 Slide the system fully into the rack until the system front panel is touching the vertical rails (see Figure 1-7). 3 Tighten the captive thumbscrews on the rack, perform the following procedure: 1... From the front of the rack, position the system in the mounting rails by yourself. CAUTION: Because of the size and weight of the system, never attempt to install the system in front of the system's...

Rack Installation Guide
Page 18
Removing the System from the electrical outlet. To remove the system from the rack, perform the following procedure: 1 Turn off the system and attached peripherals, and disconnect the system from the Rack 1 2 1 Mounting rails (2) 2 Thumbscrews (2) 3 3 Release button (2) 16 Rack Installation Guide Removing the System from the Rack CAUTION: Because of the size and weight of the system, never attempt to remove the system from the mounting rails by yourself. Figure 1-8.
Removing the System from the electrical outlet. To remove the system from the rack, perform the following procedure: 1 Turn off the system and attached peripherals, and disconnect the system from the Rack 1 2 1 Mounting rails (2) 2 Thumbscrews (2) 3 3 Release button (2) 16 Rack Installation Guide Removing the System from the Rack CAUTION: Because of the size and weight of the system, never attempt to remove the system from the mounting rails by yourself. Figure 1-8.

Rack Installation Guide
Page 19
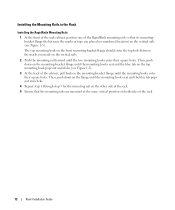
... 10 inches out of the rack, or until the latches on either side of the system catch on the rectangular stop holes on the vertical rails (see Figure 1-7). 4 With the help of another person on the other side of the rack, depress the round release buttons (blue) on each side of...
... 10 inches out of the rack, or until the latches on either side of the system catch on the rectangular stop holes on the vertical rails (see Figure 1-7). 4 With the help of another person on the other side of the rack, depress the round release buttons (blue) on each side of...

