
Dell PowerEdge R720 and R720xd Owner's Manual
Page 27
... devices. Menu Item BIOS Boot Settings Description Allows you to enable or disable UEFI Boot options. UEFI Boot Settings Allows you to enable or disable BIOS Boot options. User Accessible USB Allows you to On. Internal USB Port Allows you enable or disable the user accessible USB ports. Internal SD Card ...Timer Allows you to All Ports On. NOTE: This option is enabled only if the boot mode is Enabled. One-Time Boot Allows you to Enabled. By default, the User Accessible USB Ports option is set to On. By default, Internal SD Card Port option is set...
... devices. Menu Item BIOS Boot Settings Description Allows you to enable or disable UEFI Boot options. UEFI Boot Settings Allows you to enable or disable BIOS Boot options. User Accessible USB Allows you to On. Internal USB Port Allows you enable or disable the user accessible USB ports. Internal SD Card ...Timer Allows you to All Ports On. NOTE: This option is enabled only if the boot mode is Enabled. One-Time Boot Allows you to Enabled. By default, the User Accessible USB Ports option is set to On. By default, Internal SD Card Port option is set...

Dell PowerEdge R720 and R720xd Owner's Manual
Page 61
... not authorized by Dell is detected by a certified service technician. Insert the USB key into the USB connector. 6. USB memory key connector 2. Close the system. 7. Reconnect the system to servicing that came with a boot image and then specify the USB memory key in the boot sequence in the ...System Setup. NOTE: To locate the internal USB connector (J_USB_INT) on the system board. Turn off the system, including any attached...
... not authorized by Dell is detected by a certified service technician. Insert the USB key into the USB connector. 6. USB memory key connector 2. Close the system. 7. Reconnect the system to servicing that came with a boot image and then specify the USB memory key in the boot sequence in the ...System Setup. NOTE: To locate the internal USB connector (J_USB_INT) on the system board. Turn off the system, including any attached...

Dell PowerEdge R720 and R720xd Owner's Manual
Page 125
Damage due to servicing that is not authorized by Dell is resolved, restart the system, enter the System Setup, and check if the non-functioning USB ports are securely attached to the external connectors on the opposite side of the system. 3. Troubleshooting System Startup Failure If ... the problem is not covered by your product documentation, or as authorized in which you boot the system to the BIOS boot mode after installing an operating system from the system to the USB port(s) on your system before troubleshooting any external devices. 4 Troubleshooting Your System Safety First...
Damage due to servicing that is not authorized by Dell is resolved, restart the system, enter the System Setup, and check if the non-functioning USB ports are securely attached to the external connectors on the opposite side of the system. 3. Troubleshooting System Startup Failure If ... the problem is not covered by your product documentation, or as authorized in which you boot the system to the BIOS boot mode after installing an operating system from the system to the USB port(s) on your system before troubleshooting any external devices. 4 Troubleshooting Your System Safety First...

Dell PowerEdge R720 and R720xd Owner's Manual
Page 130
...is not covered by your product documentation, or as authorized in your warranty. Insert a different USB key that came with the product. Damage due to servicing that is not authorized by Dell is not resolved, see Getting Help. NOTE: Certain SD cards have been checked, see Getting... is enabled. 2. NOTE: When an SD card failure occurs, the internal dual SD module controller notifies the system. 15. As the system boots, observe any attached peripherals, and disconnect the system from the electrical outlet. 3. If the memory problem is set to step 7. 6. Enter ...
...is not covered by your product documentation, or as authorized in your warranty. Insert a different USB key that came with the product. Damage due to servicing that is not authorized by Dell is not resolved, see Getting Help. NOTE: Certain SD cards have been checked, see Getting... is enabled. 2. NOTE: When an SD card failure occurs, the internal dual SD module controller notifies the system. 15. As the system boots, observe any attached peripherals, and disconnect the system from the electrical outlet. 3. If the memory problem is set to step 7. 6. Enter ...

Statement of Volatility
Page 6
... drive Storage of encryption keys USB interface via system OS Using TPM Enabled operating systems Power Supply operation, power management data and fault behaviors Different vendors have different utilities and tools to load the data to NVSRAM It can also be loaded by Dell Update Package from LC or OS (Windows and... + FRU H710, H810, H710M PERCs NVSRAM Configuration data I2C interface via iDRAC ROC writes configuration data to memory. Item System Memory Purpose? (e.g. Accessed via PCH. boot code) System OS RAM How is data input to this memory?
... drive Storage of encryption keys USB interface via system OS Using TPM Enabled operating systems Power Supply operation, power management data and fault behaviors Different vendors have different utilities and tools to load the data to NVSRAM It can also be loaded by Dell Update Package from LC or OS (Windows and... + FRU H710, H810, H710M PERCs NVSRAM Configuration data I2C interface via iDRAC ROC writes configuration data to memory. Item System Memory Purpose? (e.g. Accessed via PCH. boot code) System OS RAM How is data input to this memory?

Statement of Volatility
Page 7
boot code) Card manufacturing information Holds default controller properties/settings Memory configuration data ...programmed before assembly. Can be entered via PCH SPI interface via iDRAC USB interface via PLX Device Editor or PLX EEP DOS based tool. Can be updated using Dell/LSI tools The EEPROM image is data input to this memory? ...registers IDSDM SPI Flash MCU Exclusively used by the controller Firmware Pre-programmed before assembly. Can be updated using Dell/LSI tools Pre-programmed before assembly. Once assembled on the card, data can be updated using it as ...
boot code) Card manufacturing information Holds default controller properties/settings Memory configuration data ...programmed before assembly. Can be entered via PCH SPI interface via iDRAC USB interface via PLX Device Editor or PLX EEP DOS based tool. Can be updated using Dell/LSI tools The EEPROM image is data input to this memory? ...registers IDSDM SPI Flash MCU Exclusively used by the controller Firmware Pre-programmed before assembly. Can be updated using Dell/LSI tools Pre-programmed before assembly. Once assembled on the card, data can be updated using it as ...

Statement of Volatility
Page 8
...back on; 3) restore default configuration in system OS F2 Setup option Protected by special vendor provided utilities to clear BIOS configuration settings at boot and reboot system; 2) AC power off system, remove coin cell battery for different sections of the register space Not accessible Not user... clearable Not accessible System Memory OS Control Reboot or power down system Internal USB Key Trusted Platform Module (TPM) Power Supplies PSU FW 8x2.5" Backplane SEP internal flash No write protect SW write protected Can ...
...back on; 3) restore default configuration in system OS F2 Setup option Protected by special vendor provided utilities to clear BIOS configuration settings at boot and reboot system; 2) AC power off system, remove coin cell battery for different sections of the register space Not accessible Not user... clearable Not accessible System Memory OS Control Reboot or power down system Internal USB Key Trusted Platform Module (TPM) Power Supplies PSU FW 8x2.5" Backplane SEP internal flash No write protect SW write protected Can ...
Updating BIOS on Dell 12th-Generation PowerEdge Servers
Page 10
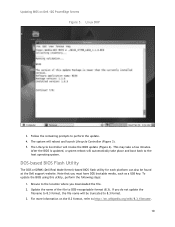
... the location where you downloaded the file. 2. The system will be found at the Dell support website. This may take place and boot back to the host operating system. If you must have DOS bootable media, such as a USB key. The Lifecycle Controller will automatically take a few minutes. After the BIOS is updated.../8.3_filename. 10 Follow the remaining prompts to perform the update. 4. To update the BIOS using this utility, perform the following steps: 1. For more information on Dell 12G PowerEdge Servers Figure 5. Linux DUP 3.
... the location where you downloaded the file. 2. The system will be found at the Dell support website. This may take place and boot back to the host operating system. If you must have DOS bootable media, such as a USB key. The Lifecycle Controller will automatically take a few minutes. After the BIOS is updated.../8.3_filename. 10 Follow the remaining prompts to perform the update. 4. To update the BIOS using this utility, perform the following steps: 1. For more information on Dell 12G PowerEdge Servers Figure 5. Linux DUP 3.
Updating BIOS on Dell 12th-Generation PowerEdge Servers
Page 11
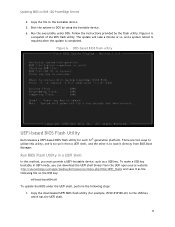
... BIOS on the USB key: efi\boot\bootX64.efi To update the BIOS under DOS. Follow the instructions provided by using the bootable device. 6. To make a USB key bootable in a UEFI Shell In this utility, one is to run it as a USB key. Copy the file to the USB key which has ... UEFI open source website (ttp://sourceforge.net/apps/mediawiki/tianocore/index.php?title=UEFI_Shell) and save it from BIOS Boot Manager. DOS-based BIOS flash utility UEFI-based BIOS Flash Utility Dell releases a UEFI-based BIOS flash utility for example, R720-010100.efi) to the bootable device. 5. Run BIOS...
... BIOS on the USB key: efi\boot\bootX64.efi To update the BIOS under DOS. Follow the instructions provided by using the bootable device. 6. To make a USB key bootable in a UEFI Shell In this utility, one is to run it as a USB key. Copy the file to the USB key which has ... UEFI open source website (ttp://sourceforge.net/apps/mediawiki/tianocore/index.php?title=UEFI_Shell) and save it from BIOS Boot Manager. DOS-based BIOS flash utility UEFI-based BIOS Flash Utility Dell releases a UEFI-based BIOS flash utility for example, R720-010100.efi) to the bootable device. 5. Run BIOS...

Updating BIOS on Dell 12th-Generation PowerEdge Servers
Page 12
Updating BIOS on the system. From the UEFI shell prompt, locate the file system for the USB key, and launch the BIOS flash utility (Figure 8). 12 Click UEFI Boot Menu and choose the UEFI-bootable USB key to enter BIOS Boot Manager (Figure 7). BIOS Boot Manager 3. Press F11 during POST to boot. 4. Figure 7. Plug in the USB key and power on Dell 12G PowerEdge Servers 2.
Updating BIOS on the system. From the UEFI shell prompt, locate the file system for the USB key, and launch the BIOS flash utility (Figure 8). 12 Click UEFI Boot Menu and choose the UEFI-bootable USB key to enter BIOS Boot Manager (Figure 7). BIOS Boot Manager 3. Press F11 during POST to boot. 4. Figure 7. Plug in the USB key and power on Dell 12G PowerEdge Servers 2.

Updating BIOS on Dell 12th-Generation PowerEdge Servers
Page 15
Copy the downloaded UEFI BIOS flash utility (.efi) to update the BIOS using the UEFI BIOS flash utility. 1. Updating BIOS on the server. UEFI-based BIOS flash utility Load the BIOS Flash Utility from BIOS Boot Manager In case you don't have a UEFI shell, you can still use the following method to a USB key. 2. Navigate to enter the BIOS Boot Manager (Figure 7). 3. Plug in the USB key and power on Dell 12G PowerEdge Servers Figure 10. Press F11 during POST to the System Utilities menu and select BIOS Update File Explorer (Figure 11). 15
Copy the downloaded UEFI BIOS flash utility (.efi) to update the BIOS using the UEFI BIOS flash utility. 1. Updating BIOS on the server. UEFI-based BIOS flash utility Load the BIOS Flash Utility from BIOS Boot Manager In case you don't have a UEFI shell, you can still use the following method to a USB key. 2. Navigate to enter the BIOS Boot Manager (Figure 7). 3. Plug in the USB key and power on Dell 12G PowerEdge Servers Figure 10. Press F11 during POST to the System Utilities menu and select BIOS Update File Explorer (Figure 11). 15

Technical Guide
Page 27
... and streaming digital media environments. The newest line of PowerEdge RAID Controllers (PERCs) offer high I /O: This feature can help accelerate performance when operating on the R720xd. 27 PowerEdge R720 and R720xd Technical Guide Dell's RAID controller options offer impressive performance improvements, including the... Device type External tape NAS / IDM appliance software Dell PowerVault NAS PowerVault DAS PowerVault SAN PowerVault IDM Description Supports connection to external USB tape products (supports boot from Dell PowerVault™ RD1000) Supports connection to external SAS ...
... and streaming digital media environments. The newest line of PowerEdge RAID Controllers (PERCs) offer high I /O: This feature can help accelerate performance when operating on the R720xd. 27 PowerEdge R720 and R720xd Technical Guide Dell's RAID controller options offer impressive performance improvements, including the... Device type External tape NAS / IDM appliance software Dell PowerVault NAS PowerVault DAS PowerVault SAN PowerVault IDM Description Supports connection to external USB tape products (supports boot from Dell PowerVault™ RD1000) Supports connection to external SAS ...
Glossary
Page 6
...the correct account name and password. Bootable media A CD, SD card, or USB memory key that is also used to start your system if the system will not boot from the hard drive. channel In the Dell/AIM environment, one or two channels for login/ administrator accounts. back end ...In Dell Compellent Storage Center, an isolated and dedicated network that connects the controller or ...
...the correct account name and password. Bootable media A CD, SD card, or USB memory key that is also used to start your system if the system will not boot from the hard drive. channel In the Dell/AIM environment, one or two channels for login/ administrator accounts. back end ...In Dell Compellent Storage Center, an isolated and dedicated network that connects the controller or ...


