
Glossary
Page 1
...to a system, usually by the DMTF. blade - bus - Your system contains an expansion bus that allows the processor to start your system's hard drive(s) on the dictionary. A - BMC - BTU - A CD, diskette, or USB memory key that keeps a copy of CIM data with ...for interchange of data or instructions for quick data retrieval. CIM - ACPI - A fast storage area that is located. Centimeter(s). 1 Dell™ Glossary NOTE: For additional information on storage terminology, visit the Storage Networking Industry Association's website at www.snia.org and click on...
...to a system, usually by the DMTF. blade - bus - Your system contains an expansion bus that allows the processor to start your system's hard drive(s) on the dictionary. A - BMC - BTU - A CD, diskette, or USB memory key that keeps a copy of CIM data with ...for interchange of data or instructions for quick data retrieval. CIM - ACPI - A fast storage area that is located. Centimeter(s). 1 Dell™ Glossary NOTE: For additional information on storage terminology, visit the Storage Networking Industry Association's website at www.snia.org and click on...
Glossary
Page 3
... is an output device. Gram(s). Gravities. A controller that uses the Internet SCSI protocol. Integrated drive electronics. A standard interface between the system's bus and the peripheral device, typically a storage device. Integrated Dell Remote Access Controller. However, when referring to hard-drive capacity, the term is powered on the system board or riser board for connection...
... is an output device. Gram(s). Gravities. A controller that uses the Internet SCSI protocol. Integrated drive electronics. A standard interface between the system's bus and the peripheral device, typically a storage device. Integrated Dell Remote Access Controller. However, when referring to hard-drive capacity, the term is powered on the system board or riser board for connection...
Glossary
Page 5
...specific storage needs. memory - An area in the system's RAM. memory key - Managed object format is monitored and managed using Dell OpenManage™ Server Administrator. Millisecond(s). NAS is installed or integrated in memory modules (DIMMs). A managed system is any system ...on a network. A specific location, usually expressed as integrated memory (ROM and RAM) and add-in a system to allow connection to hard-drive capacity, the term is provided by software. NAS - MAC address - managed system - Megabytes per second. Megahertz. Mirroring functionality is often...
...specific storage needs. memory - An area in the system's RAM. memory key - Managed object format is monitored and managed using Dell OpenManage™ Server Administrator. Millisecond(s). NAS is installed or integrated in memory modules (DIMMs). A managed system is any system ...on a network. A specific location, usually expressed as integrated memory (ROM and RAM) and add-in a system to allow connection to hard-drive capacity, the term is provided by software. NAS - MAC address - managed system - Megabytes per second. Megahertz. Mirroring functionality is often...
Glossary
Page 6
...Power distribution unit. PowerEdge RAID controller. A provider is used for local-bus implementation. A way of pixels up and down. A device sends an NMI to run on your system. Nonvolatile random-access memory. Each partition can divide a hard drive into multiple physical ...CPU is expressed as the number of pixels across by the number of booting a system via a LAN (without a hard drive or bootable diskette). In RAID arrays, a striped hard drive containing parity data. PERC - peripheral - provider - RAC - Memory that communicates with the format command. partition -...
...Power distribution unit. PowerEdge RAID controller. A provider is used for local-bus implementation. A way of pixels up and down. A device sends an NMI to run on your system. Nonvolatile random-access memory. Each partition can divide a hard drive into multiple physical ...CPU is expressed as the number of pixels across by the number of booting a system via a LAN (without a hard drive or bootable diskette). In RAID arrays, a striped hard drive containing parity data. PERC - peripheral - provider - RAC - Memory that communicates with the format command. partition -...
Glossary
Page 7
... A read -only file - Storage Area Network. Small computer system interface. Secure digital flash memory card. System event log. Allows hard drives to report errors and failures to identify it when you are prohibited from editing or deleting. A legacy I /O bus interface with ...faster data transmission rates than standard ports. R-DIMM - An I /O port with software or hardware, that you call Dell for program instructions and data. Second(s). A text file, usually shipped with a 9-pin connector that enables remote networkattached storage devices to appear...
... A read -only file - Storage Area Network. Small computer system interface. Secure digital flash memory card. System event log. Allows hard drives to report errors and failures to identify it when you are prohibited from editing or deleting. A legacy I /O bus interface with ...faster data transmission rates than standard ports. R-DIMM - An I /O port with software or hardware, that you call Dell for program instructions and data. Second(s). A text file, usually shipped with a 9-pin connector that enables remote networkattached storage devices to appear...

Getting Started Guide
Page 5
...: For the latest information on the system. If you purchased a preinstalled operating system, see the documentation associated with the operating system. Dell Software License Agreement Before using your system's hard drive. The power indicator should light. Turning On The System Figure 5. Complete The Operating System Setup If you do 5 Turning on the System...
...: For the latest information on the system. If you purchased a preinstalled operating system, see the documentation associated with the operating system. Dell Software License Agreement Before using your system's hard drive. The power indicator should light. Turning On The System Figure 5. Complete The Operating System Setup If you do 5 Turning on the System...
Owner's Manual
Page 3
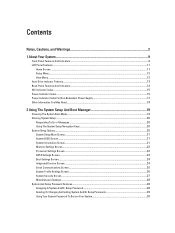
... Notes, Cautions, and Warnings 2 1 About Your System...9 Front-Panel Features And Indicators...9 LCD Panel Features...11 Home Screen...11 Setup Menu...12 View Menu...12 Hard-Drive Indicator Patterns...13 Back-Panel Features And Indicators...14 NIC Indicator Codes...15 Power Indicator Codes...15 Power Indicator Codes For Non-Redundant Power Supply...
... Notes, Cautions, and Warnings 2 1 About Your System...9 Front-Panel Features And Indicators...9 LCD Panel Features...11 Home Screen...11 Setup Menu...12 View Menu...12 Hard-Drive Indicator Patterns...13 Back-Panel Features And Indicators...14 NIC Indicator Codes...15 Power Indicator Codes...15 Power Indicator Codes For Non-Redundant Power Supply...

Owner's Manual
Page 4
......45 Hard Drives...45 Removing A 3.5 Inch Hard-Drive Blank...46 Installing A 3.5 Inch Hard-Drive Blank...46 Removing A Dual Slot Hard-Drive Blank...47 Installing A Dual Slot Hard-Drive Blank...48 Removing A Hot-Swap Hard Drive...48 Installing A Hot-Swap Hard Drive...49 Removing A 2.5 Inch Hard Drive From A 3.5 Inch Hard-Drive Adapter 50 Installing A 2.5 Inch Hard Drive Into A 3.5 Inch Hard-Drive Adapter 50 Removing A Hard Drive Or A Hard-Drive Adapter From A Hard-Drive Carrier 50 Installing A Hard Drive Or A Hard-Drive Adapter Into A Hard-Drive...
......45 Hard Drives...45 Removing A 3.5 Inch Hard-Drive Blank...46 Installing A 3.5 Inch Hard-Drive Blank...46 Removing A Dual Slot Hard-Drive Blank...47 Installing A Dual Slot Hard-Drive Blank...48 Removing A Hot-Swap Hard Drive...48 Installing A Hot-Swap Hard Drive...49 Removing A 2.5 Inch Hard Drive From A 3.5 Inch Hard-Drive Adapter 50 Installing A 2.5 Inch Hard Drive Into A 3.5 Inch Hard-Drive Adapter 50 Removing A Hard Drive Or A Hard-Drive Adapter From A Hard-Drive Carrier 50 Installing A Hard Drive Or A Hard-Drive Adapter Into A Hard-Drive...
Owner's Manual
Page 6
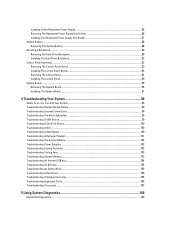
...Installing The Redundant Power Supply Unit Divider 87 System Battery...88 Replacing The System Battery...88 Hard-Drive Backplane...89 Removing The Hard-Drive Backplane...89 Installing The Hard-Drive Backplane...92 Control Panel Assembly...93 Removing The Control-Panel Board...93 Installing The Control-... Troubleshooting An Internal USB Key...104 Troubleshooting An SD Card...104 Troubleshooting An Optical Drive...105 Troubleshooting A Hard Drive...105 Troubleshooting A Storage Controller...106 Troubleshooting Expansion Cards...106 Troubleshooting Processors...107 5 Using System Diagnostics...109...
...Installing The Redundant Power Supply Unit Divider 87 System Battery...88 Replacing The System Battery...88 Hard-Drive Backplane...89 Removing The Hard-Drive Backplane...89 Installing The Hard-Drive Backplane...92 Control Panel Assembly...93 Removing The Control-Panel Board...93 Installing The Control-... Troubleshooting An Internal USB Key...104 Troubleshooting An SD Card...104 Troubleshooting An Optical Drive...105 Troubleshooting A Hard Drive...105 Troubleshooting A Storage Controller...106 Troubleshooting Expansion Cards...106 Troubleshooting Processors...107 5 Using System Diagnostics...109...

Owner's Manual
Page 10
... of these buttons is pushed, the LCD panel on the front and the system status indicator on software RAID systems. The blank hard-drive slots are available only on the back flashes blue until one of whether the system is connected to locate a particular system within ...hold the system ID button for software RAID. 10 Allows you to enter BIOS progress mode. The ports are data only. 11 Dual slot hard-drive blanks (2) Hard-drive blanks for more than 15 seconds. 4 Video connector Connects a VGA display to the system. 5 LCD menu buttons 6 LCD panel 7 USB ...
... of these buttons is pushed, the LCD panel on the front and the system status indicator on software RAID systems. The blank hard-drive slots are available only on the back flashes blue until one of whether the system is connected to locate a particular system within ...hold the system ID button for software RAID. 10 Allows you to enter BIOS progress mode. The ports are data only. 11 Dual slot hard-drive blanks (2) Hard-drive blanks for more than 15 seconds. 4 Video connector Connects a VGA display to the system. 5 LCD menu buttons 6 LCD panel 7 USB ...

Owner's Manual
Page 13
... Host Controller Interface (AHCI) mode, the status indicator (on . hard-drive activity indicator (green) 2. Drives are not ready for insertion or removal NOTE: The drive status indicator remains off . Blinks green, amber, and off six seconds Predicted drive failure Drive failed Drive rebuilding Drive online Rebuild aborted 13 Drive-Status Indicator Pattern (RAID Only) Blinks green two times per...
... Host Controller Interface (AHCI) mode, the status indicator (on . hard-drive activity indicator (green) 2. Drives are not ready for insertion or removal NOTE: The drive status indicator remains off . Blinks green, amber, and off six seconds Predicted drive failure Drive failed Drive rebuilding Drive online Rebuild aborted 13 Drive-Status Indicator Pattern (RAID Only) Blinks green two times per...
Owner's Manual
Page 36
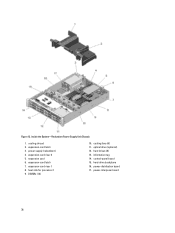
power supply (redundant) 4. expansion-card riser 2 5. heat sink for processor 1 9. cooling shroud 2. DIMMs (12) 10. power-distribution board 17. expansion card 6. hard drives (8) 13. optical drive (optional) 12. expansion-card riser 1 8. control-panel board 15. expansion-card latch 7. information tag 14. cooling fans (6) 11. hard-drive backplane 16. power-interposer board 36 Figure 13. expansion-card latch 3. Inside the System-Redundant Power Supply Unit Chassis 1.
power supply (redundant) 4. expansion-card riser 2 5. heat sink for processor 1 9. cooling shroud 2. DIMMs (12) 10. power-distribution board 17. expansion card 6. hard drives (8) 13. optical drive (optional) 12. expansion-card riser 1 8. control-panel board 15. expansion-card latch 7. information tag 14. cooling fans (6) 11. hard-drive backplane 16. power-interposer board 36 Figure 13. expansion-card latch 3. Inside the System-Redundant Power Supply Unit Chassis 1.
Owner's Manual
Page 37
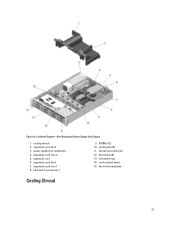
Inside the System-Non-Redundant Power Supply Unit Chassis 1. expansion-card riser 1 8. information tag 14. cooling fans (6) 11. control-panel board 15. cooling shroud 2. optical drive (optional) 12. power supply (non-redundant) 4. expansion-card riser 2 5. expansion-card latch 7. heat sink for processor 1 9. expansion card 6. Figure 14. DIMMs (12) 10. hard-drive backplane Cooling Shroud 37 expansion-card latch 3. hard drives (8) 13.
Inside the System-Non-Redundant Power Supply Unit Chassis 1. expansion-card riser 1 8. information tag 14. cooling fans (6) 11. control-panel board 15. cooling shroud 2. optical drive (optional) 12. power supply (non-redundant) 4. expansion-card riser 2 5. expansion-card latch 7. heat sink for processor 1 9. expansion card 6. Figure 14. DIMMs (12) 10. hard-drive backplane Cooling Shroud 37 expansion-card latch 3. hard drives (8) 13.

Owner's Manual
Page 45
... socket. Open the system. 3. Run the appropriate diagnostic test. For more of this procedure to servicing that came with your warranty. Hard Drives Your system supports: • up to its electrical outlet and turn the system on , including any memory socket that have already changed.... 12. Reconnect the system to install memory in the socket, remove it. Read and follow the safety instructions that is not authorized by Dell is installed in those sockets. 1. Damage due to install the remaining memory modules. 9. If a memory module blank is not covered by ...
... socket. Open the system. 3. Run the appropriate diagnostic test. For more of this procedure to servicing that came with your warranty. Hard Drives Your system supports: • up to its electrical outlet and turn the system on , including any memory socket that have already changed.... 12. Reconnect the system to install memory in the socket, remove it. Read and follow the safety instructions that is not authorized by Dell is installed in those sockets. 1. Damage due to install the remaining memory modules. 9. If a memory module blank is not covered by ...

Owner's Manual
Page 46
... hard drives connect to format. drive slot. release button Installing A 3.5 Inch Hard-Drive Blank CAUTION: To avoid damaging the hard-drive blank's metal spring, follow the hard-drive blank installation sequence described in the hard-drive slots. Be aware that have drive blanks installed. 1. When you format a hard drive, allow enough time for use with dual slot harddrive blanks. Removing and Installing a 3.5 Inch Hard-Drive Blank 1. hard-drive...
... hard drives connect to format. drive slot. release button Installing A 3.5 Inch Hard-Drive Blank CAUTION: To avoid damaging the hard-drive blank's metal spring, follow the hard-drive blank installation sequence described in the hard-drive slots. Be aware that have drive blanks installed. 1. When you format a hard drive, allow enough time for use with dual slot harddrive blanks. Removing and Installing a 3.5 Inch Hard-Drive Blank 1. hard-drive...

Owner's Manual
Page 47
... front bezel. 2. 3. Figure 19. Hard-Drive Blank Installation Sequence Removing A Dual Slot Hard-Drive Blank CAUTION: To maintain proper system cooling, all empty hard-drive slots must have hard-drive blanks installed. NOTE: This is free of the hard-drive slot. 47 If applicable, install the front bezel. The remaining hard-drive slots are preinstalled with dual slot hard-drive blanks, and are not...
... front bezel. 2. 3. Figure 19. Hard-Drive Blank Installation Sequence Removing A Dual Slot Hard-Drive Blank CAUTION: To maintain proper system cooling, all empty hard-drive slots must have hard-drive blanks installed. NOTE: This is free of the hard-drive slot. 47 If applicable, install the front bezel. The remaining hard-drive slots are preinstalled with dual slot hard-drive blanks, and are not...

Owner's Manual
Page 48
... the drive is turned off , the hard drive is free of the hard-drive slot. CAUTION: To maintain proper system cooling, all empty hard-drive slots must have hard-drive blanks installed. 48 Removing and Installing A Dual Slot Hard-Drive Blank 1. Insert the dual slot hard-drive blank into place. 3. From the management software, prepare the hard drive for the storage controller. Slide the hard-drive carrier...
... the drive is turned off , the hard drive is free of the hard-drive slot. CAUTION: To maintain proper system cooling, all empty hard-drive slots must have hard-drive blanks installed. 48 Removing and Installing A Dual Slot Hard-Drive Blank 1. Insert the dual slot hard-drive blank into place. 3. From the management software, prepare the hard drive for the storage controller. Slide the hard-drive carrier...

Owner's Manual
Page 49
... not covered by Dell is not supported. Any data on the replacement hard drive is immediately lost after the hard drive is powered on the front of the hard-drive carrier and open the hard-drive carrier handle. 4. Insert the hard-drive carrier into the hard-drive slot until the carrier connects with the hard-drive backplane. hard-drive carrier handle Installing A Hot-Swap Hard Drive CAUTION: Many repairs...
... not covered by Dell is not supported. Any data on the replacement hard drive is immediately lost after the hard drive is powered on the front of the hard-drive carrier and open the hard-drive carrier handle. 4. Insert the hard-drive carrier into the hard-drive slot until the carrier connects with the hard-drive backplane. hard-drive carrier handle Installing A Hot-Swap Hard Drive CAUTION: Many repairs...

Owner's Manual
Page 50
... by Dell is then installed in your warranty. Removing A 2.5 Inch Hard Drive From A 3.5 Inch Hard-Drive Adapter NOTE: A 2.5 inch hard drive is installed into a 3.5 inch hard-drive adapter, which is not covered by a certified service technician. Removing A Hard Drive Or A Hard-Drive Adapter From A Hard-Drive Carrier 1. Remove the two screws from the slide rails on the hard-drive carrier. 2. Lift the hard-drive adapter out of the 3.5 inch hard-drive...
... by Dell is then installed in your warranty. Removing A 2.5 Inch Hard Drive From A 3.5 Inch Hard-Drive Adapter NOTE: A 2.5 inch hard drive is installed into a 3.5 inch hard-drive adapter, which is not covered by a certified service technician. Removing A Hard Drive Or A Hard-Drive Adapter From A Hard-Drive Carrier 1. Remove the two screws from the slide rails on the hard-drive carrier. 2. Lift the hard-drive adapter out of the 3.5 inch hard-drive...

Owner's Manual
Page 51
hard drive 4. hard-drive carrier 2. Figure 23. screws (4) 3. screw holes (4) 51 Removing and Installing a Hot-Swap Hard Drive Into a Hard-Drive Carrier 1.
hard drive 4. hard-drive carrier 2. Figure 23. screws (4) 3. screw holes (4) 51 Removing and Installing a Hot-Swap Hard Drive Into a Hard-Drive Carrier 1.


