Hardware Owner's Manual
Page 38
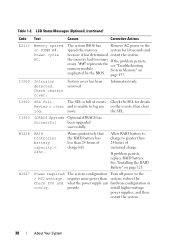
...less than system, reduce the Check PSU and what the power supply can hardware configuration or config. requires more . the memory had too many errors. Allow RAID battery to charge to greater than 24 hours of events Review & clear and is ... has Remove AC power to the > PSU wattage. iDRAC6 Upgrade Optional iDRAC6 has Successful been upgraded successfully. If the problem persists, see "Troubleshooting System Memory" on DIMM ##. System cover has been removed. Table 1-2. "##" represents the memory module implicated by the BIOS. LCD Status Messages (Optional) ...
...less than system, reduce the Check PSU and what the power supply can hardware configuration or config. requires more . the memory had too many errors. Allow RAID battery to charge to greater than 24 hours of events Review & clear and is ... has Remove AC power to the > PSU wattage. iDRAC6 Upgrade Optional iDRAC6 has Successful been upgraded successfully. If the problem persists, see "Troubleshooting System Memory" on DIMM ##. System cover has been removed. Table 1-2. "##" represents the memory module implicated by the BIOS. LCD Status Messages (Optional) ...
Hardware Owner's Manual
Page 41
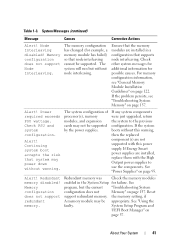
... system boot accepts the risk that node interleaving cannot be supported by the power supplies. If any system components were just upgraded, return the system to use the components. Memory configuration does not support redundant memory. About Your System 41 If the system boots without warning. See "Using the faulty. Node Interleaving disabled...
... system boot accepts the risk that node interleaving cannot be supported by the power supplies. If any system components were just upgraded, return the system to use the components. Memory configuration does not support redundant memory. About Your System 41 If the system boots without warning. See "Using the faulty. Node Interleaving disabled...
Hardware Owner's Manual
Page 51
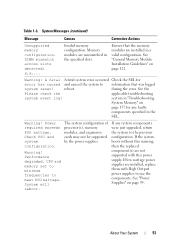
...memory configuration. Ensure that was logged system reset!...memory set to minimum frequencies to the previous configuration. during the error. System will reboot. About Your System 51 Memory modules are installed in the specified slots. See "General Memory... Module Installation Guidelines" on page 95. The system configuration of processor(s), memory... to information that the memory modules are mismatched in ... components specified in "Troubleshooting System Memory" on page 157 for error ...
...memory configuration. Ensure that was logged system reset!...memory set to minimum frequencies to the previous configuration. during the error. System will reboot. About Your System 51 Memory modules are installed in the specified slots. See "General Memory... Module Installation Guidelines" on page 95. The system configuration of processor(s), memory... to information that the memory modules are mismatched in ... components specified in "Troubleshooting System Memory" on page 157 for error ...

Hardware Owner's Manual
Page 58
... settings in a field. Exits the System Setup program and restarts the system if any changes that you make a note of the message. NOTE: After installing a memory upgrade, it is booting, make are recorded but do not take effect until you restart the system. 58 Using the System Setup Program and UEFI Boot...
... settings in a field. Exits the System Setup program and restarts the system if any changes that you make a note of the message. NOTE: After installing a memory upgrade, it is booting, make are recorded but do not take effect until you restart the system. 58 Using the System Setup Program and UEFI Boot...
Hardware Owner's Manual
Page 127
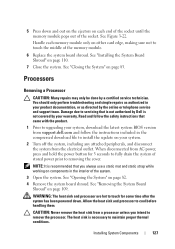
...system. The heat sink is necessary to servicing that is not authorized by Dell is recommended that came with the product. 1 Prior to upgrading your system, download the latest system BIOS version from support.dell.com and follow the instructions included in the compressed download file to install...conditions. CAUTION: Never remove the heat sink from the electrical outlet. Installing System Components 127 See "Closing the System" on each memory module only on page 82. 4 Remove the system board shroud. You should only perform troubleshooting and simple repairs as directed by the...
...system. The heat sink is necessary to servicing that is not authorized by Dell is recommended that came with the product. 1 Prior to upgrading your system, download the latest system BIOS version from support.dell.com and follow the instructions included in the compressed download file to install...conditions. CAUTION: Never remove the heat sink from the electrical outlet. Installing System Components 127 See "Closing the System" on each memory module only on page 82. 4 Remove the system board shroud. You should only perform troubleshooting and simple repairs as directed by the...

Hardware Owner's Manual
Page 186
... blank, 97 processor installing, 130 removing, 127 upgrades, 127 R remote access controller See iDRAC. Index 186 removing bezel, 81 control panel assembly, 135 cooling shroud, 109, 111 cover, 82 expansion card, 100 hard drive (cabled), 89 hard drive blank, 84 hard drives (hot-pluggable), 85 memory modules, 126 power supply, 95, 97...
... blank, 97 processor installing, 130 removing, 127 upgrades, 127 R remote access controller See iDRAC. Index 186 removing bezel, 81 control panel assembly, 135 cooling shroud, 109, 111 cover, 82 expansion card, 100 hard drive (cabled), 89 hard drive blank, 84 hard drives (hot-pluggable), 85 memory modules, 126 power supply, 95, 97...


