
SCSI Backplane Option
Page 5
...x 8 backplane. Contact your chassis supports the 1 x 8 backplane. Only trained service technicians are identical). support.dell.com Dell PowerEdge 6300 and 4x00 Systems SCSI Backplane Option 1-1 NOTE: Before you may not be able to use 1.6-inch hard-...label (located between the connectors and the first power supply) that specifies that your Dell representative for further information and instructions. Dell™ PowerEdge™6300 and 4x00 Systems SCSI Backplane Option This document describes the optional small computer system interface (SCSI) backplane for the Dell PowerEdge...
...x 8 backplane. Contact your chassis supports the 1 x 8 backplane. Only trained service technicians are identical). support.dell.com Dell PowerEdge 6300 and 4x00 Systems SCSI Backplane Option 1-1 NOTE: Before you may not be able to use 1.6-inch hard-...label (located between the connectors and the first power supply) that specifies that your Dell representative for further information and instructions. Dell™ PowerEdge™6300 and 4x00 Systems SCSI Backplane Option This document describes the optional small computer system interface (SCSI) backplane for the Dell PowerEdge...

SCSI Backplane Option
Page 6
... cable from the locking connector on the side of the connector. 9. tem AC power cable from the chassis (see Figure 1-1). 1-2 Dell PowerEdge 6300 and 4x00 Systems SCSI Backplane Option NOTICE: You must turn off the system, including any attached peripherals, and disconnect the sys- ...Loosen the captive thumbscrew on the backplane board. To release the connector, press the latch on the backplane board. Disconnect the power cable labeled "HD-B/P" from its service position (see "Safety First-For You and Your Computer" in the Installation and Troubleshooting Guide. 1. Slide ...
... cable from the locking connector on the side of the connector. 9. tem AC power cable from the chassis (see Figure 1-1). 1-2 Dell PowerEdge 6300 and 4x00 Systems SCSI Backplane Option NOTICE: You must turn off the system, including any attached peripherals, and disconnect the sys- ...Loosen the captive thumbscrew on the backplane board. To release the connector, press the latch on the backplane board. Disconnect the power cable labeled "HD-B/P" from its service position (see "Safety First-For You and Your Computer" in the Installation and Troubleshooting Guide. 1. Slide ...

SCSI Backplane Option
Page 7
Connect the 20-pin data cable leading from the system board to the connector labeled "PLANAR" on the computer chassis wall fit through the corresponding slots in the backplane board. While holding the backplane board by tightening the captive screw. ... the tabs on the backplane board (see Figure 1-2). Install the new backplane board: a. Slide the backplane board toward the power-supply paralleling board (PSPB). support.dell.com Dell PowerEdge 6300 and 4x00 Systems SCSI Backplane Option 1-3 b. c. Removing a SCSI Backplane Board 1 Thumbscrew 2 SCSI backplane board 12.
Connect the 20-pin data cable leading from the system board to the connector labeled "PLANAR" on the computer chassis wall fit through the corresponding slots in the backplane board. While holding the backplane board by tightening the captive screw. ... the tabs on the backplane board (see Figure 1-2). Install the new backplane board: a. Slide the backplane board toward the power-supply paralleling board (PSPB). support.dell.com Dell PowerEdge 6300 and 4x00 Systems SCSI Backplane Option 1-3 b. c. Removing a SCSI Backplane Board 1 Thumbscrew 2 SCSI backplane board 12.

SCSI Backplane Option
Page 8
... the system chassis. 17. Yes. Does the new SCSI backplane board have easier access to the upper drive bay key screws. 1-4 Dell PowerEdge 6300 and 4x00 Systems SCSI Backplane Option No. Remove the front bezel. 19. You must change the orientation of the two drive bay... flange (see Figure 1-3). Figure 1-2. Connect the power cable labeled "HD-B/P" to the connector labeled "SCSIA" on the backplane board. 15. Connect the Ultra160/m SCSI cable leading from the connector labeled "SCSI2" on the system board to the connector labeled "POWER" on the backplane board. 16. With the flange...
... the system chassis. 17. Yes. Does the new SCSI backplane board have easier access to the upper drive bay key screws. 1-4 Dell PowerEdge 6300 and 4x00 Systems SCSI Backplane Option No. Remove the front bezel. 19. You must change the orientation of the two drive bay... flange (see Figure 1-3). Figure 1-2. Connect the power cable labeled "HD-B/P" to the connector labeled "SCSIA" on the backplane board. 15. Connect the Ultra160/m SCSI cable leading from the connector labeled "SCSI2" on the system board to the connector labeled "POWER" on the backplane board. 16. With the flange...

Activating the PERC 3/Di
Page 7
Preliminary 1/14/00 Dell PowerEdge 4400 Systems-Activating the PERC 3/Di 1-3 Press down on the DIMM with your index fingers to be an unbuffered DIMM, rated to run at 100 ... key with the latches on the ejectors with the slot in the center of the socket (see step A in only one way and is labeled "PE4400." support.dell.com DELL CONFIDENTIAL - (Rev. 11/3/98) FILE LOCATION: S:\SYSTEMS\opal\ts\Romb\8648Reb0.fm DIMM socket ejectors (2) alignment keys (2) B A Figure 1-2. Install the RAID hardware key...
Preliminary 1/14/00 Dell PowerEdge 4400 Systems-Activating the PERC 3/Di 1-3 Press down on the DIMM with your index fingers to be an unbuffered DIMM, rated to run at 100 ... key with the latches on the ejectors with the slot in the center of the socket (see step A in only one way and is labeled "PE4400." support.dell.com DELL CONFIDENTIAL - (Rev. 11/3/98) FILE LOCATION: S:\SYSTEMS\opal\ts\Romb\8648Reb0.fm DIMM socket ejectors (2) alignment keys (2) B A Figure 1-2. Install the RAID hardware key...
Rack Installation Guide
Page 7
... wet environment. If the computer gets wet, see the appropriate chapter in your system, purchase a power cable that your Dell authorized service provider: - DELL CONFIDENTIAL - The product has been exposed to cool before removing covers or touching internal components. • Use the correct external... power source. Also, do not block cooling vents. • Do not spill food or liquids on the electrical ratings label. The ...
... wet environment. If the computer gets wet, see the appropriate chapter in your system, purchase a power cable that your Dell authorized service provider: - DELL CONFIDENTIAL - The product has been exposed to cool before removing covers or touching internal components. • Use the correct external... power source. Also, do not block cooling vents. • Do not spill food or liquids on the electrical ratings label. The ...

Installing the External Drive Bay
Page 8
... cable from its connector on the new system management cable connector. Do not disconnect the other end of the drive bay assembly. 1-4 Dell PowerEdge Systems - d. Installing the External Drive Bay Attaching the SCSI Cable 5. b. Locate the system management ribbon cable (provided with latches on... the SCSI backplane board. Attach the power cable(s) to the connector labeled PLANAR 1X2 on the back of this cable, marked PLANAR, to the middle connector of the system management ribbon cable you disconnected...
... cable from its connector on the new system management cable connector. Do not disconnect the other end of the drive bay assembly. 1-4 Dell PowerEdge Systems - d. Installing the External Drive Bay Attaching the SCSI Cable 5. b. Locate the system management ribbon cable (provided with latches on... the SCSI backplane board. Attach the power cable(s) to the connector labeled PLANAR 1X2 on the back of this cable, marked PLANAR, to the middle connector of the system management ribbon cable you disconnected...
Tower Installation Guide
Page 17
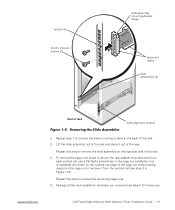
... screws at the back of the rack. 4. Repeat step 1 to remove the remaining cage nuts. 5. support.dell.com Dell PowerEdge 4x00 and 6300 Systems Tower Installation Guide 1-11 Package all the rack installation hardware you removed and label it for future use a flat-blade screwdriver or the cage-nut installation tool (if available), pry...
... screws at the back of the rack. 4. Repeat step 1 to remove the remaining cage nuts. 5. support.dell.com Dell PowerEdge 4x00 and 6300 Systems Tower Installation Guide 1-11 Package all the rack installation hardware you removed and label it for future use a flat-blade screwdriver or the cage-nut installation tool (if available), pry...