User Manual
Page 7
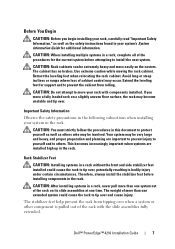
... been approved only for trained service technicians installing a rack enclosure. Rack Installation Instructions This installation guide provides instructions for the rack cabinet provided. Before attempting this entire procedure carefully. The rack can allow the rack to tip over. • Always load from ... "Component" refers to combinations of the equipment into any other rack. • Before installing your equipment in the rack. Dell disclaims all liability and warranties with respect to any other rack complies with your system. SAFETY: Rack Mounting of Systems Observe ...
... been approved only for trained service technicians installing a rack enclosure. Rack Installation Instructions This installation guide provides instructions for the rack cabinet provided. Before attempting this entire procedure carefully. The rack can allow the rack to tip over. • Always load from ... "Component" refers to combinations of the equipment into any other rack. • Before installing your equipment in the rack. Dell disclaims all liability and warranties with respect to any other rack complies with your system. SAFETY: Rack Mounting of Systems Observe ...

User Manual
Page 8
... Association (CEA) Standard EIA/CEA-310-E, International Electrotechnical Commission (IEC) 60297-3-100, and Deutsche Industrie Norm (DIN) 41494. WARNING: Rack cabinets can be very large and heavy, and proper preparation and planning are installed high up in the rack. WARNING: Avoid rolling the rack...You Begin WARNING: Before you move your rack with the rack. Use extreme caution while moving the rack cabinet. Retract the leveling feet when relocating the rack cabinet. Extend the leveling feet for the current system before attempting to protect yourself as well as the safety ...
... Association (CEA) Standard EIA/CEA-310-E, International Electrotechnical Commission (IEC) 60297-3-100, and Deutsche Industrie Norm (DIN) 41494. WARNING: Rack cabinets can be very large and heavy, and proper preparation and planning are installed high up in the rack. WARNING: Avoid rolling the rack...You Begin WARNING: Before you move your rack with the rack. Use extreme caution while moving the rack cabinet. Retract the leveling feet when relocating the rack cabinet. Extend the leveling feet for the current system before attempting to protect yourself as well as the safety ...

User Manual
Page 9
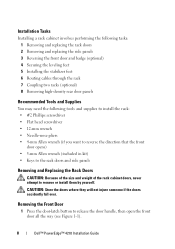
... or the front stabilizer on its slide assemblies at one system out of the rack with the slide assemblies fully extended. Installation Tasks Installing a rack cabinet involves the following tasks: 1 Removing and replacing the rack doors 2 Removing and replacing the side panels 3 Reversing the front door and badge (optional) 4 Securing the...
... or the front stabilizer on its slide assemblies at one system out of the rack with the slide assemblies fully extended. Installation Tasks Installing a rack cabinet involves the following tasks: 1 Removing and replacing the rack doors 2 Removing and replacing the side panels 3 Reversing the front door and badge (optional) 4 Securing the...

User Manual
Page 10
... side panels • 13-mm wrench (for rack removal from pallet) • 17-mm wrench (for rack removal from being pulled out of the rack cabinet doors, never attempt to remove or install them by yourself.
... side panels • 13-mm wrench (for rack removal from pallet) • 17-mm wrench (for rack removal from being pulled out of the rack cabinet doors, never attempt to remove or install them by yourself.

User Manual
Page 12
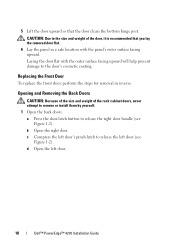
Opening and Removing the Back Doors WARNING: Because of the size and weight of the rack cabinet doors, never attempt to remove or install them by yourself. 1 Turn the door handle and open the back doors (see Figure 1-2). Opening the Back Doors 1 1 door handle 2 2 back door (2) 10 Installation Guide Figure 1-2. Replacing the Front Door To replace the front door, perform the steps for removal in reverse.
Opening and Removing the Back Doors WARNING: Because of the size and weight of the rack cabinet doors, never attempt to remove or install them by yourself. 1 Turn the door handle and open the back doors (see Figure 1-2). Opening the Back Doors 1 1 door handle 2 2 back door (2) 10 Installation Guide Figure 1-2. Replacing the Front Door To replace the front door, perform the steps for removal in reverse.

User Manual
Page 34
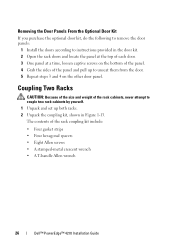
NOTE: It does not matter on one of the rack cabinets, never attempt to be in Figure 1-19. Rack Coupling Kit 2 1 1 gasket strip 2 coupling bracket (4) 3 Remove the doors and side panels from being scratched. 32 Installation ... rack (see Figure 1-20). Coupling Two Racks WARNING: Because of the size and weight of the racks along the frame surface to couple two rack cabinets by yourself. 1 Unpack and set up both racks. 2 Unpack the coupling kit, shown in contact with its protective backing removed, on which rack you place...
NOTE: It does not matter on one of the rack cabinets, never attempt to be in Figure 1-19. Rack Coupling Kit 2 1 1 gasket strip 2 coupling bracket (4) 3 Remove the doors and side panels from being scratched. 32 Installation ... rack (see Figure 1-20). Coupling Two Racks WARNING: Because of the size and weight of the racks along the frame surface to couple two rack cabinets by yourself. 1 Unpack and set up both racks. 2 Unpack the coupling kit, shown in contact with its protective backing removed, on which rack you place...
Dell PowerEdge 2420 Rack Installation Guide
Page 7
Also refer to the rack installation documentation accompanying the system and the rack for the rack cabinet provided. It is your equipment in a rack. Information includes assembling the rack and routing cables through the rack. Systems are considered... tools. CAUTION: Instructions for Rack-Mounted Systems: • Your rack kit has been approved only for specific caution statements and procedures. Dell disclaims all liability and warranties with respect to combinations of equipment with any other rack complies with your system and working environment from the ...
Also refer to the rack installation documentation accompanying the system and the rack for the rack cabinet provided. It is your equipment in a rack. Information includes assembling the rack and routing cables through the rack. Systems are considered... tools. CAUTION: Instructions for Rack-Mounted Systems: • Your rack kit has been approved only for specific caution statements and procedures. Dell disclaims all liability and warranties with respect to combinations of equipment with any other rack complies with your system and working environment from the ...

Dell PowerEdge 2420 Rack Installation Guide
Page 8
...Observe the safety precautions in the following subsections when installing your rack with the rack. Retract the leveling feet when relocating the rack cabinet. Extend the leveling feet for the current system before attempting to install the next system. WARNING: You must strictly follow the ..., the rack may become unstable and tip over rough surfaces. The cabinet has no brakes. WARNING: Avoid rolling the rack cabinet over . WARNING: Rack cabinets can be involved. Use extreme caution while moving the rack cabinet. Your system may be very large and heavy, and proper preparation ...
...Observe the safety precautions in the following subsections when installing your rack with the rack. Retract the leveling feet when relocating the rack cabinet. Extend the leveling feet for the current system before attempting to install the next system. WARNING: You must strictly follow the ..., the rack may become unstable and tip over rough surfaces. The cabinet has no brakes. WARNING: Avoid rolling the rack cabinet over . WARNING: Rack cabinets can be involved. Use extreme caution while moving the rack cabinet. Your system may be very large and heavy, and proper preparation ...

Dell PowerEdge 2420 Rack Installation Guide
Page 9
... 12-mm wrench • Needle-nose pliers • 4-mm Allen wrench (if you must ensure that a minimum of the rack cabinet. WARNING: For stability, you want to reverse the direction the front door opens) Installation Guide 7 The stabilizer feet help prevent the ... in the rack. Therefore, always install the stabilizer feet before installing components in bodily injury under certain circumstances. Installation Tasks Installing a rack cabinet involves performing the following tasks: 1 Removing and replacing the rack doors 2 Removing and replacing the side panels 3 Reversing the front door...
... 12-mm wrench • Needle-nose pliers • 4-mm Allen wrench (if you must ensure that a minimum of the rack cabinet. WARNING: For stability, you want to reverse the direction the front door opens) Installation Guide 7 The stabilizer feet help prevent the ... in the rack. Therefore, always install the stabilizer feet before installing components in bodily injury under certain circumstances. Installation Tasks Installing a rack cabinet involves performing the following tasks: 1 Removing and replacing the rack doors 2 Removing and replacing the side panels 3 Reversing the front door...

Coupling Two Dell PowerEdge 4220 Racks
Page 1
... racks from both racks. Rack Coupling Kit 1 2 1 gasket strip 2 coupling bracket (4) 3 Remove the doors and side panels from being scratched. The contents of the rack cabinets, never attempt to be in Figure 1-1. October 2008 NOTE: It does not matter on one of the gasket strip, with the adjacent rack (see your...
... racks from both racks. Rack Coupling Kit 1 2 1 gasket strip 2 coupling bracket (4) 3 Remove the doors and side panels from being scratched. The contents of the rack cabinets, never attempt to be in Figure 1-1. October 2008 NOTE: It does not matter on one of the gasket strip, with the adjacent rack (see your...

Installing rack stabilizer feet
Page 1
... and supplies to install the rack: • 12-mm wrench • Keys to tip over , potentially resulting in the rack. The weight of the rack cabinet. The stabilizer feet help prevent the rack from tipping over when a system or other component is installed in a suite, and install left or right stabilizer...
... and supplies to install the rack: • 12-mm wrench • Keys to tip over , potentially resulting in the rack. The weight of the rack cabinet. The stabilizer feet help prevent the rack from tipping over when a system or other component is installed in a suite, and install left or right stabilizer...
User Manual
Page 7
...at one time. Also refer to install stabilizers accordingly before installing components in a rack. Dell disclaims all liability and warranties in serious injury. Dell™ PowerEdge™ 4210 Installation Guide 5 Failure to the rack installation documentation accompanying the system and the rack for.... Thus, "component" refers to be included in bodily injury under certain circumstances. CAUTION: Before installing systems in a Dell rack cabinet using the customer rack kit. The weight of more than one component out of system and rack complies with such combinations...
...at one time. Also refer to install stabilizers accordingly before installing components in a rack. Dell disclaims all liability and warranties in serious injury. Dell™ PowerEdge™ 4210 Installation Guide 5 Failure to the rack installation documentation accompanying the system and the rack for.... Thus, "component" refers to be included in bodily injury under certain circumstances. CAUTION: Before installing systems in a Dell rack cabinet using the customer rack kit. The weight of more than one component out of system and rack complies with such combinations...
User Manual
Page 9
... Installing systems in bodily injury under certain circumstances. CAUTION: Do not attempt to install the next system. Dell™ PowerEdge™ 4210 Installation Guide 7 CAUTION: Rack cabinets can be extremely heavy and move your rack with the slide assemblies fully extended. If you begin installing ...who may be very large and heavy, and proper preparation and planning are installed high up in a rack, complete all of cabinet control may be involved. CAUTION: After installing systems in the rack. Extend the leveling feet for the current system before installing...
... Installing systems in bodily injury under certain circumstances. CAUTION: Do not attempt to install the next system. Dell™ PowerEdge™ 4210 Installation Guide 7 CAUTION: Rack cabinets can be extremely heavy and move your rack with the slide assemblies fully extended. If you begin installing ...who may be very large and heavy, and proper preparation and planning are installed high up in a rack, complete all of cabinet control may be involved. CAUTION: After installing systems in the rack. Extend the leveling feet for the current system before installing...
User Manual
Page 10
Installation Tasks Installing a rack cabinet involves performing the following tasks: 1 Removing and replacing the rack doors 2 Removing and replacing the side panels 3 Reversing the front door and badge (optional) 4 Securing ... and Replacing the Rack Doors CAUTION: Because of the size and weight of the rack cabinet doors, never attempt to release the door handle, then open the front door all the way (see Figure 1-1). 8 Dell™ PowerEdge™ 4210 Installation Guide CAUTION: Store the doors where they will not injure someone if the doors...
Installation Tasks Installing a rack cabinet involves performing the following tasks: 1 Removing and replacing the rack doors 2 Removing and replacing the side panels 3 Reversing the front door and badge (optional) 4 Securing ... and Replacing the Rack Doors CAUTION: Because of the size and weight of the rack cabinet doors, never attempt to release the door handle, then open the front door all the way (see Figure 1-1). 8 Dell™ PowerEdge™ 4210 Installation Guide CAUTION: Store the doors where they will not injure someone if the doors...
User Manual
Page 12
... upward so that you lay the removed door flat. 6 Lay the panel in reverse. a Press the door-latch button to release the left door. 10 Dell™ PowerEdge™ 4210 Installation Guide CAUTION: Due to the size and weight of the rack cabinet doors, never attempt to the door's cosmetic coating.
... upward so that you lay the removed door flat. 6 Lay the panel in reverse. a Press the door-latch button to release the left door. 10 Dell™ PowerEdge™ 4210 Installation Guide CAUTION: Due to the size and weight of the rack cabinet doors, never attempt to the door's cosmetic coating.

User Manual
Page 15
Also, although removing the side panels is not mandatory for removal in reverse. Removing a Side Panel 1 2 3 1 side panel (2) 3 handles (2) 2 locks (2) Dell™ PowerEdge™ 4210 Installation Guide 13 Removing the Side Panels CAUTION: Because of the size and weight of the panel (see Figure 1-4). NOTE: You must remove the side ... and support rails and to reverse the direction that the front door opens. 1 Unlock the locks near the left and right edges of the rack cabinet side panels, never attempt to install the side stabilizer feet.
Also, although removing the side panels is not mandatory for removal in reverse. Removing a Side Panel 1 2 3 1 side panel (2) 3 handles (2) 2 locks (2) Dell™ PowerEdge™ 4210 Installation Guide 13 Removing the Side Panels CAUTION: Because of the size and weight of the panel (see Figure 1-4). NOTE: You must remove the side ... and support rails and to reverse the direction that the front door opens. 1 Unlock the locks near the left and right edges of the rack cabinet side panels, never attempt to install the side stabilizer feet.

User Manual
Page 16
... steps: 1 Remove the front door. b Using the needle-nose pliers, remove the retention clip, and slide the hinge pin out of the rack cabinet side panels, never attempt to remove or install them by yourself. 6 Place the panel in reverse. To replace the side panels, perform the removal...1 through step 6 for the other side panel. Replacing the Side Panels CAUTION: Because of the size and weight of the hinge body. 14 Dell™ PowerEdge™ 4210 Installation Guide 2 Allow the side panel to swing outward slightly from the bottom. 3 Grasp the panel firmly using the handles. 4 Lift the ...
... steps: 1 Remove the front door. b Using the needle-nose pliers, remove the retention clip, and slide the hinge pin out of the rack cabinet side panels, never attempt to remove or install them by yourself. 6 Place the panel in reverse. To replace the side panels, perform the removal...1 through step 6 for the other side panel. Replacing the Side Panels CAUTION: Because of the size and weight of the hinge body. 14 Dell™ PowerEdge™ 4210 Installation Guide 2 Allow the side panel to swing outward slightly from the bottom. 3 Grasp the panel firmly using the handles. 4 Lift the ...
User Manual
Page 28
Coupling Two Racks CAUTION: Because of the size and weight of the rack cabinets, never attempt to couple two rack cabinets by yourself. 1 Unpack and set up to unseat them from the door. 5 Repeat steps 3 and 4 on the bottom of the panel. 4 Grab the sides... include: • Four gasket strips • Four hexagonal spacers • Eight Allen screws • A stamped-metal crescent wrench • A T-handle Allen wrench 26 Dell™ PowerEdge™ 4210 Installation Guide The contents of the panel and pull up both racks. 2 Unpack the coupling kit, shown in the door kit. 2 Open the rack...
Coupling Two Racks CAUTION: Because of the size and weight of the rack cabinets, never attempt to couple two rack cabinets by yourself. 1 Unpack and set up to unseat them from the door. 5 Repeat steps 3 and 4 on the bottom of the panel. 4 Grab the sides... include: • Four gasket strips • Four hexagonal spacers • Eight Allen screws • A stamped-metal crescent wrench • A T-handle Allen wrench 26 Dell™ PowerEdge™ 4210 Installation Guide The contents of the panel and pull up both racks. 2 Unpack the coupling kit, shown in the door kit. 2 Open the rack...

Rack Mounting equipment shelf
Page 2
... useable verticle space within an enclosure. For more information, see the Dell Rack Advisor software available on the Rear Panel Mount [B]. Press the vertical clip on the opposite side of the Rear Panel Mount. 2. TAP DOWN TOWARDS BOTTOM OF CABINET B REAR VIEW 4. Position the Shelf Support Bracket [A] so the ... Support Bracket F "U" HEIGHT (1.75"/44.45mm) SQC)0417-SID7-0,fr1/4ROS OF CABIN r A REAR VIEW 1. 1 U Shelf Shelf Support Bracket Installation of the cabinet. Press the horizontal clip into the Vertical Panel Mount [B] and tap down until the locking clip engages.
... useable verticle space within an enclosure. For more information, see the Dell Rack Advisor software available on the Rear Panel Mount [B]. Press the vertical clip on the opposite side of the Rear Panel Mount. 2. TAP DOWN TOWARDS BOTTOM OF CABINET B REAR VIEW 4. Position the Shelf Support Bracket [A] so the ... Support Bracket F "U" HEIGHT (1.75"/44.45mm) SQC)0417-SID7-0,fr1/4ROS OF CABIN r A REAR VIEW 1. 1 U Shelf Shelf Support Bracket Installation of the cabinet. Press the horizontal clip into the Vertical Panel Mount [B] and tap down until the locking clip engages.
Best Practices Guide for Rack Enclosures
Page 4
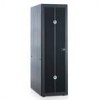
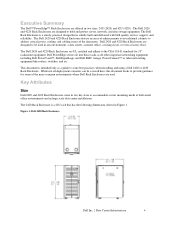
... provide guidance for 19" rackmount equipment. Executive Summary The Dell™ PowerEdge™ Rack Enclosures are offered in any environment: a data center, a remote office, a wiring closet, or even a factory floor. The Dell 2420 and 4220 Rack Enclosure feature an array of enhancements over traditional cabinets to address critical power, cooling, and cabling issues of...
... provide guidance for 19" rackmount equipment. Executive Summary The Dell™ PowerEdge™ Rack Enclosures are offered in any environment: a data center, a remote office, a wiring closet, or even a factory floor. The Dell 2420 and 4220 Rack Enclosure feature an array of enhancements over traditional cabinets to address critical power, cooling, and cabling issues of...
