

Getting Started Guide
Page 5
...two hot-pluggable, 750-W power supplies in the eight memory module sockets on systems with two Intel Xeon processors. The upgrade kit from Dell. The system also features redundant memory, which is available if eight identical memory modules are data only. • An intrusion switch that... SMP greatly improves overall system performance by installing a second processor, you must order the processor upgrade kits from Dell contains the correct version of the processor, heat sink, and fan as well as additional processors. To take advantage of this feature, you must use an operating...
...two hot-pluggable, 750-W power supplies in the eight memory module sockets on systems with two Intel Xeon processors. The upgrade kit from Dell. The system also features redundant memory, which is available if eight identical memory modules are data only. • An intrusion switch that... SMP greatly improves overall system performance by installing a second processor, you must order the processor upgrade kits from Dell contains the correct version of the processor, heat sink, and fan as well as additional processors. To take advantage of this feature, you must use an operating...

Getting Started Guide
Page 13
.../hr maximum Under typical line conditions and over the entire system ambient operating range, the inrush current may reach 55 A per power supply) Wattage Voltage Heat dissipation Maximum inrush current Batteries System battery RAID battery (optional) one optional internal half height tape backup device external optional USB Two RJ-45 (for...
.../hr maximum Under typical line conditions and over the entire system ambient operating range, the inrush current may reach 55 A per power supply) Wattage Voltage Heat dissipation Maximum inrush current Batteries System battery RAID battery (optional) one optional internal half height tape backup device external optional USB Two RJ-45 (for...
Hardware Owner's Manual (PDF)
Page 20
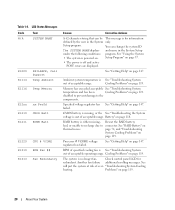
... "Troubleshooting System Cooling Problems" on page 118. Cooling Problems" on page 119. 20 About Your System Another fan failure additional scrolling messages. "Troubleshooting System Cooling heating. Problems" on page 119.
... "Troubleshooting System Cooling Problems" on page 118. Cooling Problems" on page 119. 20 About Your System Another fan failure additional scrolling messages. "Troubleshooting System Cooling heating. Problems" on page 119.
Hardware Owner's Manual (PDF)
Page 21
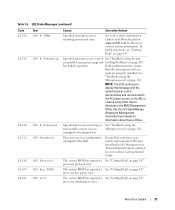
... Technical Specifications outlined in an Microprocessors" on page 119. Processors are properly installed. Ensure that the microprocessor heat sinks are in a configuration unsupported by Dell. The system BIOS has reported a See "Getting Help" on page 147. About Your System 21 If...See "Getting Help" on page 128. processor protocol error. Table 1-6. See "Troubleshooting the Microprocessors" on page 147. See the Dell OpenManage Baseboard Management Controller User's Guide for the most current system information. Specified processor is missing or See "Troubleshooting the bad, ...
... Technical Specifications outlined in an Microprocessors" on page 119. Processors are properly installed. Ensure that the microprocessor heat sinks are in a configuration unsupported by Dell. The system BIOS has reported a See "Getting Help" on page 147. About Your System 21 If...See "Getting Help" on page 128. processor protocol error. Table 1-6. See "Troubleshooting the Microprocessors" on page 147. See the Dell OpenManage Baseboard Management Controller User's Guide for the most current system information. Specified processor is missing or See "Troubleshooting the bad, ...

Hardware Owner's Manual (PDF)
Page 93
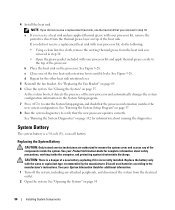
... the computer, and protecting against electrostatic discharge. 1 Prior to upgrading your system, download the latest system BIOS version on support.dell.com. 2 Turn off the system, including any attached peripherals, and disconnect the system from the electrical outlet. 3 Open the system. The...about safety precautions, working inside the system. See "Opening the System" on page 65 5 Remove the fan bracket. NOTICE: When you remove the heat sink while the processor is installed in speed and functionality. See "Removing a System Fan" on page 54. 4 Remove the fans. It is recommended...
... the computer, and protecting against electrostatic discharge. 1 Prior to upgrading your system, download the latest system BIOS version on support.dell.com. 2 Turn off the system, including any attached peripherals, and disconnect the system from the electrical outlet. 3 Open the system. The...about safety precautions, working inside the system. See "Opening the System" on page 65 5 Remove the fan bracket. NOTICE: When you remove the heat sink while the processor is installed in speed and functionality. See "Removing a System Fan" on page 54. 4 Remove the fans. It is recommended...

Hardware Owner's Manual (PDF)
Page 94
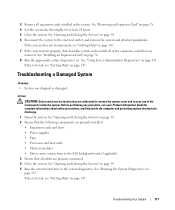
... the socket-release lever 90 degrees upward until it releases from the socket. Do not pry the heat sink from the processor. 10 Lift the heat sink off of the way. 94 Installing System Components Installing and Removing the Heat Sink 1 2 3 1 heat sink 2 heat-sink retention levers (2) 3 retention lever latch 7 Wait 30 seconds for the...
... the socket-release lever 90 degrees upward until it releases from the socket. Do not pry the heat sink from the processor. 10 Lift the heat sink off of the way. 94 Installing System Components Installing and Removing the Heat Sink 1 2 3 1 heat sink 2 heat-sink retention levers (2) 3 retention lever latch 7 Wait 30 seconds for the...
Hardware Owner's Manual (PDF)
Page 96
... with your processor kit, do the following: • Using a clean lint-free cloth, remove the existing thermal grease from the heat sink you receive a heat sink and pre-applied thermal grease with the same or equivalent type recommended by the manufacturer. As the system boots, it detects the...If you removed in the System Setup program. 7 Press to enter the System Setup program, and check that you did not receive a replacement heat sink with your processor kit and apply thermal grease evenly to verify that the new processor operates correctly. c Close one of the processor. System...
... with your processor kit, do the following: • Using a clean lint-free cloth, remove the existing thermal grease from the heat sink you receive a heat sink and pre-applied thermal grease with the same or equivalent type recommended by the manufacturer. As the system boots, it detects the...If you removed in the System Setup program. 7 Press to enter the System Setup program, and check that you did not receive a replacement heat sink with your processor kit and apply thermal grease evenly to verify that the new processor operates correctly. c Close one of the processor. System...
Hardware Owner's Manual (PDF)
Page 117
... "Getting Help" on page 54. 2 Ensure that all cables are properly installed: • Expansion cards and risers • Power supplies • Fans • Processors and heat sinks • Memory modules • Drive-carrier connections to remove the system cover and access any procedure, see "Getting Help" on page 54. 5 Run the...
... "Getting Help" on page 54. 2 Ensure that all cables are properly installed: • Expansion cards and risers • Power supplies • Fans • Processors and heat sinks • Memory modules • Drive-carrier connections to remove the system cover and access any procedure, see "Getting Help" on page 54. 5 Run the...
Hardware Owner's Manual (PDF)
Page 128
..."Removing an Expansion Card" on page 54. See "Opening and Closing the System" on page 54. 4 Ensure that each processor and heat sink are authorized to remove the system cover and access any procedure, see "Getting Help" on page 147. Action CAUTION: Only trained service...• Error message indicates a processor problem. • Front-panel status LCD indicates a problem with the processors or system board. • A heat sink is not installed for complete information about safety precautions, working inside the system. See "Opening and Closing the System" on page 54. If ...
..."Removing an Expansion Card" on page 54. See "Opening and Closing the System" on page 54. 4 Ensure that each processor and heat sink are authorized to remove the system cover and access any procedure, see "Getting Help" on page 147. Action CAUTION: Only trained service...• Error message indicates a processor problem. • Front-panel status LCD indicates a problem with the processors or system board. • A heat sink is not installed for complete information about safety precautions, working inside the system. See "Opening and Closing the System" on page 54. If ...


