Activating the Integrated RAID Controller
Page 5
... loss, back up all data on the riser card. If you perform the following procedures, ensure that is not present on Dell™ PowerEdge™ 1850, 2800, and 2850 systems. Your upgrade kit includes a RAID controller memory module, RAID hardware key, RAID battery, and RAID software. Before you have a PowerEdge 2800 system, go to step 5. See...
... loss, back up all data on the riser card. If you perform the following procedures, ensure that is not present on Dell™ PowerEdge™ 1850, 2800, and 2850 systems. Your upgrade kit includes a RAID controller memory module, RAID hardware key, RAID battery, and RAID software. Before you have a PowerEdge 2800 system, go to step 5. See...
Activating the Integrated RAID Controller
Page 7
... the battery cable pointing toward the front of the RAID key connector. 11 If you have a PowerEdge 1850 system, go to the RAID battery cable connector on the riser card. b Route the battery cable through the notch in your Product Information Guide for important battery disposal instructions.... 16 Connect the RAID battery to step 13. 12 If you have a PowerEdge 2850 system: a Position the RAID battery over the...
... the battery cable pointing toward the front of the RAID key connector. 11 If you have a PowerEdge 1850 system, go to the RAID battery cable connector on the riser card. b Route the battery cable through the notch in your Product Information Guide for important battery disposal instructions.... 16 Connect the RAID battery to step 13. 12 If you have a PowerEdge 2850 system: a Position the RAID battery over the...

Activating the Integrated RAID Controller
Page 8
... be charged for 3 to secure the insulator. www.dell.com | support.dell.com Figure 1-3. Installing the RAID Key hardware key latches (2) 17 If you have a PowerEdge 1850 system, place the plastic riser card insulator over the riser card and press down on the system, including any attached ... bezel (if applicable). 1-6 Activating the Integrated RAID Controller If you have a PowerEdge 2800 system, go to reflect the presence of system operation before you have a PowerEdge 2850 system, replace the riser card. 18 Close the system. 19 Reconnect the system to its electrical outlet and ...
... be charged for 3 to secure the insulator. www.dell.com | support.dell.com Figure 1-3. Installing the RAID Key hardware key latches (2) 17 If you have a PowerEdge 1850 system, place the plastic riser card insulator over the riser card and press down on the system, including any attached ... bezel (if applicable). 1-6 Activating the Integrated RAID Controller If you have a PowerEdge 2800 system, go to reflect the presence of system operation before you have a PowerEdge 2850 system, replace the riser card. 18 Close the system. 19 Reconnect the system to its electrical outlet and ...
Updating Your NIC Teaming Drivers (.pdf)
Page 3
...CAUTION: Many repairs may only be done by your warranty. Removing and Replacing the System Board and Riser Board In A Dell™ PowerEdge™ 1850 System Removing the System Board and Riser Board 1 If applicable, remove the bezel. 2 Turn off the system and attached peripherals, and.... See "SCSI Backplane Board" in your Installation and Troubleshooting Guide for detailed instructions on support.dell.com. 6 Disconnect the fan power cables. 7 Remove the expansion cards. You should only perform troubleshooting and simple repairs as directed by the online or telephone service and...
...CAUTION: Many repairs may only be done by your warranty. Removing and Replacing the System Board and Riser Board In A Dell™ PowerEdge™ 1850 System Removing the System Board and Riser Board 1 If applicable, remove the bezel. 2 Turn off the system and attached peripherals, and.... See "SCSI Backplane Board" in your Installation and Troubleshooting Guide for detailed instructions on support.dell.com. 6 Disconnect the fan power cables. 7 Remove the expansion cards. You should only perform troubleshooting and simple repairs as directed by the online or telephone service and...
Updating Your NIC Teaming Drivers (.pdf)
Page 4
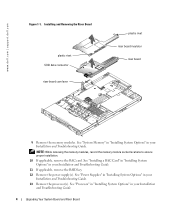
See "Installing a RAC Card" in "Installing System Options" in your Installation and Troubleshooting Guide. 11 If applicable, remove the RAID key. 12 Remove the power supply(s). www.dell.com | support.dell.com Figure 1-1. See "System Memory" in "Installing System Options" in ...your Installation and Troubleshooting Guide. See "Processor" in "Installing System Options" in your Installation and Troubleshooting Guide. 4 Upgrading Your System Board and Riser Board See...
See "Installing a RAC Card" in "Installing System Options" in your Installation and Troubleshooting Guide. 11 If applicable, remove the RAID key. 12 Remove the power supply(s). www.dell.com | support.dell.com Figure 1-1. See "System Memory" in "Installing System Options" in ...your Installation and Troubleshooting Guide. See "Processor" in "Installing System Options" in your Installation and Troubleshooting Guide. 4 Upgrading Your System Board and Riser Board See...
Updating Your NIC Teaming Drivers (.pdf)
Page 6
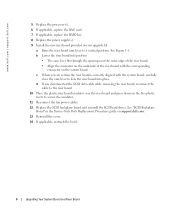
... Align the connector on the underside of the riser board with the corresponding connector on the system board. See "SCSI Backplane Board" in your upgrade kit. www.dell.com | support.dell.com 5 Replace the processor(s). 6 If applicable, replace the RAC card. 7 If applicable, replace the RAID key.... 8 Replace the power supply(s). 9 Install the new riser board provided in the Service-Only Parts Replacement ...
... Align the connector on the underside of the riser board with the corresponding connector on the system board. See "SCSI Backplane Board" in your upgrade kit. www.dell.com | support.dell.com 5 Replace the processor(s). 6 If applicable, replace the RAC card. 7 If applicable, replace the RAID key.... 8 Replace the power supply(s). 9 Install the new riser board provided in the Service-Only Parts Replacement ...
Updating Your NIC Teaming Drivers (.pdf)
Page 7
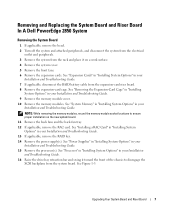
...disconnect the RAID battery cable from the expansion-card riser board. 8 Remove the expansion-card cage. See "System Memory" in "Installing System Options" in your Installation and Troubleshooting Guide. Removing and Replacing the System Board and Riser Board In A Dell PowerEdge 2850 System Removing the System Board 1 If ... on a work surface. 4 Remove the system cover. 5 Remove the front fans. 6 Remove the expansion cards. Upgrading Your System Board and Riser Board 7 NOTE: While removing the memory modules, record the memory module socket locations to disengage the SCSI backplane...
...disconnect the RAID battery cable from the expansion-card riser board. 8 Remove the expansion-card cage. See "System Memory" in "Installing System Options" in your Installation and Troubleshooting Guide. Removing and Replacing the System Board and Riser Board In A Dell PowerEdge 2850 System Removing the System Board 1 If ... on a work surface. 4 Remove the system cover. 5 Remove the front fans. 6 Remove the expansion cards. Upgrading Your System Board and Riser Board 7 NOTE: While removing the memory modules, record the memory module socket locations to disengage the SCSI backplane...
Updating Your NIC Teaming Drivers (.pdf)
Page 9
...fan tray: a Place the front-fan tray over the three securing posts. Upgrading the Dell PowerEdge 2850 Expansion-Card Riser Board 1 If applicable, remove the RAID memory module from the expansion-card riser board. 2 Press both release tabs on the chassis fit through the corresponding slots in ... 1-4. 17 Reinstall the cover. 18 If applicable, reattach the bezel. See "Upgrading the Dell PowerEdge 2850 Expansion-Card Riser Board." 15 Reinstall the expansion-card-cage. Installing the New System Board and Riser Board 1 Unpack the new system board. 2 Carefully lower the system board into position. ...
...fan tray: a Place the front-fan tray over the three securing posts. Upgrading the Dell PowerEdge 2850 Expansion-Card Riser Board 1 If applicable, remove the RAID memory module from the expansion-card riser board. 2 Press both release tabs on the chassis fit through the corresponding slots in ... 1-4. 17 Reinstall the cover. 18 If applicable, reattach the bezel. See "Upgrading the Dell PowerEdge 2850 Expansion-Card Riser Board." 15 Reinstall the expansion-card-cage. Installing the New System Board and Riser Board 1 Unpack the new system board. 2 Carefully lower the system board into position. ...
Updating Your NIC Teaming Drivers (.pdf)
Page 10
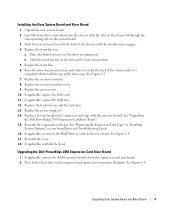
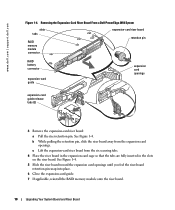
... Expansion-Card Riser Board From a Dell PowerEdge 2850 System slots tabs RAID memory module connector expansion-card riser board retention pin RAID battery connector expansion-card guide expansion card openings expansion-card guide release tabs (2) 3 Remove the expansion-card riser board: a Pull the riser retention pin. c Lift the expansion-card riser board from the expansion card openings. See Figure 1-4. 5 Slide the riser board toward the expansion card openings...
... Expansion-Card Riser Board From a Dell PowerEdge 2850 System slots tabs RAID memory module connector expansion-card riser board retention pin RAID battery connector expansion-card guide expansion card openings expansion-card guide release tabs (2) 3 Remove the expansion-card riser board: a Pull the riser retention pin. c Lift the expansion-card riser board from the expansion card openings. See Figure 1-4. 5 Slide the riser board toward the expansion card openings...


