

Processor Upgrade Installation Guide (.pdf)
Page 3
... the U.S.A. Other trademarks and trade names may be used in your User's Guide. Dell Inc. disclaims any manner whatsoever without notice. © 2004 Dell Inc. When the system boots, the Remote Access Control Detected message displays and the option ROM and firmware information for... CDROM and LS-120. www.dell.com | support.dell.com Figure 2. All rights reserved. Printed in ...
... the U.S.A. Other trademarks and trade names may be used in your User's Guide. Dell Inc. disclaims any manner whatsoever without notice. © 2004 Dell Inc. When the system boots, the Remote Access Control Detected message displays and the option ROM and firmware information for... CDROM and LS-120. www.dell.com | support.dell.com Figure 2. All rights reserved. Printed in ...
Installing the 1 x 2 SCSI Backplane
Page 8
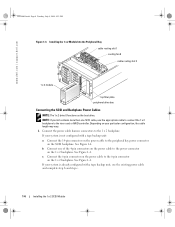
... 1 cooling fan 8 cable routing slot 2 1 x 2 module top filler plate peripheral drive bay Connecting the SCSI and Backplane Power Cables NOTE: The 1 x 2 drive 0 functions as the boot drive. See Figure 1-4. See Figure 1-4. If your particular configuration, the cable length may vary. 1 Connect the power cable harness connectors to the power connector on...
... 1 cooling fan 8 cable routing slot 2 1 x 2 module top filler plate peripheral drive bay Connecting the SCSI and Backplane Power Cables NOTE: The 1 x 2 drive 0 functions as the boot drive. See Figure 1-4. See Figure 1-4. If your particular configuration, the cable length may vary. 1 Connect the power cable harness connectors to the power connector on...
Installing the 1 x 2 SCSI Backplane
Page 10
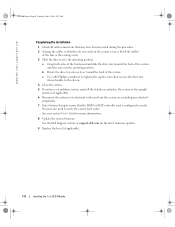
...so that they do not catch on , including any attached peripherals. 7 Enter System Setup to ensure that may also need to verify the correct boot order. See your system User's Guide for the latest firmware updates. 9 Replace the bezel (if applicable). 1-8 Installing the 1 x 2 ... standalone system, reinstall the stabilizers and place the system in the operating position. See the Dell Support website at support.dell.com for more information. 8 Update the system firmware. www.dell.com | support.dell.com F6590bk0.book Page 8 Tuesday, July 6, 2004 4:33 PM Completing the Installation 1...
...so that they do not catch on , including any attached peripherals. 7 Enter System Setup to ensure that may also need to verify the correct boot order. See your system User's Guide for the latest firmware updates. 9 Replace the bezel (if applicable). 1-8 Installing the 1 x 2 ... standalone system, reinstall the stabilizers and place the system in the operating position. See the Dell Support website at support.dell.com for more information. 8 Update the system firmware. www.dell.com | support.dell.com F6590bk0.book Page 8 Tuesday, July 6, 2004 4:33 PM Completing the Installation 1...

Installing the SCSI Backplane Daughter Card
Page 6
... turn the system on, including any attached peripherals. 12 Enter System Setup to connector SCSIB on the SCSI backplane. This channel controls the boot drive (drive 0) and drives 1, 2, and 3. Installing the SCSI Daughter Card SCSI backplane board SCSI daughter card standoffs (2) 8 To ...for more information. 13 Replace the bezel (if applicable). 1-4 Installing the SCSI Backplane Daughter Card This channel controls the boot drive (drive 0) and drives 1, 2, and 3. www.dell.com | support.dell.com Figure 1-1. To use the optional integrated ROMB controller in the operating position.
... turn the system on, including any attached peripherals. 12 Enter System Setup to connector SCSIB on the SCSI backplane. This channel controls the boot drive (drive 0) and drives 1, 2, and 3. Installing the SCSI Daughter Card SCSI backplane board SCSI daughter card standoffs (2) 8 To ...for more information. 13 Replace the bezel (if applicable). 1-4 Installing the SCSI Backplane Daughter Card This channel controls the boot drive (drive 0) and drives 1, 2, and 3. www.dell.com | support.dell.com Figure 1-1. To use the optional integrated ROMB controller in the operating position.

Installing the SCSI Backplane Daughter Card
Page 8
... and lock the card into the card guide. b Connect SCSI channel B on the riser card to SCSIA on the SCSI backplane. See Figure 1-3. www.dell.com | support.dell.com 6 The daughter card fits between the sides of the system. Drive Bay Retraction Bar drive bay retraction bar 8 Reconnect the control panel cable... the SCSI backplane and the retention peg facing the retention lever. To install the daughter card in the open position. Figure 1-3. This channel controls the boot drive (drive 0) and drive 1.
... and lock the card into the card guide. b Connect SCSI channel B on the riser card to SCSIA on the SCSI backplane. See Figure 1-3. www.dell.com | support.dell.com 6 The daughter card fits between the sides of the system. Drive Bay Retraction Bar drive bay retraction bar 8 Reconnect the control panel cable... the SCSI backplane and the retention peg facing the retention lever. To install the daughter card in the open position. Figure 1-3. This channel controls the boot drive (drive 0) and drive 1.

Installing the SCSI Backplane Daughter Card
Page 9
... controller card in a split backplane configuration: a Connect SCSI channel A (channel 0) on the controller card to connector SCSIB on the SCSI backplane. This channel controls the boot drive (drive 0) and drive 1. Installing the SCSI Backplane Daughter Card 1-7
... controller card in a split backplane configuration: a Connect SCSI channel A (channel 0) on the controller card to connector SCSIB on the SCSI backplane. This channel controls the boot drive (drive 0) and drive 1. Installing the SCSI Backplane Daughter Card 1-7
Processor Upgrade Installation Guide
Page 9
... System Setup program. 17 Run the system diagnostics to enter the System Setup program, and check that the new processor operates correctly. As the system boots, it detects the presence of the new processor and automatically changes the system configuration information in your system and peripherals to their electrical outlets, and...
... System Setup program. 17 Run the system diagnostics to enter the System Setup program, and check that the new processor operates correctly. As the system boots, it detects the presence of the new processor and automatically changes the system configuration information in your system and peripherals to their electrical outlets, and...


