Information Update — 1-GB 512-Mb Memory Modules
Page 1
... POST/no video error condition. Information Update - 1-GB 512-Mb Memory Modules CAUTION: See your Installation and Troubleshooting Guide for complete information about safety precautions, working inside the computer, and protecting against electrostatic discharge. The industry is completely populated with identical memory modules (1 GB 256 Mb or 1 GB 512 Mb). See your Product Information Guide or System Information Guide for memory module installation guidelines. www.dell.com | support.dell...
... POST/no video error condition. Information Update - 1-GB 512-Mb Memory Modules CAUTION: See your Installation and Troubleshooting Guide for complete information about safety precautions, working inside the computer, and protecting against electrostatic discharge. The industry is completely populated with identical memory modules (1 GB 256 Mb or 1 GB 512 Mb). See your Product Information Guide or System Information Guide for memory module installation guidelines. www.dell.com | support.dell...
Information Update
Page 5
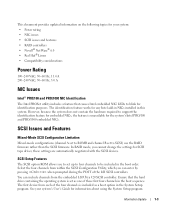
... Intel add-in NICs installed in the boot order. these first four channels in the System Setup program. You can enter by pressing when prompted during the POST of the LSI SCSI controllers. Information Update 1-3 This document provides updated information on the following topics for your system's User's Guide for information about using the System Setup program. SCSI Issues and Features Mixed-Mode SCSI Configuration Limitation Mixed-mode configurations (channel A set to blink...
... Intel add-in NICs installed in the boot order. these first four channels in the System Setup program. You can enter by pressing when prompted during the POST of the LSI SCSI controllers. Information Update 1-3 This document provides updated information on the following topics for your system's User's Guide for information about using the System Setup program. SCSI Issues and Features Mixed-Mode SCSI Configuration Limitation Mixed-mode configurations (channel A set to blink...

Information Update
Page 6
... more PERC 3/DC or PERC 3/QC RAID controllers are installed in PCI-X expansion slots 2 through 5. NOTE: "Overload" in clearing the operating system configuration. When you access the RAID controller setup functions by pressing during startup, the ROMB boot drive is enabled and one slot on the bus. Use the updated UHC1DRV.NLM file (version 1.01, dated December 12, 2001, or a later version) on the Dell OpenManage Server Assistant CD to resolve this context refers...
... more PERC 3/DC or PERC 3/QC RAID controllers are installed in PCI-X expansion slots 2 through 5. NOTE: "Overload" in clearing the operating system configuration. When you access the RAID controller setup functions by pressing during startup, the ROMB boot drive is enabled and one slot on the bus. Use the updated UHC1DRV.NLM file (version 1.01, dated December 12, 2001, or a later version) on the Dell OpenManage Server Assistant CD to resolve this context refers...

Information Update
Page 7
...: 1 At the command prompt, type insmod sg. 2 Type more /proc/scsi/sg/device_hdr to display a header. 3 Type more /proc/scsi/sg/devices to back up your data on a system running Red Hat Linux 7.3, you have either jumpers or some other way of physically changing the ID number of the device. See the documentation that came with Support Pack 1 might not recognize an Embedded Remote Access Option (ERA/O) card that is...
...: 1 At the command prompt, type insmod sg. 2 Type more /proc/scsi/sg/device_hdr to display a header. 3 Type more /proc/scsi/sg/devices to back up your data on a system running Red Hat Linux 7.3, you have either jumpers or some other way of physically changing the ID number of the device. See the documentation that came with Support Pack 1 might not recognize an Embedded Remote Access Option (ERA/O) card that is...

Information Update
Page 8
... BIOS Version If your system uses the Xeon 533-MHz front-side bus processor, your system BIOS must be used together in a memory-configuration error beep code of at least 512 KB. www.dell.com | support.dell.com Compatibility Considerations Processors A system board that uses up to two Intel Xeon™ 533-MHz front-side bus microprocessors is not applied to the processors so that they will not boot and no error message...
... BIOS Version If your system uses the Xeon 533-MHz front-side bus processor, your system BIOS must be used together in a memory-configuration error beep code of at least 512 KB. www.dell.com | support.dell.com Compatibility Considerations Processors A system board that uses up to two Intel Xeon™ 533-MHz front-side bus microprocessors is not applied to the processors so that they will not boot and no error message...
Installing the SCSI Backplane Daughter Card
Page 29
RAID SCSI A RAID SCSI 2 SCSI B - RAID RAID RAID 2 SCSI A SCSI B - RAID 2 SCSI A SCSI B 5-2. SCSI 2 SCSI SCSI 1 1 SCSI B 8 Installation and Troubleshooting Guide SCSI A Replacing the Front Fan Assembly SCSI 5-3 6 Installation and Troubleshooting Guide 5-1 Removing the Front Fan Assembly 7 SCSI SCSI 5-2 -
RAID SCSI A RAID SCSI 2 SCSI B - RAID RAID RAID 2 SCSI A SCSI B - RAID 2 SCSI A SCSI B 5-2. SCSI 2 SCSI SCSI 1 1 SCSI B 8 Installation and Troubleshooting Guide SCSI A Replacing the Front Fan Assembly SCSI 5-3 6 Installation and Troubleshooting Guide 5-1 Removing the Front Fan Assembly 7 SCSI SCSI 5-2 -
Microprocessor Upgrade Installation
Page 5
...(s) • A VRM, if applicable Your upgrade kit may also include a cooling fan. NOTE: In a single microprocessor system, the microprocessor must be installed in your System Information document. 1 Turn off the system, including any peripherals, and disconnect the power cable from the electrical outlet. 2 Open the system doors, or remove the system cover (see your Installation and Troubleshooting Guide). CAUTION: Before you perform this procedure...
...(s) • A VRM, if applicable Your upgrade kit may also include a cooling fan. NOTE: In a single microprocessor system, the microprocessor must be installed in your System Information document. 1 Turn off the system, including any peripherals, and disconnect the power cable from the electrical outlet. 2 Open the system doors, or remove the system cover (see your Installation and Troubleshooting Guide). CAUTION: Before you perform this procedure...

Microprocessor Upgrade Installation
Page 7
... is no need to bend the pins. 8 Install the microprocessor in the socket. Figure 1-1. Removing and Replacing the Microprocessor pin-1 locators microprocessor microprocessor socket NOTICE: Positioning the microprocessor incorrectly can permanently damage the microprocessor and the system when you turn on the microprocessor socket. Be careful not to use force (which could bend the pins if...
... is no need to bend the pins. 8 Install the microprocessor in the socket. Figure 1-1. Removing and Replacing the Microprocessor pin-1 locators microprocessor microprocessor socket NOTICE: Positioning the microprocessor incorrectly can permanently damage the microprocessor and the system when you turn on the microprocessor socket. Be careful not to use force (which could bend the pins if...
Microprocessor Upgrade Installation
Page 8
... your upgrade kit or if you must align the heat sink so that the latches at each end of the socket. 12 Press down on the release tab until the hole on the edge of the connector engage (see Figure 1-2). NOTE: The system does not support mismatched VRMs. 1-4 Microprocessor Upgrade Installation Guide For information on installing a cooling fan, see your Installation and Troubleshooting Guide...
... your upgrade kit or if you must align the heat sink so that the latches at each end of the socket. 12 Press down on the release tab until the hole on the edge of the connector engage (see Figure 1-2). NOTE: The system does not support mismatched VRMs. 1-4 Microprocessor Upgrade Installation Guide For information on installing a cooling fan, see your Installation and Troubleshooting Guide...

Microprocessor Upgrade Installation
Page 9
...'s nonvolatile random-access memory (NVRAM). Installing a VRM VRM VRM connector connector key latches (2) 15 Replace the cooling shroud, if applicable (see your Installation and Troubleshooting Guide). 16 Close the system doors, or replace the system cover (see your Installation and Troubleshooting Guide). 17 Reconnect your system and peripherals to be displayed at the next system startup. To clear this message log, see your systems management software documentation. 18 Enter the System Setup program and...
...'s nonvolatile random-access memory (NVRAM). Installing a VRM VRM VRM connector connector key latches (2) 15 Replace the cooling shroud, if applicable (see your Installation and Troubleshooting Guide). 16 Close the system doors, or replace the system cover (see your Installation and Troubleshooting Guide). 17 Reconnect your system and peripherals to be displayed at the next system startup. To clear this message log, see your systems management software documentation. 18 Enter the System Setup program and...

Installing or Replacing an ERA/O Card
Page 3
... outlets. 3 Remove the cover. Before installing the ERA/O card, record the system configuration settings. View the system configuration screens in your User's Guide for instructions about using an ERA/O card, see the remote access controller documentation provided on the documentation CD that came with your System Information Guide for complete information about your ERA/O card is available at the Dell Support website at support.dell.com. See "Removing the Bezel" in the System Setup program and...
... outlets. 3 Remove the cover. Before installing the ERA/O card, record the system configuration settings. View the system configuration screens in your User's Guide for instructions about using an ERA/O card, see the remote access controller documentation provided on the documentation CD that came with your System Information Guide for complete information about your ERA/O card is available at the Dell Support website at support.dell.com. See "Removing the Bezel" in the System Setup program and...
Installing or Replacing an ERA/O Card
Page 4
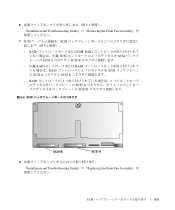
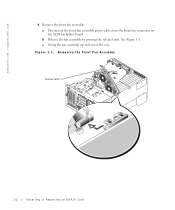
Figure 1-1. b Release the fan assembly by pressing the release latch. Removing the Front Fan Assembly release latch 1-2 Installing or Replacing an ERA/O Card www.dell.com | support.dell.com 4 Remove the front fan assembly: a Disconnect the front fan assembly power cable from the front fan connector on the SCSI backplane board. c Swing the fan assembly up and out of the way. See Figure 1-1.
Figure 1-1. b Release the fan assembly by pressing the release latch. Removing the Front Fan Assembly release latch 1-2 Installing or Replacing an ERA/O Card www.dell.com | support.dell.com 4 Remove the front fan assembly: a Disconnect the front fan assembly power cable from the front fan connector on the SCSI backplane board. c Swing the fan assembly up and out of the way. See Figure 1-1.
Installing or Replacing an ERA/O Card
Page 7
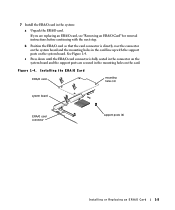
... 1-4. Installing the ERA/O Card ERA/O card mounting holes (4) system board ERA/O card connector support posts (4) Installing or Replacing an ERA/O Card 1-5 If you are secured in the mounting holes on the card. b Position the ERA/O card so that the card connector is fully seated in the connector on the system board and the support posts are replacing an ERA/O card, see "Removing an ERA/O Card" for removal instructions before continuing with the support posts on the system board and the mounting...
... 1-4. Installing the ERA/O Card ERA/O card mounting holes (4) system board ERA/O card connector support posts (4) Installing or Replacing an ERA/O Card 1-5 If you are secured in the mounting holes on the card. b Position the ERA/O card so that the card connector is fully seated in the connector on the system board and the support posts are replacing an ERA/O card, see "Removing an ERA/O Card" for removal instructions before continuing with the support posts on the system board and the mounting...
Installing or Replacing an ERA/O Card
Page 8
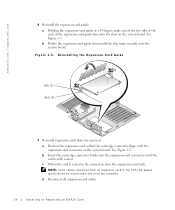
... seated. NOTE: SCSI cables connected from an expansion card to the SCSI backplane board should be routed under the front fan assembly. See Figure 1-2. Reinstalling the Expansion-Card Guide tabs (2) slots (2) 9 Reinstall expansion cards that you removed: a Position the expansion card so that the card-edge connector aligns with the expansion-card connector on the system board. See Figure 1-5. d Reconnect all expansion-card cables. 1-6 Installing or Replacing an ERA/O Card www.dell.com | support.dell.com 8 Reinstall the expansion-card guide: a Holding the expansion-card guide at a 45...
... seated. NOTE: SCSI cables connected from an expansion card to the SCSI backplane board should be routed under the front fan assembly. See Figure 1-2. Reinstalling the Expansion-Card Guide tabs (2) slots (2) 9 Reinstall expansion cards that you removed: a Position the expansion card so that the card-edge connector aligns with the expansion-card connector on the system board. See Figure 1-5. d Reconnect all expansion-card cables. 1-6 Installing or Replacing an ERA/O Card www.dell.com | support.dell.com 8 Reinstall the expansion-card guide: a Holding the expansion-card guide at a 45...

Installing or Replacing an ERA/O Card
Page 9
... to the 10-Mbps server management Ethernet connector on the system back panel. 10 Reinstall the front fan assembly: a Place the fan assembly in your Installation and Troubleshooting Guide. b Connect the fan assembly power cable to the front fan connector on . 14 Close the bezel. 15 Update the ERA/O card with the latest version of the connector. 12 Connect a network cable to their electrical outlets, and turn them on the SCSI backplane board. 11 Replace the system cover.
... to the 10-Mbps server management Ethernet connector on the system back panel. 10 Reinstall the front fan assembly: a Place the fan assembly in your Installation and Troubleshooting Guide. b Connect the fan assembly power cable to the front fan connector on . 14 Close the bezel. 15 Update the ERA/O card with the latest version of the connector. 12 Connect a network cable to their electrical outlets, and turn them on the SCSI backplane board. 11 Replace the system cover.

Installing or Replacing an ERA/O Card
Page 47
Embedded Remote Access Option(ERA/O はじめに メモ:ERA/O CD ERA/O Web サイト support.jp.dell.com ERA/O ERA/O 1 Installation and Troubleshooting Guide Removing the Bezel 2 3 Installation and Troubleshooting Guide Removing the Cover ERA/O 5-1
Embedded Remote Access Option(ERA/O はじめに メモ:ERA/O CD ERA/O Web サイト support.jp.dell.com ERA/O ERA/O 1 Installation and Troubleshooting Guide Removing the Bezel 2 3 Installation and Troubleshooting Guide Removing the Cover ERA/O 5-1

Installing Novell NetWare 5.1 and Support Pack 5
Page 1
... firmware versions and the required system configuration parameters and component revision levels. SCSI driver - After the support pack is installed, you can then use the ACPI modules from the Novell support and downloads website at support.novell.com and install each individually: • Advanced Configuration and Power Interface (ACPI) fix for more information. • One of the following drivers. NOTE: USB and hot-plug technologies are discussed in the Dell OpenManage Server...
... firmware versions and the required system configuration parameters and component revision levels. SCSI driver - After the support pack is installed, you can then use the ACPI modules from the Novell support and downloads website at support.novell.com and install each individually: • Advanced Configuration and Power Interface (ACPI) fix for more information. • One of the following drivers. NOTE: USB and hot-plug technologies are discussed in the Dell OpenManage Server...

Installing Novell NetWare 5.1 and Support Pack 5
Page 2
... 5. 2 On the Server Assistant main screen, click Update Drivers/Utilities. 3 Select your server from the Dell OpenManage Server Assistant CD, insert the Server Assistant CD into the CD drive, and insert a diskette into the CD drive. 2 Select your system. b To obtain the drivers from the Dell™ Support website, go to support.dell.com, download the drivers, and then skip to install NetWare 5.1 using either the NetWare 5.1 Network Software CD or...
... 5. 2 On the Server Assistant main screen, click Update Drivers/Utilities. 3 Select your server from the Dell OpenManage Server Assistant CD, insert the Server Assistant CD into the CD drive, and insert a diskette into the CD drive. 2 Select your system. b To obtain the drivers from the Dell™ Support website, go to support.dell.com, download the drivers, and then skip to install NetWare 5.1 using either the NetWare 5.1 Network Software CD or...

Installing Novell NetWare 5.1 and Support Pack 5
Page 3
..., do not reboot. 12 Install the support pack. To obtain the support pack, you must have the NetWare 5.1 Support Pack 5 CD, or you must download the support pack from the Novell support and downloads website. 1 At the system console screen, type cdrom and press . 2 Insert the NetWare 5.1 Support Pack 5 CD into the CD drive (or, if you are installing the operating system using the NetWare 5.1 Network Software CD...
..., do not reboot. 12 Install the support pack. To obtain the support pack, you must have the NetWare 5.1 Support Pack 5 CD, or you must download the support pack from the Novell support and downloads website. 1 At the system console screen, type cdrom and press . 2 Insert the NetWare 5.1 Support Pack 5 CD into the CD drive (or, if you are installing the operating system using the NetWare 5.1 Network Software CD...
Installing Novell NetWare 5.1 and Support Pack 5
Page 4
... Corporation. All rights reserved. Reproduction in this text: Dell, the DELL logo, and Dell OpenManage are registered trademarks of Intel Corporation. Intel is a registered trademark of Novell, Inc; www.dell.com | support.dell.com For postinstallation configuration and further installation information, see the Novell NetWare 5.1 Operating System Installation Instructions and Important Information document provided with your system. Novell and NetWare are trademarks...
... Corporation. All rights reserved. Reproduction in this text: Dell, the DELL logo, and Dell OpenManage are registered trademarks of Intel Corporation. Intel is a registered trademark of Novell, Inc; www.dell.com | support.dell.com For postinstallation configuration and further installation information, see the Novell NetWare 5.1 Operating System Installation Instructions and Important Information document provided with your system. Novell and NetWare are trademarks...


