SCSI Backplane Daughter Card (.pdf)
Page 6
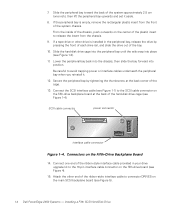
...board (see Figure 1-3). 11. then slide the bay forward into the chassis; Attach the other drive is empty, remove the rectangular plastic insert from the chassis. 9. If a tape drive or other end of the hard-disk drive cage (see Figure 5). 1-4 Dell PowerEdge 2450 Systems - If the peripheral bay is... 10. Connect the SCSI interface cable (see Figure 1-1) to connector DRIVE5 on the Fifth-Drive Backplane Board 14. Connect one inch); 7. Slide the hard-disk drive cage into the peripheral bay until the rails snap into place (see Figure 4). 15. Connectors on the main SCSI ...
...board (see Figure 1-3). 11. then slide the bay forward into the chassis; Attach the other drive is empty, remove the rectangular plastic insert from the chassis. 9. If a tape drive or other end of the hard-disk drive cage (see Figure 5). 1-4 Dell PowerEdge 2450 Systems - If the peripheral bay is... 10. Connect the SCSI interface cable (see Figure 1-1) to connector DRIVE5 on the Fifth-Drive Backplane Board 14. Connect one inch); 7. Slide the hard-disk drive cage into the peripheral bay until the rails snap into place (see Figure 4). 15. Connectors on the main SCSI ...

Activating the Dell PERC 3/Si (.pdf)
Page 6
... throughput up to SCSI Enabled, Channel A and Channel B display SCSI. When you perform any devices. 1-4 Dell PowerEdge 2450 Systems Information Update The Ultra3 SCSI standard supports a combination of the Dell PowerEdge 2450 Systems Installation and Troubleshooting Guide, make sure to slide in the daughter card until it to 160 megabytes per second (MB/sec). Your system's integrated...
... throughput up to SCSI Enabled, Channel A and Channel B display SCSI. When you perform any devices. 1-4 Dell PowerEdge 2450 Systems Information Update The Ultra3 SCSI standard supports a combination of the Dell PowerEdge 2450 Systems Installation and Troubleshooting Guide, make sure to slide in the daughter card until it to 160 megabytes per second (MB/sec). Your system's integrated...

Activating the Dell PERC 3/Si (.pdf)
Page 9
...to unseat it. e. NOTE: The RCU recognizes microprocessors operating at http://support.dell.com. 1. a. Push firmly on the outside of the power supply enclosure beside the narrower front part of the chassis. Slide the air blower slightly up and toward the front of the chassis until the... tab at the back right of the air blower slides out of the small slot at the top back of the air blower. You should hear it slightly away from the power supplies to clear the power supply enclosure. support.dell.com Dell PowerEdge 2450 Systems Information Update 1-7 c. d. b. Position your...
...to unseat it. e. NOTE: The RCU recognizes microprocessors operating at http://support.dell.com. 1. a. Push firmly on the outside of the power supply enclosure beside the narrower front part of the chassis. Slide the air blower slightly up and toward the front of the chassis until the... tab at the back right of the air blower slides out of the small slot at the top back of the air blower. You should hear it slightly away from the power supplies to clear the power supply enclosure. support.dell.com Dell PowerEdge 2450 Systems Information Update 1-7 c. d. b. Position your...

Activating the Dell PERC 3/Si (.pdf)
Page 11
Slide the SEC cartridge and heat sink into the guide-bracket assembly and firmly seat them in the assembly until the tabs snap into place over the ends of the heat sink (see Figure 1-5). heat sink guide-bracket assembly SEC cartridge tab 1. support.dell.com Dell PowerEdge 2450 Systems Information Update 1-9
Slide the SEC cartridge and heat sink into the guide-bracket assembly and firmly seat them in the assembly until the tabs snap into place over the ends of the heat sink (see Figure 1-5). heat sink guide-bracket assembly SEC cartridge tab 1. support.dell.com Dell PowerEdge 2450 Systems Information Update 1-9

Activating the Dell PERC 3/Si (.pdf)
Page 12
Slide the metal tab at the back right of the air blower carefully into the topmost slot at the top back of the air blower is ... supply enclosure beside the narrower front part of the air blower. c. e. Reconnect your right thumb on the power supply enclosure to their power sources. 1-10 Dell PowerEdge 2450 Systems Information Update heat sink SEC cartridge tab guide-bracket assembly 2. a. d. With your left hand, push down and toward the power supplies, allowing extra clearance...
Slide the metal tab at the back right of the air blower carefully into the topmost slot at the top back of the air blower is ... supply enclosure beside the narrower front part of the air blower. c. e. Reconnect your right thumb on the power supply enclosure to their power sources. 1-10 Dell PowerEdge 2450 Systems Information Update heat sink SEC cartridge tab guide-bracket assembly 2. a. d. With your left hand, push down and toward the power supplies, allowing extra clearance...

Installation and Troubleshooting Guide (.pdf)
Page 6
Slide the system completely into position on the support tray. 3. (Rev. 11/3/98) FILE LOCATION: C:\Dell\docs\2450\2post\81HFFts0.fm 12-24 x 0.5 inch screws (4) Figure 3. If your system has an optional plastic bezel, remove it to install the computer system by yourself. 1. ... the Installation and Troubleshooting Guide for instructions). 2. tive fasteners at the lower edge of the computer system, never attempt to the rack using the cap- DELL CONFIDENTIAL - Preliminary 9/27/01 4 Dell PowerEdge 2450 Systems - Lift the system into position and secure it (see Figure 4).
Slide the system completely into position on the support tray. 3. (Rev. 11/3/98) FILE LOCATION: C:\Dell\docs\2450\2post\81HFFts0.fm 12-24 x 0.5 inch screws (4) Figure 3. If your system has an optional plastic bezel, remove it to install the computer system by yourself. 1. ... the Installation and Troubleshooting Guide for instructions). 2. tive fasteners at the lower edge of the computer system, never attempt to the rack using the cap- DELL CONFIDENTIAL - Preliminary 9/27/01 4 Dell PowerEdge 2450 Systems - Lift the system into position and secure it (see Figure 4).
