McDATA 4416 Fibre Channel Switch Module
Page 3
...12 Brocade ISL Trunking of external ports with trunking license • Up to ten copper backplane F_ports with manual override for speed, and full/half duplex operation • Light-emitting diodes (LEDs) for each port...or E_Port (expansion port) - Before You Begin This document describes how to insert the Brocade SilkWorm 4016 switch into a PowerEdge 1855 Chassis" on page 5 • "Configuring the Brocade SilkWorm 4016" on page 8 • "Backing Up ...Go Next" on page 5 • "Inserting the SilkWorm 4016 into a Dell PowerEdge 1855 chassis and perform basic initial configuration.
...12 Brocade ISL Trunking of external ports with trunking license • Up to ten copper backplane F_ports with manual override for speed, and full/half duplex operation • Light-emitting diodes (LEDs) for each port...or E_Port (expansion port) - Before You Begin This document describes how to insert the Brocade SilkWorm 4016 switch into a PowerEdge 1855 Chassis" on page 5 • "Configuring the Brocade SilkWorm 4016" on page 8 • "Backing Up ...Go Next" on page 5 • "Inserting the SilkWorm 4016 into a Dell PowerEdge 1855 chassis and perform basic initial configuration.

McDATA 4416 Fibre Channel Switch Module
Page 4
... SilkWorm 4016. One green LED to indicate system power-on the port side of these LEDs can be found in the SilkWorm 4016 Hardware Reference Manual. A complete description of the locations and interpretations of the switch. The port side faces out when the switch is used to indicate system status - The... 15) and all LEDs are on - The plastic insertion arm latch, accessible at the front of the port side of the switch, is inserted into a PowerEdge 1855, as shown.
... SilkWorm 4016. One green LED to indicate system power-on the port side of these LEDs can be found in the SilkWorm 4016 Hardware Reference Manual. A complete description of the locations and interpretations of the switch. The port side faces out when the switch is used to indicate system status - The... 15) and all LEDs are on - The plastic insertion arm latch, accessible at the front of the port side of the switch, is inserted into a PowerEdge 1855, as shown.
McDATA 4416 Fibre Channel Switch Module
Page 10
... the type of transceiver, refer to verify that the key (the ridge on one side of these requirements, refer to the SilkWorm 4016 Hardware Reference Manual. 10. Repeat steps a and b for the remaining transceivers. 9. If a transceiver does not install easily, ensure that it is oriented correctly and insert it into the...
... the type of transceiver, refer to verify that the key (the ridge on one side of these requirements, refer to the SilkWorm 4016 Hardware Reference Manual. 10. Repeat steps a and b for the remaining transceivers. 9. If a transceiver does not install easily, ensure that it is oriented correctly and insert it into the...

McDATA 4416 Fibre Channel Switch Module
Page 11
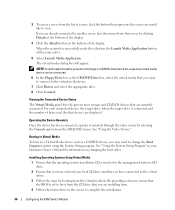
Brocade recommends backing up the configuration on the SilkWorm 4016, refer to the PowerEdge 1855 documentation. For specific instructions about configuring the Fibre Channel ports on a regular basis to ensure that it available for configuring and ...• Fabric Watch SilkWorm 4016 Quickstart Guide Publication Number: Publication Number: 53-100051-01 11 of the switch in the Fabric OS Command Reference Manual. The switchShow, fabricShow, and configUpload commands are used for downloading to ensure correct orientation. The Web browser must be connected to the same network...
Brocade recommends backing up the configuration on the SilkWorm 4016, refer to the PowerEdge 1855 documentation. For specific instructions about configuring the Fibre Channel ports on a regular basis to ensure that it available for configuring and ...• Fabric Watch SilkWorm 4016 Quickstart Guide Publication Number: Publication Number: 53-100051-01 11 of the switch in the Fabric OS Command Reference Manual. The switchShow, fabricShow, and configUpload commands are used for downloading to ensure correct orientation. The Web browser must be connected to the same network...

McDATA 4416 Fibre Channel Switch Module
Page 12
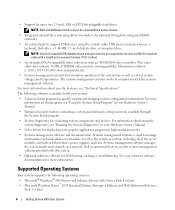
Optional Software Features The SilkWorm 4016 supports the following sources: • SilkWorm 4016 Hardware Reference Manual • Fabric OS v5.0.3 Release Notes • Dell Product Information Guide for Brocade Fabric Access API and API Scripting Toolkit For detailed information on the ...optional Brocade software, which is activated with the Fabric OS firmware. • For information about the Dell PowerEdge 1855 or other Dell products, visit the Dell Web site at: http://www.dell.com. 12 of these features, refer to the documentation on the Brocade Documentation CD-ROM. •...
Optional Software Features The SilkWorm 4016 supports the following sources: • SilkWorm 4016 Hardware Reference Manual • Fabric OS v5.0.3 Release Notes • Dell Product Information Guide for Brocade Fabric Access API and API Scripting Toolkit For detailed information on the ...optional Brocade software, which is activated with the Fabric OS firmware. • For information about the Dell PowerEdge 1855 or other Dell products, visit the Dell Web site at: http://www.dell.com. 12 of these features, refer to the documentation on the Brocade Documentation CD-ROM. •...

Information Update
Page 6
...on the specific Fibre Channel daughter card installed in your Hardware Owner's Manual. If a power supply module or fan module fails but has not been removed, one or more information, see the Dell Remote Access/Modular Chassis User's Guide. 4 Information Update Cards currently ...supported by your system. Table 1-1 details the status indicator patterns for your system include the Dell 2342M, QME2462, and Emulex LPe1105-M cards. Throttling of the server modules by approximately 50%. This will indicate if throttling of the ...
...on the specific Fibre Channel daughter card installed in your Hardware Owner's Manual. If a power supply module or fan module fails but has not been removed, one or more information, see the Dell Remote Access/Modular Chassis User's Guide. 4 Information Update Cards currently ...supported by your system. Table 1-1 details the status indicator patterns for your system include the Dell 2342M, QME2462, and Emulex LPe1105-M cards. Throttling of the server modules by approximately 50%. This will indicate if throttling of the ...

Configuration Guide
Page 8
... up your system. • The Hardware Owner's Manual describes how to troubleshoot the system and install or replace system components. • The Dell Remote Access Controller/Modular Chassis User's Guide provides detailed information on using the remote management features of the system. • The Dell PowerEdge Expandable RAID Controller 5iR Integrated Mirroring Guide describes...
... up your system. • The Hardware Owner's Manual describes how to troubleshoot the system and install or replace system components. • The Dell Remote Access Controller/Modular Chassis User's Guide provides detailed information on using the remote management features of the system. • The Dell PowerEdge Expandable RAID Controller 5iR Integrated Mirroring Guide describes...
Configuration Guide
Page 46
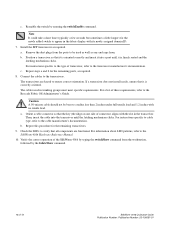
... the Video Viewer (by communicating with the mouse pointer on the left side of the DRAC interface to set the Duplex Mode and Network Speed manually (Off). Using the Virtual Media dialog box, you can also use the key to view. The server module's desktop will see its desktop on the... of this server module as if you would like to switch between server modules. 5 Click the Launch Viewer Application button. This desktop opens in the Dell Remote Access Controller/Modular Chassis User's Guide for specific instructions for the Avocent Digital Access KVM NIC.
... the Video Viewer (by communicating with the mouse pointer on the left side of the DRAC interface to set the Duplex Mode and Network Speed manually (Off). Using the Virtual Media dialog box, you can also use the key to view. The server module's desktop will see its desktop on the... of this server module as if you would like to switch between server modules. 5 Click the Launch Viewer Application button. This desktop opens in the Dell Remote Access Controller/Modular Chassis User's Guide for specific instructions for the Avocent Digital Access KVM NIC.

Configuration Guide
Page 47
... or DVD device to loss of the Viewer Application window, click Calibrate. 2 To adjust the video quality automatically, click the Automatic Video Adjustment button. 3 To manually adjust or fine tune the video quality, including the screen position, click each video adjustment button in the viewer application. The device will be able...
... or DVD device to loss of the Viewer Application window, click Calibrate. 2 To adjust the video quality automatically, click the Automatic Video Adjustment button. 3 To manually adjust or fine tune the video quality, including the screen position, click each video adjustment button in the viewer application. The device will be able...
Configuration Guide
Page 48
... each connected device, the target drive, where the target drive is set to boot from the CD drive that you have selected your Hardware Owner's Manual for information on the screen to complete the installation. 46 Configuring the KVM Switch Module Booting to Virtual Media To boot to a Virtual Media device...
... each connected device, the target drive, where the target drive is set to boot from the CD drive that you have selected your Hardware Owner's Manual for information on the screen to complete the installation. 46 Configuring the KVM Switch Module Booting to Virtual Media To boot to a Virtual Media device...
Getting Started Guide
Page 6
...solutions software for displaying many popular application programs in conjunction with Service Pack 1 or later 4 Getting Started With Your System Dell recommends that monitors operation of the system fans as well as a whole, including all of SDRAM video memory (nonupgradable). ...hard drives. Maximum resolution is used to support USB devices using the system diagnostics, see "Technical Specifications." See your Hardware Owner's Manual. • Enhanced security features, including a system password and a setup password, available through the integrated RAID controller. • ...
...solutions software for displaying many popular application programs in conjunction with Service Pack 1 or later 4 Getting Started With Your System Dell recommends that monitors operation of the system fans as well as a whole, including all of SDRAM video memory (nonupgradable). ...hard drives. Maximum resolution is used to support USB devices using the system diagnostics, see "Technical Specifications." See your Hardware Owner's Manual. • Enhanced security features, including a system password and a setup password, available through the integrated RAID controller. • ...

Getting Started Guide
Page 7
...to install your system into a rack. • The Hardware Owner's Manual provides information about system features and describes how to troubleshoot the system and install or replace system components. • The Dell OpenManage Baseboard Management Controller User's Guide provides detailed information on using the... provides detailed information on using the remote management features of the system. • The Configuration Guide provides information on support.dell.com and read the updates first because they often supersede information in your system. • CDs included with your system ...
...to install your system into a rack. • The Hardware Owner's Manual provides information about system features and describes how to troubleshoot the system and install or replace system components. • The Dell OpenManage Baseboard Management Controller User's Guide provides detailed information on using the... provides detailed information on using the remote management features of the system. • The Configuration Guide provides information on support.dell.com and read the updates first because they often supersede information in your system. • CDs included with your system ...

Getting Started Guide
Page 8
see your system for more information. This section describes the steps required to set up your Hardware Owner's Manual. Dell Enterprise Training and Certification is available; Unpack the System Unpack your Product Information Guide. Obtaining Technical Assistance If you need them later. 6 Getting Started With ... procedure, read and follow the safety instructions and important regulatory information in this guide or if the system does not perform as expected, see www.dell.com/training for the first time. Keep all locations.
see your system for more information. This section describes the steps required to set up your Hardware Owner's Manual. Dell Enterprise Training and Certification is available; Unpack the System Unpack your Product Information Guide. Obtaining Technical Assistance If you need them later. 6 Getting Started With ... procedure, read and follow the safety instructions and important regulatory information in this guide or if the system does not perform as expected, see www.dell.com/training for the first time. Keep all locations.

