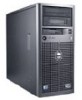
Dell PowerEdge Systems Microprocessor Upgrade Guide
Page 7
...and then follow the online instructions to reboot the system. Disconnecting power and peripheral cables. Removing the covers. Remove the microprocessors. After the BIOS has been successfully installed message appears on the screen, remove ...PowerEdge 1300, perform the following steps. Reboot the system. 3. To upgrade to save the current system configuration information. See your BIOS with the version contained on that diskette by performing the following steps: a. c. The main menu appears. 3. Insert the BIOS diskette provided in this document. 1-4 Dell PowerEdge...
...and then follow the online instructions to reboot the system. Disconnecting power and peripheral cables. Removing the covers. Remove the microprocessors. After the BIOS has been successfully installed message appears on the screen, remove ...PowerEdge 1300, perform the following steps. Reboot the system. 3. To upgrade to save the current system configuration information. See your BIOS with the version contained on that diskette by performing the following steps: a. c. The main menu appears. 3. Insert the BIOS diskette provided in this document. 1-4 Dell PowerEdge...
Dell PowerEdge Systems Microprocessor Upgrade Guide
Page 8
...in the System Setup program. If the upgrade kit comes with a new cooling shroud, you remove and replace the cover of a PowerEdge 1300 system, the chassis intrusion detector causes the following message to their power sources and turn them on resetting the chassis ...the Cooling Shroud", found later in this document. d. 3. See "Installing a New Cooling Shroud", found later in this document. 4. support.dell.com Dell PowerEdge Systems - See "Removing and Replacing the Guide Brackets", found later in this document. 7. b. Enter the System Setup program and confirm that...
...in the System Setup program. If the upgrade kit comes with a new cooling shroud, you remove and replace the cover of a PowerEdge 1300 system, the chassis intrusion detector causes the following message to their power sources and turn them on resetting the chassis ...the Cooling Shroud", found later in this document. d. 3. See "Installing a New Cooling Shroud", found later in this document. 4. support.dell.com Dell PowerEdge Systems - See "Removing and Replacing the Guide Brackets", found later in this document. 7. b. Enter the System Setup program and confirm that...
Dell PowerEdge Systems Microprocessor Upgrade Guide
Page 9
...board mounting plate must be replaced. Removing the covers. Removing the front bezel. To upgrade to Pentium II or Pentium III microprocessors in your computer Installation and Troubleshooting Guide for specific instructions, if needed. 1-6 Dell PowerEdge Systems - Access the system board, which ... mounting plate or tray. Microprocessor Upgrade If you are upgrading a PowerEdge 2300 with one or two microprocessors with the upgrade kit. b. Removing the cooling fan shroud. e. e. Run the Dell Diagnostics to replace the system board mounting plate. 1. See your system...
...board mounting plate must be replaced. Removing the covers. Removing the front bezel. To upgrade to Pentium II or Pentium III microprocessors in your computer Installation and Troubleshooting Guide for specific instructions, if needed. 1-6 Dell PowerEdge Systems - Access the system board, which ... mounting plate or tray. Microprocessor Upgrade If you are upgrading a PowerEdge 2300 with one or two microprocessors with the upgrade kit. b. Removing the cooling fan shroud. e. e. Run the Dell Diagnostics to replace the system board mounting plate. 1. See your system...
Dell PowerEdge Systems Microprocessor Upgrade Guide
Page 10
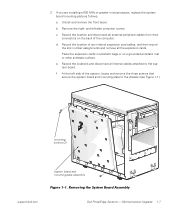
... screws that secure the system board and mounting plate to the system board. mounting screws (3) system board and mounting-plate assembly support.dell.com Dell PowerEdge Systems - e. At the left -side computer covers. Record the locations and disconnect all internal cables attached to the chassis (see Figure 1-1). a. Unlock and remove the front bezel. Remove...
... screws that secure the system board and mounting plate to the system board. mounting screws (3) system board and mounting-plate assembly support.dell.com Dell PowerEdge Systems - e. At the left -side computer covers. Record the locations and disconnect all internal cables attached to the chassis (see Figure 1-1). a. Unlock and remove the front bezel. Remove...
Dell PowerEdge Systems Microprocessor Upgrade Guide
Page 12
... (left edge of any position, depress and hold the tray release latch as follows. Remove the microprocessors. Unlock and remove the computer cover. c. Record the location of the mounting tray, as shown in reverse order. 3. Lay the tray assembly with the system board facing... the system board. To access the system board, release the system-board tray latch at the back lower corner of the chassis. support.dell.com Dell PowerEdge Systems - a. See "Removing the Microprocessors", found later in antistatic bags or on a flat surface. 1. b. NOTE: From the service...
... (left edge of any position, depress and hold the tray release latch as follows. Remove the microprocessors. Unlock and remove the computer cover. c. Record the location of the mounting tray, as shown in reverse order. 3. Lay the tray assembly with the system board facing... the system board. To access the system board, release the system-board tray latch at the back lower corner of the chassis. support.dell.com Dell PowerEdge Systems - a. See "Removing the Microprocessors", found later in antistatic bags or on a flat surface. 1. b. NOTE: From the service...
Dell PowerEdge Systems Microprocessor Upgrade Guide
Page 14
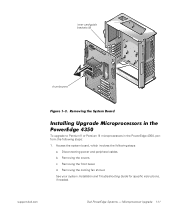
See your system Installation and Troubleshooting Guide for specific instructions, if needed. Removing the covers. support.dell.com Dell PowerEdge Systems - Removing the front bezel. d. c. Removing the cooling fan shroud. Microprocessor Upgrade 1-11 inner card-guide brackets (6) thumbscrew To upgrade to Pentium II or Pentium III microprocessors in the PowerEdge 4350, perform the following steps: a. Disconnecting power and peripheral cables. b. Access the system board, which involves the following steps: 1.
See your system Installation and Troubleshooting Guide for specific instructions, if needed. Removing the covers. support.dell.com Dell PowerEdge Systems - Removing the front bezel. d. c. Removing the cooling fan shroud. Microprocessor Upgrade 1-11 inner card-guide brackets (6) thumbscrew To upgrade to Pentium II or Pentium III microprocessors in the PowerEdge 4350, perform the following steps: a. Disconnecting power and peripheral cables. b. Access the system board, which involves the following steps: 1.
Dell PowerEdge Systems Microprocessor Upgrade Guide
Page 18
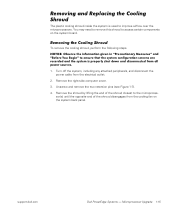
To remove the cooling shroud, perform the following steps. 1. Unscrew and remove the two retention pins (see Figure 1-7). 4. support.dell.com Dell PowerEdge Systems - Remove the right-side computer cover. 3. Remove the shroud by lifting the end of the shroud disengages from the electrical outlet. 2. sor(s) until the opposite end of the shroud closest to...
To remove the cooling shroud, perform the following steps. 1. Unscrew and remove the two retention pins (see Figure 1-7). 4. support.dell.com Dell PowerEdge Systems - Remove the right-side computer cover. 3. Remove the shroud by lifting the end of the shroud disengages from the electrical outlet. 2. sor(s) until the opposite end of the shroud closest to...
Dell PowerEdge Systems Microprocessor Upgrade Guide
Page 22
... checks, perform the following procedures apply to PowerEdge 2300, 4300, and 4350 systems. For PowerEdge 1300 systems, see step 7 under "Installing Upgrade Microprocessors in the PowerEdge 1300", found earlier in this document. 1. Run the Dell Diagnostics to verify that the top line in... (for PowerEdge 4350 systems only) or replace the covers and front bezel, and reconnect your Installation and Troubleshooting Guide for accessing and modifying entries in the System Setup program. The following message appears: Second processor detected 2. support.dell.com Dell PowerEdge Systems -...
... checks, perform the following procedures apply to PowerEdge 2300, 4300, and 4350 systems. For PowerEdge 1300 systems, see step 7 under "Installing Upgrade Microprocessors in the PowerEdge 1300", found earlier in this document. 1. Run the Dell Diagnostics to verify that the top line in... (for PowerEdge 4350 systems only) or replace the covers and front bezel, and reconnect your Installation and Troubleshooting Guide for accessing and modifying entries in the System Setup program. The following message appears: Second processor detected 2. support.dell.com Dell PowerEdge Systems -...

