Hardware Installation Guide
Page 4
... in a PowerConnect B-MLXe 16-slot router . 62 Installing power supplies in a PowerConnect B-MLXe-16 router66 Final steps 68 Attaching a management station 68 Attaching a PC or terminal to the console port or Ethernet port 68 Activating the power source 69 Verifying proper operation 70 Observing the LEDs 70 Displaying the module status 72 Using the Dell Structured Cabling...
... in a PowerConnect B-MLXe 16-slot router . 62 Installing power supplies in a PowerConnect B-MLXe-16 router66 Final steps 68 Attaching a management station 68 Attaching a PC or terminal to the console port or Ethernet port 68 Activating the power source 69 Verifying proper operation 70 Observing the LEDs 70 Displaying the module status 72 Using the Dell Structured Cabling...

Hardware Installation Guide
Page 10
... in which are tested and supported by Dell, documenting all possible configurations and scenarios is beyond the scope of this manual follows these conventions: x PowerConnect B-MLXe Hardware Installation Guide 53-1002111-01 The following hardware platforms are described in this document: • PowerConnect B-MLXe-4 router • PowerConnect B-MLXe-8 router • PowerConnect B-MLXe-16 router What's new in this document The...
... in which are tested and supported by Dell, documenting all possible configurations and scenarios is beyond the scope of this manual follows these conventions: x PowerConnect B-MLXe Hardware Installation Guide 53-1002111-01 The following hardware platforms are described in this document: • PowerConnect B-MLXe-4 router • PowerConnect B-MLXe-8 router • PowerConnect B-MLXe-16 router What's new in this document The...

Hardware Installation Guide
Page 14
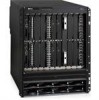
FIGURE 1 PowerConnect B-MLXe-4 router 2 1 3 4 5 6 7 8 9 10 1 Interface slot 2 2 Switch fabric slot 2 3 Switch fabric slot 3 4 ESD connector 5 Interface slot 1 6 Switch fabric slot 1 7 Interface slot 3 8 Management slot 1 9 Management slot 2 10 Interface slot 4 2 PowerConnect B-MLXe Hardware Installation Guide 53-1002111-01 1 Hardware features • PowerConnect B-MLXe-4: 4 interface slots • PowerConnect B-MLXe-8: 8 interface slots • PowerConnect B-MLXe-16: 16 interface slots Figure 1, Figure 2, and Figure 3 illustrate these models.
FIGURE 1 PowerConnect B-MLXe-4 router 2 1 3 4 5 6 7 8 9 10 1 Interface slot 2 2 Switch fabric slot 2 3 Switch fabric slot 3 4 ESD connector 5 Interface slot 1 6 Switch fabric slot 1 7 Interface slot 3 8 Management slot 1 9 Management slot 2 10 Interface slot 4 2 PowerConnect B-MLXe Hardware Installation Guide 53-1002111-01 1 Hardware features • PowerConnect B-MLXe-4: 4 interface slots • PowerConnect B-MLXe-8: 8 interface slots • PowerConnect B-MLXe-16: 16 interface slots Figure 1, Figure 2, and Figure 3 illustrate these models.

Hardware Installation Guide
Page 16
... covers a slot that does not currently have a module installed in each empty module slot. 1 Hardware features FIGURE 3 PowerConnect B-MLXe-16 router 1 3 5 7 17 19 9 11 13 23 15 21 22 2 4 6 8 18 20 10 12 14 16 1-16 Interface slots 1-16 17 Switch fabric slot 1 18 Switch fabric slot 2 19 Switch fabric slot 3 20 Switch fabric slot 4 21...
... covers a slot that does not currently have a module installed in each empty module slot. 1 Hardware features FIGURE 3 PowerConnect B-MLXe-16 router 1 3 5 7 17 19 9 11 13 23 15 21 22 2 4 6 8 18 20 10 12 14 16 1-16 Interface slots 1-16 17 Switch fabric slot 1 18 Switch fabric slot 2 19 Switch fabric slot 3 20 Switch fabric slot 4 21...

Hardware Installation Guide
Page 17
...the router, and two fan assemblies located at the rear of the router. You can install the following components are factory-installed in PowerConnect B-MLXe-16 routers: • Three high-speed switch fabric modules. • A slot blank in each empty module slot. Hardware features 1...8226; A fan tray assembly, which is located in the front right side of the router. PowerConnect B-MLXe-8 router components The following components in each empty module slot. PowerConnect B-MLXe-16 router components The following components in the router slots: • Up to two management modules (...
...the router, and two fan assemblies located at the rear of the router. You can install the following components are factory-installed in PowerConnect B-MLXe-16 routers: • Three high-speed switch fabric modules. • A slot blank in each empty module slot. Hardware features 1...8226; A fan tray assembly, which is located in the front right side of the router. PowerConnect B-MLXe-8 router components The following components in each empty module slot. PowerConnect B-MLXe-16 router components The following components in the router slots: • Up to two management modules (...

Hardware Installation Guide
Page 31
FIGURE 12 Fan locations for PowerConnect B-MLXe-8-routers Router modules 1 1 1 Fan module FIGURE 13 Fan location for PowerConnect B-MLXe-16 routers 1 1 Fan assembly PowerConnect B-MLXe Hardware Installation Guide 19 53-1002111-01
FIGURE 12 Fan locations for PowerConnect B-MLXe-8-routers Router modules 1 1 1 Fan module FIGURE 13 Fan location for PowerConnect B-MLXe-16 routers 1 1 Fan assembly PowerConnect B-MLXe Hardware Installation Guide 19 53-1002111-01

Hardware Installation Guide
Page 32
..., the system generates a Syslog message and SNMP trap. You can change default low and high temperature thresholds for PowerConnect B-MLXe-16 routers 1 1 Rear fan assemblies At startup, the fans operate at high speed. Refer to "Changing temperature thresholds for high...-speed fan installation instructions. 20 PowerConnect B-MLXe Hardware Installation Guide 53-1002111-01 PowerConnect B-MLXe-16 routers ship with fan assemblies fully installed. Refer to low. Depending on the results, the router ...
..., the system generates a Syslog message and SNMP trap. You can change default low and high temperature thresholds for PowerConnect B-MLXe-16 routers 1 1 Rear fan assemblies At startup, the fans operate at high speed. Refer to "Changing temperature thresholds for high...-speed fan installation instructions. 20 PowerConnect B-MLXe Hardware Installation Guide 53-1002111-01 PowerConnect B-MLXe-16 routers ship with fan assemblies fully installed. Refer to low. Depending on the results, the router ...

Hardware Installation Guide
Page 37
... 6 American Wire Gauge (AWG). CAUTION For the DC input circuit to the bare wire. PowerConnect B-MLXe-8, and PowerConnect B-MLXe-16 routers (1200W supply), make sure there is applied to the system of PowerConnect B-MLXe-4. CAUTION For the NEBS-compliant installation of PowerConnect B-MLXe-4, PowerConnect B-MLXe--8, and PowerConnect B-MLXe-16 routers with the rating limit for installation in restricted access areas only. The input wiring...
... 6 American Wire Gauge (AWG). CAUTION For the DC input circuit to the bare wire. PowerConnect B-MLXe-8, and PowerConnect B-MLXe-16 routers (1200W supply), make sure there is applied to the system of PowerConnect B-MLXe-4. CAUTION For the NEBS-compliant installation of PowerConnect B-MLXe-4, PowerConnect B-MLXe--8, and PowerConnect B-MLXe-16 routers with the rating limit for installation in restricted access areas only. The input wiring...

Hardware Installation Guide
Page 65
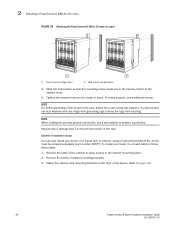
...percent of the chassis. 2. Preparing the installation site Before installing the router, plan the location and orientation relative to install a PowerConnect B-MLXe-16 router. Snap the cord-retainer over the power plug to hold it in the order listed: • "Attaching a management ...station" • "Activating the power source" • "Verifying proper operation" Installing a PowerConnect B-MLXe-16 router The following sections describe how to other obstructions. Locate the power receptable on the rear of the surface. Ensure that the ...
...percent of the chassis. 2. Preparing the installation site Before installing the router, plan the location and orientation relative to install a PowerConnect B-MLXe-16 router. Snap the cord-retainer over the power plug to hold it in the order listed: • "Attaching a management ...station" • "Activating the power source" • "Verifying proper operation" Installing a PowerConnect B-MLXe-16 router The following sections describe how to other obstructions. Locate the power receptable on the rear of the surface. Ensure that the ...

Hardware Installation Guide
Page 66
...to move or ship the router at the bottom and progressively place lighter routers above. 2 Installing a PowerConnect B-MLXe-16 router Unpacking a PowerConnect B-MLXe-16 router The PowerConnect B-MLXe-16 router ships with the following items: • Router chassis with RJ45 and fiber-optic connectors. Save the...the factory-installed mounting brackets. If any router components. You can install up the three PowerConnect B-MLXe-16 routers in either a front- You can install your PowerConnect B-MLXe-16 router from the front edges of the device. Remove your router in a standard rack ...
...to move or ship the router at the bottom and progressively place lighter routers above. 2 Installing a PowerConnect B-MLXe-16 router Unpacking a PowerConnect B-MLXe-16 router The PowerConnect B-MLXe-16 router ships with the following items: • Router chassis with RJ45 and fiber-optic connectors. Save the...the factory-installed mounting brackets. If any router components. You can install up the three PowerConnect B-MLXe-16 routers in either a front- You can install your PowerConnect B-MLXe-16 router from the front edges of the device. Remove your router in a standard rack ...

Hardware Installation Guide
Page 67
... For example, place routers with the fewest modules near the bottom of each router in a rack. Installing a PowerConnect B-MLXe-16 router 2 Front- You will need a Phillips screwdriver to the rack frame, use thread-forming screws and paint-piercing... or mid-mount in a standard rack Follow these steps to mount each router in the rack post. PowerConnect B-MLXe Hardware Installation Guide 55 53-1002111-01 FIGURE 37 Positioning the mounting screws in Figure 37. When tightening...provide standard #12-24 pan-head screws to mount a PowerConnect B-MLXe-16 router in Figure 38.
... For example, place routers with the fewest modules near the bottom of each router in a rack. Installing a PowerConnect B-MLXe-16 router 2 Front- You will need a Phillips screwdriver to the rack frame, use thread-forming screws and paint-piercing... or mid-mount in a standard rack Follow these steps to mount each router in the rack post. PowerConnect B-MLXe Hardware Installation Guide 55 53-1002111-01 FIGURE 37 Positioning the mounting screws in Figure 37. When tightening...provide standard #12-24 pan-head screws to mount a PowerConnect B-MLXe-16 router in Figure 38.
Hardware Installation Guide
Page 68
... should also use additional screws. Remove the sides of the router to secure the router in a closed cabinet, follow these steps. 1. 2 Installing a PowerConnect B-MLXe-16 router FIGURE 38 Mounting the PowerConnect B-MLXe-16 router in the rack. Tighten the screws to the rack, attach the router using a Cabinet Rack Mount Kit, which must be ordered separately...
... should also use additional screws. Remove the sides of the router to secure the router in a closed cabinet, follow these steps. 1. 2 Installing a PowerConnect B-MLXe-16 router FIGURE 38 Mounting the PowerConnect B-MLXe-16 router in the rack. Tighten the screws to the rack, attach the router using a Cabinet Rack Mount Kit, which must be ordered separately...
Hardware Installation Guide
Page 69
Attach the side plates to Figure 40. PowerConnect B-MLXe Hardware Installation Guide 57 53-1002111-01 Refer to the device. Installing a PowerConnect B-MLXe-16 router 2 FIGURE 39 Attach the mounting brackets to the front of the device 4.
Attach the side plates to Figure 40. PowerConnect B-MLXe Hardware Installation Guide 57 53-1002111-01 Refer to the device. Installing a PowerConnect B-MLXe-16 router 2 FIGURE 39 Attach the mounting brackets to the front of the device 4.
Hardware Installation Guide
Page 70
Refer to the cabinet mounting posts. Attach the telescoping rails to Figure 41, 58 PowerConnect B-MLXe Hardware Installation Guide 53-1002111-01 2 Installing a PowerConnect B-MLXe-16 router FIGURE 40 Attach the side plates to the device 5.
Refer to the cabinet mounting posts. Attach the telescoping rails to Figure 41, 58 PowerConnect B-MLXe Hardware Installation Guide 53-1002111-01 2 Installing a PowerConnect B-MLXe-16 router FIGURE 40 Attach the side plates to the device 5.
Hardware Installation Guide
Page 71
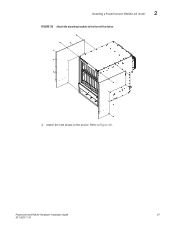
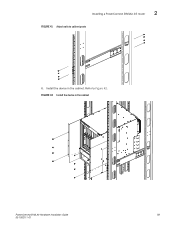
Refer to cabinet posts 6. Install the device in the cabinet PowerConnect B-MLXe Hardware Installation Guide 59 53-1002111-01 Installing a PowerConnect B-MLXe-16 router 2 FIGURE 41 Attach rails to Figure 42. FIGURE 42 Install the device in the cabinet.
Refer to cabinet posts 6. Install the device in the cabinet PowerConnect B-MLXe Hardware Installation Guide 59 53-1002111-01 Installing a PowerConnect B-MLXe-16 router 2 FIGURE 41 Attach rails to Figure 42. FIGURE 42 Install the device in the cabinet.
Hardware Installation Guide
Page 72
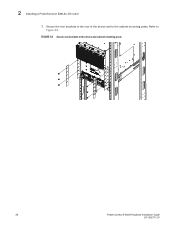
Secure the rear brackets to the rear of the device and to the device and cabinet mounting posts 60 PowerConnect B-MLXe Hardware Installation Guide 53-1002111-01 FIGURE 43 Secure rear brackets to the cabinet mounting posts. 2 Installing a PowerConnect B-MLXe-16 router 7. Refer to Figure 43.
Secure the rear brackets to the rear of the device and to the device and cabinet mounting posts 60 PowerConnect B-MLXe Hardware Installation Guide 53-1002111-01 FIGURE 43 Secure rear brackets to the cabinet mounting posts. 2 Installing a PowerConnect B-MLXe-16 router 7. Refer to Figure 43.

Hardware Installation Guide
Page 73
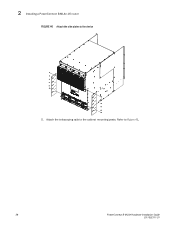
Install the air block bracket to Figure 44. FIGURE 44 Install the air block bracket PowerConnect B-MLXe Hardware Installation Guide 61 53-1002111-01 Installing a PowerConnect B-MLXe-16 router 2 8. Refer to the front of the cabinet.
Install the air block bracket to Figure 44. FIGURE 44 Install the air block bracket PowerConnect B-MLXe Hardware Installation Guide 61 53-1002111-01 Installing a PowerConnect B-MLXe-16 router 2 8. Refer to the front of the cabinet.

Hardware Installation Guide
Page 74
...are identical for multiple modules is important to OSP wiring. 62 PowerConnect B-MLXe Hardware Installation Guide 53-1002111-01 Refer to the outside plant (OSP) or its wiring. Installing modules in a PowerConnect B-MLXe 16-slot router The installation sequence for interface, management, and switch fabric... comb. These ports are suitable for connection to "Installing modules in a PowerConnect B-MLXe 16-slot router" on page 4 for NI-MLX-10x8G and NI-MLX-1Gx48-T-A modules in the PowerConnect B-MLXe-16 router first. Refer to intra-building or unexposed wiring or cabling only. ...
...are identical for multiple modules is important to OSP wiring. 62 PowerConnect B-MLXe Hardware Installation Guide 53-1002111-01 Refer to the outside plant (OSP) or its wiring. Installing modules in a PowerConnect B-MLXe 16-slot router The installation sequence for interface, management, and switch fabric... comb. These ports are suitable for connection to "Installing modules in a PowerConnect B-MLXe 16-slot router" on page 4 for NI-MLX-10x8G and NI-MLX-1Gx48-T-A modules in the PowerConnect B-MLXe-16 router first. Refer to intra-building or unexposed wiring or cabling only. ...
Hardware Installation Guide
Page 75
... module works, optional software configurations that you install a PowerConnect B-MLXe module in another Dell router or install a module intended for another Dell router in PowerConnect B-MLXe routers only. DANGER For safety reasons, the ESD wrist strap should contain a 1 megohm series resistor. Redundant module - M2 (lower). 1 - 16 SF1 - Installing a PowerConnect B-MLXe-16 router 2 Table 15 provides the router slot numbers into...
... module works, optional software configurations that you install a PowerConnect B-MLXe module in another Dell router or install a module intended for another Dell router in PowerConnect B-MLXe routers only. DANGER For safety reasons, the ESD wrist strap should contain a 1 megohm series resistor. Redundant module - M2 (lower). 1 - 16 SF1 - Installing a PowerConnect B-MLXe-16 router 2 Table 15 provides the router slot numbers into...

Hardware Installation Guide
Page 76
...must remove the slot blank to install a module in config mode to auto, enter the following command: NetIron# set-fan-speed auto The PowerConnect B-MLXe-16 router ships with a flat-blade screwdriver. 2. If you operate the router with an uncovered slot, the system may have been previously configured for... you will need a flat-blade screwdriver to perform this procedure to auto. Slot blank removal steps Follow these steps to auto For PowerConnect B-MLXe 16-slot routers, if you insert a module into a slot where the fan speed for future use. Use the show running -config command in...
...must remove the slot blank to install a module in config mode to auto, enter the following command: NetIron# set-fan-speed auto The PowerConnect B-MLXe-16 router ships with a flat-blade screwdriver. 2. If you operate the router with an uncovered slot, the system may have been previously configured for... you will need a flat-blade screwdriver to perform this procedure to auto. Slot blank removal steps Follow these steps to auto For PowerConnect B-MLXe 16-slot routers, if you insert a module into a slot where the fan speed for future use. Use the show running -config command in...


