
User's Guide
Page 3
... 13 Configuration Handling 14 Rearranging Stacks 15 Replacing Stack Members 15 PowerConnect User Guide Overview 17 Installing the PowerConnect 3324/3348 Switch 17 Using the Dell OpenManage Switch Administrator 17 PowerConnect 3324/3348 CLI Documentation 18 2 Hardware Description PowerConnect 3324/3348 Description 20 PowerConnect 3324/3348 Dimensions 20 PowerConnect 3324/3348 Rear Panel 20 PowerConnect 3324/3348 Components 20 Ports Description 24 Ethernet Port Description 24...
... 13 Configuration Handling 14 Rearranging Stacks 15 Replacing Stack Members 15 PowerConnect User Guide Overview 17 Installing the PowerConnect 3324/3348 Switch 17 Using the Dell OpenManage Switch Administrator 17 PowerConnect 3324/3348 CLI Documentation 18 2 Hardware Description PowerConnect 3324/3348 Description 20 PowerConnect 3324/3348 Dimensions 20 PowerConnect 3324/3348 Rear Panel 20 PowerConnect 3324/3348 Components 20 Ports Description 24 Ethernet Port Description 24...
User's Guide
Page 4
...Installation 31 Package Contents 31 Unpacking 31 Device Rack Installation 32 Installing the Switch without a Rack 32 Stacking PowerConnect 3324/3348 33 Connecting Stacking Cables 33 Connecting the PowerConnect 3324/3348 to a Power Supply 34 Cable, Port, and Pinout Information 35... Port Connections 36 Cable Connections 38 4 Configuring the PowerConnect 3324/3348 Switch Configuration Overview 42 General Configuration Information 43 Auto-Negotiation 43 Switching Port Default Settings 44 Baud Rate 45 Terminal Connection Configuration 45 Other Configuration...
...Installation 31 Package Contents 31 Unpacking 31 Device Rack Installation 32 Installing the Switch without a Rack 32 Stacking PowerConnect 3324/3348 33 Connecting Stacking Cables 33 Connecting the PowerConnect 3324/3348 to a Power Supply 34 Cable, Port, and Pinout Information 35... Port Connections 36 Cable Connections 38 4 Configuring the PowerConnect 3324/3348 Switch Configuration Overview 42 General Configuration Information 43 Auto-Negotiation 43 Switching Port Default Settings 44 Baud Rate 45 Terminal Connection Configuration 45 Other Configuration...
User's Guide
Page 5
... to Stacking Units 80 Downloading the Software Sequentially Using the CLI . . . . . 81 Downloading the Software Individually Using the CLI 82 Downloading the Software Via the PowerConnect 3324/3348 Dell OpenManage Switch Administrator 84 Contents 5
... to Stacking Units 80 Downloading the Software Sequentially Using the CLI . . . . . 81 Downloading the Software Individually Using the CLI 82 Downloading the Software Via the PowerConnect 3324/3348 Dell OpenManage Switch Administrator 84 Contents 5
User's Guide
Page 6
... 88 Understanding the Interface 88 Tree View 89 Device View 90 Device Representation 90 Using the Switch Administrator Buttons 92 Information Buttons 93 About PageDevice Management Buttons 95 Using the CLI 97 Command Mode 97 User EXEC Mode 97 Privileged EXEC Mode ...
... 88 Understanding the Interface 88 Tree View 89 Device View 90 Device Representation 90 Using the Switch Administrator Buttons 92 Information Buttons 93 About PageDevice Management Buttons 95 Using the CLI 97 Command Mode 97 User EXEC Mode 97 Privileged EXEC Mode ...
User's Guide
Page 8
7 Configuring Switch Information Configuring Network Security 190 Network Security Overview 191 Configuring Port Security 193 Defining IP-Based ACLs 196 Defining MAC-Based ACLs 200 Binding ACLs ...
7 Configuring Switch Information Configuring Network Security 190 Network Security Overview 191 Configuring Port Security 193 Defining IP-Based ACLs 196 Defining MAC-Based ACLs 200 Binding ACLs ...
User's Guide
Page 12
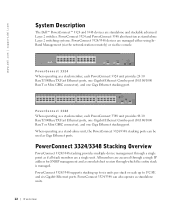
... The Dell™ PowerConnect™ 3324 and 3348 devices are accessed through a single IP address for SNMP management and a console/telnet session through a single point as if all stack members are managed either using InBand Management (via the network station remotely) or via the console. All members are standalone and stackable advanced Layer 2 switches.
... The Dell™ PowerConnect™ 3324 and 3348 devices are accessed through a single IP address for SNMP management and a console/telnet session through a single point as if all stack members are managed either using InBand Management (via the network station remotely) or via the console. All members are standalone and stackable advanced Layer 2 switches.
User's Guide
Page 13
... the network administrator as stack members and assigned a unique Unit ID. Device software is reconnected to a third stack member. PowerConnect 3324/3348 units are centralized. During the stacking setup, one . Applications running in a stacking configuration are shipped with minimal operational ... the unit is downloaded separately for the stack to the stacking configuration. Over view 13 PowerConnect 3324/3348 stacks provide across-the-stack Layer 2 functionality including: • Switching • Trunking • Port Mirroring • VLANs For example, VLANs can be ...
... the network administrator as stack members and assigned a unique Unit ID. Device software is reconnected to a third stack member. PowerConnect 3324/3348 units are centralized. During the stacking setup, one . Applications running in a stacking configuration are shipped with minimal operational ... the unit is downloaded separately for the stack to the stacking configuration. Over view 13 PowerConnect 3324/3348 stacks provide across-the-stack Layer 2 functionality including: • Switching • Trunking • Port Mirroring • VLANs For example, VLANs can be ...

User's Guide
Page 14
... if the stack is configured with the same Unit ID, or a master unit is written in the Dell OpenManage™ Switch Administrator and can be configured through the web management system. Configuration Handling In a PowerConnect 3324/3348 operative stack, the stack master is part of both the configuration commands and the configuration files. If...
... if the stack is configured with the same Unit ID, or a master unit is written in the Dell OpenManage™ Switch Administrator and can be configured through the web management system. Configuration Handling In a PowerConnect 3324/3348 operative stack, the stack master is part of both the configuration commands and the configuration files. If...

User's Guide
Page 17
... viewing table and chart statistics for ports, GVRP, Etherlike, RMON, and interface statistics. PowerConnect User Guide Overview The PowerConnect User Guide is divided into two parts: • About Installing the PowerConnect 3324/3348 Switch • Using the Dell OpenManage Switch Administrator Installing the PowerConnect 3324/3348 Switch This section contains the following information about configuring the device using the web...
... viewing table and chart statistics for ports, GVRP, Etherlike, RMON, and interface statistics. PowerConnect User Guide Overview The PowerConnect User Guide is divided into two parts: • About Installing the PowerConnect 3324/3348 Switch • Using the Dell OpenManage Switch Administrator Installing the PowerConnect 3324/3348 Switch This section contains the following information about configuring the device using the web...

User's Guide
Page 29
SECTION 3 Installing the PowerConnect 3324/3348 Switch Installation Precautions Site Requirements Unpacking and Installation Cable, Port, and Pinout Information
SECTION 3 Installing the PowerConnect 3324/3348 Switch Installation Precautions Site Requirements Unpacking and Installation Cable, Port, and Pinout Information
User's Guide
Page 30
... system documentation. NOTICE: Ensure the air flow around the front, sides, and back of all switches installed on n e c t 3324/3348 Sw itc h CAUTION: Ensure the power source circuits are usually printed on a table. Site Requirements Dell™ PowerConnect™ 3324/3348 series equipment can be mounted in an environment where the operating ambient temperature might...
... system documentation. NOTICE: Ensure the air flow around the front, sides, and back of all switches installed on n e c t 3324/3348 Sw itc h CAUTION: Ensure the power source circuits are usually printed on a table. Site Requirements Dell™ PowerConnect™ 3324/3348 series equipment can be mounted in an environment where the operating ambient temperature might...

User's Guide
Page 31
... frontal clearance for operator access. Allow clearance for rack installation. • Documentation CD. Unpacking NOTE: Before unpacking the PowerConnect 3324/3348 switch, inspect the package and report any evidence of the unit. Installing the PowerConnect 3324/3348 Switch 31 It is 0 to 40ºC (32 to 122ºF) at a relative humidity of a grounded, easily accessible outlet...
... frontal clearance for operator access. Allow clearance for rack installation. • Documentation CD. Unpacking NOTE: Before unpacking the PowerConnect 3324/3348 switch, inspect the package and report any evidence of the unit. Installing the PowerConnect 3324/3348 Switch 31 It is 0 to 40ºC (32 to 122ºF) at a relative humidity of a grounded, easily accessible outlet...

User's Guide
Page 32
www.dell.com | support.dell.com 6 Inspect the product for the rack-mounting bracket on the other side of the PowerConnect 3324/3348. Ensure that the device has proper ventilation. 3 Attach the rubber feet to the bottom of the unit is not installed on a... screwdriver. 5 Repeat the process for damage. The surface must be able to prevent the device from the unit before mounting the PowerConnect 3324/3348 switch in a rack or cabinet. Installing PowerConnect 3324/3348: 1 Ground yourself by putting on an ESD wrist strap and attaching the ESD clip to a metal surface. 2 Place ...
www.dell.com | support.dell.com 6 Inspect the product for the rack-mounting bracket on the other side of the PowerConnect 3324/3348. Ensure that the device has proper ventilation. 3 Attach the rubber feet to the bottom of the unit is not installed on a... screwdriver. 5 Repeat the process for damage. The surface must be able to prevent the device from the unit before mounting the PowerConnect 3324/3348 switch in a rack or cabinet. Installing PowerConnect 3324/3348: 1 Ground yourself by putting on an ESD wrist strap and attaching the ESD clip to a metal surface. 2 Place ...
User's Guide
Page 33
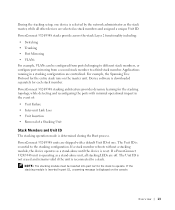
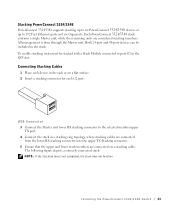
... stacking members. All management is not completed, the stack does not function. Installing the PowerConnect 3324/3348 Switch 33 Stacking PowerConnect 3324/3348 PowerConnect 3324/3348 supports stacking up to six PowerConnect 3324/3348 devices or up to port G2 in the SFP slot. Each PowerConnect 3324/3348 stack contains a single Master unit, while the remaining units are connected via a stacking...
... stacking members. All management is not completed, the stack does not function. Installing the PowerConnect 3324/3348 Switch 33 Stacking PowerConnect 3324/3348 PowerConnect 3324/3348 supports stacking up to six PowerConnect 3324/3348 devices or up to port G2 in the SFP slot. Each PowerConnect 3324/3348 stack contains a single Master unit, while the remaining units are connected via a stacking...
User's Guide
Page 35
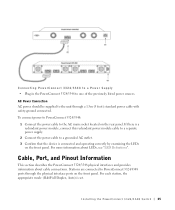
... the AC main socket located on the front panel. Cable, Port, and Pinout Information This section describes the PowerConnect 3324/3348 physical interfaces and provides information about LEDs, see "LED Definitions". Installing the PowerConnect 3324/3348 Switch 35 Stations are connected to a grounded AC outlet. 3 Confirm that the device is connected and operating correctly by...
... the AC main socket located on the front panel. Cable, Port, and Pinout Information This section describes the PowerConnect 3324/3348 physical interfaces and provides information about LEDs, see "LED Definitions". Installing the PowerConnect 3324/3348 Switch 35 Stations are connected to a grounded AC outlet. 3 Confirm that the device is connected and operating correctly by...
User's Guide
Page 36
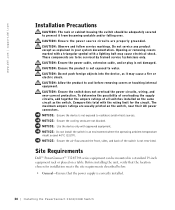
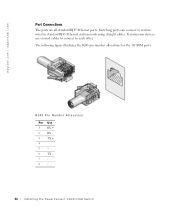
Transmission devices use crossed cables to connect to stations wired in standard RJ45 Ethernet station mode using straight cables. RJ45 Pin Number Allocation Pin Use 1 RX + 2 RX 3 TX + 4 5 -6 TX 78- 36 I n s t a llin g t h e Po we rC on n e c t 3324/3348 Sw itc h Switching ports can connect to each other. The following figure illustrates the RJ45 pin number allocations for the 10/100M ports. www.dell.com | support.dell.com Port Connections The ports are all standard RJ45 Ethernet ports.
Transmission devices use crossed cables to connect to stations wired in standard RJ45 Ethernet station mode using straight cables. RJ45 Pin Number Allocation Pin Use 1 RX + 2 RX 3 TX + 4 5 -6 TX 78- 36 I n s t a llin g t h e Po we rC on n e c t 3324/3348 Sw itc h Switching ports can connect to each other. The following figure illustrates the RJ45 pin number allocations for the 10/100M ports. www.dell.com | support.dell.com Port Connections The ports are all standard RJ45 Ethernet ports.

User's Guide
Page 37
The following figure illustrates the Gigaport Connector: GigaPort Connector A serial cable connects PowerConnect 3324/3348 to a terminal for the initial setup and configuration. (A PC running terminal emulation software can also be used.) The serial cable is a female-to-female DB-9 crossover cable. Installing the PowerConnect 3324/3348 Switch 37
The following figure illustrates the Gigaport Connector: GigaPort Connector A serial cable connects PowerConnect 3324/3348 to a terminal for the initial setup and configuration. (A PC running terminal emulation software can also be used.) The serial cable is a female-to-female DB-9 crossover cable. Installing the PowerConnect 3324/3348 Switch 37
User's Guide
Page 39
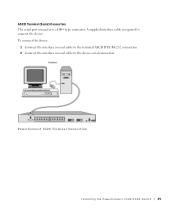
PowerConnect 3324 Terminal Connection Installing the PowerConnect 3324/3348 Switch 39 ASCII Terminal (Serial) Connection The serial port connector is required to the device serial connection. A supplied interface cable is a DB-9 type connector. To connect the device: 1 Connect the interface crossed cable to the terminal ASCII DTE RS-232 connection. 2 Connect the interface crossed cable to connect the device.
PowerConnect 3324 Terminal Connection Installing the PowerConnect 3324/3348 Switch 39 ASCII Terminal (Serial) Connection The serial port connector is required to the device serial connection. A supplied interface cable is a DB-9 type connector. To connect the device: 1 Connect the interface crossed cable to the terminal ASCII DTE RS-232 connection. 2 Connect the interface crossed cable to connect the device.
User's Guide
Page 41
SECTION 4 Configuring the PowerConnect 3324/3348 Switch Configuration Overview General Configuration Information Terminal Connection Configuration Other Configuration Requirements Booting the Device Device Configuration Introduction Initial Configuration Advanced Configuration Sample Configuration Process Configuring Stacking Rebooting the Device Startup Menu Functions Downloading the Software to Stacking Units Defining SNMP Settings Connecting Devices
SECTION 4 Configuring the PowerConnect 3324/3348 Switch Configuration Overview General Configuration Information Terminal Connection Configuration Other Configuration Requirements Booting the Device Device Configuration Introduction Initial Configuration Advanced Configuration Sample Configuration Process Configuring Stacking Rebooting the Device Startup Menu Functions Downloading the Software to Stacking Units Defining SNMP Settings Connecting Devices

User's Guide
Page 43
...commands to the same speed and duplex mode. Configuring the PowerConnect 3324/3348 Switch 43 Autonegotiation allows the ports to do the following: • Advertise their abilities. General Configuration Information Dell™ PowerConnect™ 3324/3348 is performed completely within the physical layers during link ...operation that both devices share. • Reject the use of operation and share information with another device that both the switching port and the NIC must be performed, but this section. This automatically configures both devices. • Configure each ...
...commands to the same speed and duplex mode. Configuring the PowerConnect 3324/3348 Switch 43 Autonegotiation allows the ports to do the following: • Advertise their abilities. General Configuration Information Dell™ PowerConnect™ 3324/3348 is performed completely within the physical layers during link ...operation that both devices share. • Reject the use of operation and share information with another device that both the switching port and the NIC must be performed, but this section. This automatically configures both devices. • Configure each ...


