User's Guide
Page 5
... chassis • Internal power supply Package Contents Before you install a switch, verify that your package contains the following features: • 10/100/1000-Mbps switch ports - 8 ports (PowerConnect 2608) - 16 ports (PowerConnect 2616) - 24 ports, including one combination RJ-45/small form factor (SFP) port (PowerConnect 2624) • Complies with...-adhesive rubber pads for desktop installation • Kit for 19-inch rack installation • Kit for speed and full- 1 Introduction Dell™ PowerConnect™ 26xx switches provide 10/100/1000-Mbps Gigabit Ethernet connectivity.
... chassis • Internal power supply Package Contents Before you install a switch, verify that your package contains the following features: • 10/100/1000-Mbps switch ports - 8 ports (PowerConnect 2608) - 16 ports (PowerConnect 2616) - 24 ports, including one combination RJ-45/small form factor (SFP) port (PowerConnect 2624) • Complies with...-adhesive rubber pads for desktop installation • Kit for 19-inch rack installation • Kit for speed and full- 1 Introduction Dell™ PowerConnect™ 26xx switches provide 10/100/1000-Mbps Gigabit Ethernet connectivity.
User's Guide
Page 10
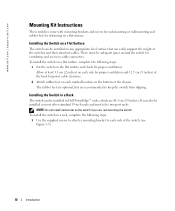
To install the switch on a flat surface, complete the following steps: 1 Use the supplied screws to attach a mounting bracket to cable connectors. Installing the Switch in a Rack The switch can be installed in Dell PowerEdge™ racks, which are recommended to keep the switch from slipping. There must be ... on a Flat Surface The switch can be installed on any appropriate level surface that can also be adequate space around the switch for power cable clearance. 2 Attach rubber feet on the switch if you are rackmounting the switch. To install the switch in most other standard...
To install the switch on a flat surface, complete the following steps: 1 Use the supplied screws to attach a mounting bracket to cable connectors. Installing the Switch in a Rack The switch can be installed in Dell PowerEdge™ racks, which are recommended to keep the switch from slipping. There must be ... on a Flat Surface The switch can be installed on any appropriate level surface that can also be adequate space around the switch for power cable clearance. 2 Attach rubber feet on the switch if you are rackmounting the switch. To install the switch in most other standard...
User's Guide
Page 11
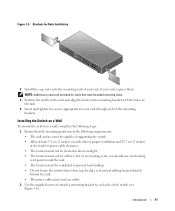
...the switch. • Allow at least 5.1 cm (2 inches) on each side for proper ventilation and 12.7 cm (5 inches) at the back for power cable clearance. • The location must not be located in the rack. 4 Insert and tighten two screws appropriate for your rack requires them. Figure ...8226; Do not locate the switch where there may be data or electrical cabling located directly behind the unit. • The power cable must reach an outlet. 2 Use the supplied screws to attach a mounting bracket to each of the switch (see Figure 1-6). NOTE: Additional screws are provided for Rack ...
...the switch. • Allow at least 5.1 cm (2 inches) on each side for proper ventilation and 12.7 cm (5 inches) at the back for power cable clearance. • The location must not be located in the rack. 4 Insert and tighten two screws appropriate for your rack requires them. Figure ...8226; Do not locate the switch where there may be data or electrical cabling located directly behind the unit. • The power cable must reach an outlet. 2 Use the supplied screws to attach a mounting bracket to each of the switch (see Figure 1-6). NOTE: Additional screws are provided for Rack ...
User's Guide
Page 12
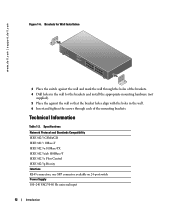
... so that the bracket holes align with the holes in the wall. 6 Insert and tighten the screws through each of the mounting brackets. www.dell.com | support.dell.com Figure 1-6. Technical Information Table 1-2. one SFP connector available on 24-port switch Power Supply 100-240 VAC/5060 Hz universal input 12 Introduction
... so that the bracket holes align with the holes in the wall. 6 Insert and tighten the screws through each of the mounting brackets. www.dell.com | support.dell.com Figure 1-6. Technical Information Table 1-2. one SFP connector available on 24-port switch Power Supply 100-240 VAC/5060 Hz universal input 12 Introduction


