User's Guide
Page 6
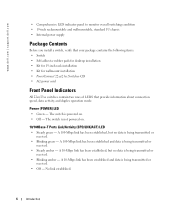
www.dell.com | support.dell.com • Comprehensive LED indicator panel to monitor overall switching condition • 19-inch rackmountable and wallmountable, standard 1U chassis • Internal power supply Package Contents Before you install a switch, verify that your package contains the following ...items: • Switch • Self-adhesive rubber pads for desktop installation • Kit for 19-inch rack installation • Kit for wallmount installation • PowerConnect ...
www.dell.com | support.dell.com • Comprehensive LED indicator panel to monitor overall switching condition • 19-inch rackmountable and wallmountable, standard 1U chassis • Internal power supply Package Contents Before you install a switch, verify that your package contains the following ...items: • Switch • Self-adhesive rubber pads for desktop installation • Kit for 19-inch rack installation • Kit for wallmount installation • PowerConnect ...
User's Guide
Page 12
... the mounting bracket with the holes in the rack. 4 Insert and tighten two screws appropriate for your rack requires them. Brackets for power cable clearance. • The location must not be located in direct sunlight. • The location must be ventilated to prevent heat ...buildup. 12 Introduction Figure 1-7. www.dell.com | support.dell.com To install the switch in a rack, complete the following steps: 1 Use the supplied screws to attach a mounting bracket to each of the mounting brackets.
... the mounting bracket with the holes in the rack. 4 Insert and tighten two screws appropriate for your rack requires them. Brackets for power cable clearance. • The location must not be located in direct sunlight. • The location must be ventilated to prevent heat ...buildup. 12 Introduction Figure 1-7. www.dell.com | support.dell.com To install the switch in a rack, complete the following steps: 1 Use the supplied screws to attach a mounting bracket to each of the mounting brackets.

User's Guide
Page 13
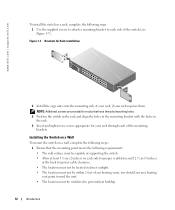
... • Do not locate the switch where there may be data or electrical cabling located directly behind the unit. • The power cable must reach an outlet. 2 Use the supplied screws to attach a mounting bracket to each of the switch (see Figure 1-8). Brackets for Wall Installation 3 Place the switch against... mark the wall through the holes of the brackets. 4 Drill holes in the wall for the brackets and install the appropriate mounting hardware (not supplied). 5 Place the switch against the wall so that the bracket holes align with the holes in the wall. 6 Insert and tighten the screws ...
... • Do not locate the switch where there may be data or electrical cabling located directly behind the unit. • The power cable must reach an outlet. 2 Use the supplied screws to attach a mounting bracket to each of the switch (see Figure 1-8). Brackets for Wall Installation 3 Place the switch against... mark the wall through the holes of the brackets. 4 Drill holes in the wall for the brackets and install the appropriate mounting hardware (not supplied). 5 Place the switch against the wall so that the bracket holes align with the holes in the wall. 6 Insert and tighten the screws ...
User's Guide
Page 14
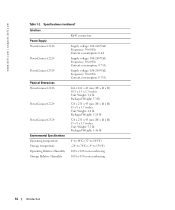
... Power Supply PowerConnect 2216 PowerConnect 2224 PowerConnect 2324 Physical Dimensions PowerConnect 2216 PowerConnect 2224 PowerConnect 2324 Environmental Specifications Operating temperature Storage temperature Operating Relative Humidity Storage Relative Humidity RJ-45 connectors Supply voltage: 100-240 VAC Frequency: 50-60 Hz Current consumption: 0.4A Supply voltage: 100-240 VAC Frequency: 50-60 Hz Current consumption: 0.75A Supply ...70ºC (-4º to 158ºF) 10% to 90% non-condensing 10% to 95% non-condensing 14 Introduction www.dell.com | support.dell.com Table 1-2.
... Power Supply PowerConnect 2216 PowerConnect 2224 PowerConnect 2324 Physical Dimensions PowerConnect 2216 PowerConnect 2224 PowerConnect 2324 Environmental Specifications Operating temperature Storage temperature Operating Relative Humidity Storage Relative Humidity RJ-45 connectors Supply voltage: 100-240 VAC Frequency: 50-60 Hz Current consumption: 0.4A Supply voltage: 100-240 VAC Frequency: 50-60 Hz Current consumption: 0.75A Supply ...70ºC (-4º to 158ºF) 10% to 90% non-condensing 10% to 95% non-condensing 14 Introduction www.dell.com | support.dell.com Table 1-2.


