Rack Installation Guide
Page 3
... and to help protect your server, storage system, or appliance from potential damage. iii Servers, storage systems, and appliances are used as to the rack installation documentation accompanying the system and the rack for specific warning and/or caution statements and procedures. These blocks are notes, notices, cautions, and warnings, and they are considered to avoid the problem. WARNING: A WARNING indicates a potentially hazardous situation which...
... and to help protect your server, storage system, or appliance from potential damage. iii Servers, storage systems, and appliances are used as to the rack installation documentation accompanying the system and the rack for specific warning and/or caution statements and procedures. These blocks are notes, notices, cautions, and warnings, and they are considered to avoid the problem. WARNING: A WARNING indicates a potentially hazardous situation which...
Rack Installation Guide
Page 4
... your fingers. • After a component is the customer's responsibility to have the final combination of Dell systems and rack kits for suitability by yourself. NOTE: Dell's servers, storage systems, and appliances are intended to be sure that provides power to the rack. ponent into the rack. • Do not overload the AC supply branch circuit that the rack meets the specifications of a rack;
... your fingers. • After a component is the customer's responsibility to have the final combination of Dell systems and rack kits for suitability by yourself. NOTE: Dell's servers, storage systems, and appliances are intended to be sure that provides power to the rack. ponent into the rack. • Do not overload the AC supply branch circuit that the rack meets the specifications of a rack;
Rack Installation Guide
Page 5
... the Rack 1-9 Installing Tab Covers 1-11 Four-Post Rack Kit Installation 1-11 Rack Kit Contents 1-11 Before You Begin 1-13 Recommended Tools and Supplies 1-13 Installing the Rack Kit 1-13 Removing the Doors From the 42-U Rack 1-14 Removing the Doors From the 24-U Rack 1-16 Installing the Slide Assemblies in the Rack 1-18 Installing the Inner Rails on the Appliance Chassis 1-21 Installing the Appliance in the Rack 1-21 Installing the Cable-Management Arm 1-22 Replacing the Rack...
... the Rack 1-9 Installing Tab Covers 1-11 Four-Post Rack Kit Installation 1-11 Rack Kit Contents 1-11 Before You Begin 1-13 Recommended Tools and Supplies 1-13 Installing the Rack Kit 1-13 Removing the Doors From the 42-U Rack 1-14 Removing the Doors From the 24-U Rack 1-16 Installing the Slide Assemblies in the Rack 1-18 Installing the Inner Rails on the Appliance Chassis 1-21 Installing the Appliance in the Rack 1-21 Installing the Cable-Management Arm 1-22 Replacing the Rack...
Rack Installation Guide
Page 6
...-Post Flush-Mount Rack Kit Contents 1-6 Figure 1-5. Removing the 24-U Rack Doors 1-17 Figure 1-15. Installing the Cable-Management Arm 1-23 vi Two-Post Open-Frame Relay Rack 1-U Hole Spacing 1-3 Figure 1-3. Opening the 24-U Rack Door 1-16 Figure 1-14. Two-Post Open-Frame Relay Rack 1-U Hole Spacing 1-7 Figure 1-6. Installing the Tab Cover 1-11 Figure 1-10. Removing the 42-U Rack Doors 1-15 Figure 1-13. Four-Post Rack Kit Contents 1-12 Figure 1-11. Securing the Inner Rails...
...-Post Flush-Mount Rack Kit Contents 1-6 Figure 1-5. Removing the 24-U Rack Doors 1-17 Figure 1-15. Installing the Cable-Management Arm 1-23 vi Two-Post Open-Frame Relay Rack 1-U Hole Spacing 1-3 Figure 1-3. Opening the 24-U Rack Door 1-16 Figure 1-14. Two-Post Open-Frame Relay Rack 1-U Hole Spacing 1-7 Figure 1-6. Installing the Tab Cover 1-11 Figure 1-10. Removing the 42-U Rack Doors 1-15 Figure 1-13. Four-Post Rack Kit Contents 1-12 Figure 1-11. Securing the Inner Rails...
Rack Installation Guide
Page 7
... Figure 1-12. Using Template to the Appliance Chassis1-9 Figure 1-8. Installing the Cable-Management Arm1-23 vii Securing the Inner Rails to Mark Vertical Rails1-19 Figure 1-17. Installing the Slide Assemblies1-20 Figure 1-18. Two-Post Flush-Mount Rack Kit Contents1-6 Figure 1-5. Installing the Bracket in the Rack1-22 Figure 1-20. Opening the 24-U Rack Door1-16 Figure 1-14. Four-Post Rack Kit Contents1-12 Figure...
... Figure 1-12. Using Template to the Appliance Chassis1-9 Figure 1-8. Installing the Cable-Management Arm1-23 vii Securing the Inner Rails to Mark Vertical Rails1-19 Figure 1-17. Installing the Slide Assemblies1-20 Figure 1-18. Two-Post Flush-Mount Rack Kit Contents1-6 Figure 1-5. Installing the Bracket in the Rack1-22 Figure 1-20. Opening the 24-U Rack Door1-16 Figure 1-14. Four-Post Rack Kit Contents1-12 Figure...
Rack Installation Guide
Page 9
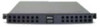
... this installation. support.dell.com Rack Installation Guide 1-1 Dell™ PowerApp™ 100 and 110 Appliances - This guide includes procedures for the following three rack kits: • Two-post center-mount • Two-post flush-mount • Four-post rack cabinet One rack kit is required for additional safety information regarding rack installation. Two-Post Center-Mount Rack Kit Installation This procedure provides instructions for installing a Dell PowerApp appliance in a twopost open -frame relay rack manufacturer's installation documentation for trained service technicians...
... this installation. support.dell.com Rack Installation Guide 1-1 Dell™ PowerApp™ 100 and 110 Appliances - This guide includes procedures for the following three rack kits: • Two-post center-mount • Two-post flush-mount • Four-post rack cabinet One rack kit is required for additional safety information regarding rack installation. Two-Post Center-Mount Rack Kit Installation This procedure provides instructions for installing a Dell PowerApp appliance in a twopost open -frame relay rack manufacturer's installation documentation for trained service technicians...
Rack Installation Guide
Page 10
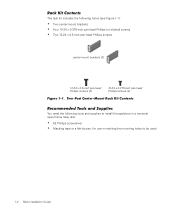
... screws center-mount brackets (2) 12-24 x 0.5-inch pan-head Phillips screws (2) 10-24 x 0.375-inch pan-head Phillips screws (4) Figure 1-1. Rack Kit Contents The rack kit includes the following tools and supplies to install the appliance in a two-post open-frame relay rack: • #2 Phillips screwdriver • Masking tape or a felt-tip pen, for use in marking the mounting holes to be used 1-2 Rack Installation Guide
... screws center-mount brackets (2) 12-24 x 0.5-inch pan-head Phillips screws (2) 10-24 x 0.375-inch pan-head Phillips screws (4) Figure 1-1. Rack Kit Contents The rack kit includes the following tools and supplies to install the appliance in a two-post open-frame relay rack: • #2 Phillips screwdriver • Masking tape or a felt-tip pen, for use in marking the mounting holes to be used 1-2 Rack Installation Guide
Rack Installation Guide
Page 11
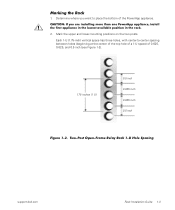
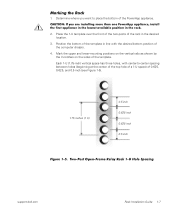
...0.5 inch 0.625 inch 0.625 inch 0.5 inch Figure 1-2. Two-Post Open-Frame Relay Rack 1-U Hole Spacing support.dell.com Rack Installation Guide 1-3 CAUTION: If you want to -center spacing between holes (...beginning at the center of the top hole of a 1-U space) of the PowerApp appliance. Determine where you are installing more than one PowerApp appliance, install the first appliance in the lowest available position in the rack. 2. Mark the upper and lower-mounting...
...0.5 inch 0.625 inch 0.625 inch 0.5 inch Figure 1-2. Two-Post Open-Frame Relay Rack 1-U Hole Spacing support.dell.com Rack Installation Guide 1-3 CAUTION: If you want to -center spacing between holes (...beginning at the center of the top hole of a 1-U space) of the PowerApp appliance. Determine where you are installing more than one PowerApp appliance, install the first appliance in the lowest available position in the rack. 2. Mark the upper and lower-mounting...
Rack Installation Guide
Page 12
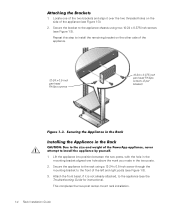
... 1-3. Attaching the Brackets 1. Securing the Appliance in the Rack Installing the Appliance in the two posts. 2. This completes the two-post center-mount rack installation. 1-4 Rack Installation Guide Secure the appliance to the rack using a 12-24 x 0.5-inch screw through the mounting bracket to the appliance chassis using two 10-24 x 0.375-inch screws (see Figure 1-3). 3. Locate one hole above the mark you made in the...
... 1-3. Attaching the Brackets 1. Securing the Appliance in the Rack Installing the Appliance in the two posts. 2. This completes the two-post center-mount rack installation. 1-4 Rack Installation Guide Secure the appliance to the rack using a 12-24 x 0.5-inch screw through the mounting bracket to the appliance chassis using two 10-24 x 0.375-inch screws (see Figure 1-3). 3. Locate one hole above the mark you made in the...
Rack Installation Guide
Page 13
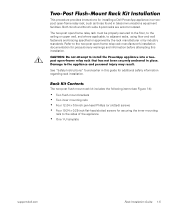
... of the appliance • One 1-U template support.dell.com Rack Installation Guide 1-5 See "Safety Instructions" found in telecommunications equipment facilities. Refer to the two-post open-frame relay rack manufacturer's installation documentation for securing the inner mounting rails to the appliance and personal injury may result. Two-Post Flush-Mount Rack Kit Installation This procedure provides instructions for installing a Dell PowerApp appliance in a twopost open-frame relay rack, such as those found earlier in...
... of the appliance • One 1-U template support.dell.com Rack Installation Guide 1-5 See "Safety Instructions" found in telecommunications equipment facilities. Refer to the two-post open-frame relay rack manufacturer's installation documentation for securing the inner mounting rails to the appliance and personal injury may result. Two-Post Flush-Mount Rack Kit Installation This procedure provides instructions for installing a Dell PowerApp appliance in a twopost open-frame relay rack, such as those found earlier in...
Rack Installation Guide
Page 14
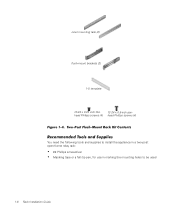
head Phillips screws (4) head Phillips screws (4) Figure 1-4. Two-Post Flush-Mount Rack Kit Contents Recommended Tools and Supplies You need the following tools and supplies to install the appliance in a two-post open-frame relay rack: • #2 Phillips screwdriver • Masking tape or a felt-tip pen, for use in marking the mounting holes to be used 1-6 Rack Installation Guide inner mounting rails (2) flush-mount brackets (2) 1-U template 10-24 x 0.25 inch flat- 12-24 x 0.5-inch pan-
head Phillips screws (4) head Phillips screws (4) Figure 1-4. Two-Post Flush-Mount Rack Kit Contents Recommended Tools and Supplies You need the following tools and supplies to install the appliance in a two-post open-frame relay rack: • #2 Phillips screwdriver • Masking tape or a felt-tip pen, for use in marking the mounting holes to be used 1-6 Rack Installation Guide inner mounting rails (2) flush-mount brackets (2) 1-U template 10-24 x 0.25 inch flat- 12-24 x 0.5-inch pan-
Rack Installation Guide
Page 15
... upper and lower-mounting positions on the vertical rails as shown by the V-notches on the sides of the rack in the desired location. 3. CAUTION: If you want to -center spacing between holes (beginning at the center of the top hole of a 1-U space) of the computer chassis. 4. Two-Post Open-Frame Relay Rack 1-U Hole Spacing support.dell.com Rack Installation Guide 1-7 Place the...
... upper and lower-mounting positions on the vertical rails as shown by the V-notches on the sides of the rack in the desired location. 3. CAUTION: If you want to -center spacing between holes (beginning at the center of the top hole of a 1-U space) of the computer chassis. 4. Two-Post Open-Frame Relay Rack 1-U Hole Spacing support.dell.com Rack Installation Guide 1-7 Place the...
Rack Installation Guide
Page 17
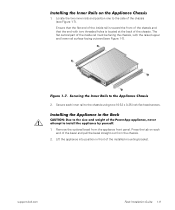
... front panel. Press the tab on the Appliance Chassis 1. Remove the optional bezel from the chassis. 2. Ensure that the flat end of the inside rail must be facing the chassis, with two threaded holes is toward the front of the chassis and that the end with the raised upper and lower rail surface facing outward (see Figure 1-7). support.dell.com Rack Installation Guide 1-9 Installing...
... front panel. Press the tab on the Appliance Chassis 1. Remove the optional bezel from the chassis. 2. Ensure that the flat end of the inside rail must be facing the chassis, with two threaded holes is toward the front of the chassis and that the end with the raised upper and lower rail surface facing outward (see Figure 1-7). support.dell.com Rack Installation Guide 1-9 Installing...
Rack Installation Guide
Page 18
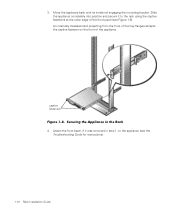
... completely into position and secure it was removed in the Rack 4. Move the appliance back with its inside rail engaging the mounting bracket. An internally threaded stud projecting from the front of the tray flanges accepts the captive fastener on the front of the front panel (see the Troubleshooting Guide for instructions). 1-10 Rack Installation Guide Attach the front bezel, if it...
... completely into position and secure it was removed in the Rack 4. Move the appliance back with its inside rail engaging the mounting bracket. An internally threaded stud projecting from the front of the tray flanges accepts the captive fastener on the front of the front panel (see the Troubleshooting Guide for instructions). 1-10 Rack Installation Guide Attach the front bezel, if it...
Rack Installation Guide
Page 19
... opening on the slide bracket. 4. This completes the two-post flush-mount rack installation. Four-Post Rack Kit Installation This procedure provides instructions for installing a Dell PowerApp appliance in and out of slide assemblies • One cable-management arm • Four 10-32 x 0.5-inch pan-head Phillips screws • Six 10-24 x 0.375-inch pan-head Phillips screws • One 1-U template for a four-post rack support.dell.com Rack Installation Guide 1-11 Installing...
... opening on the slide bracket. 4. This completes the two-post flush-mount rack installation. Four-Post Rack Kit Installation This procedure provides instructions for installing a Dell PowerApp appliance in and out of slide assemblies • One cable-management arm • Four 10-32 x 0.5-inch pan-head Phillips screws • Six 10-24 x 0.375-inch pan-head Phillips screws • One 1-U template for a four-post rack support.dell.com Rack Installation Guide 1-11 Installing...

Rack Installation Guide
Page 20
NOTE: If you purchased a Dell rack along with mounting brackets (1 pair) 1-U template 10-32 x 0.5-inch pan-head Phillips screws (4) 10-24 x 0.375inch pan-head Phillips screws (6) Figure 1-10. Four-Post Rack Kit Contents 1-12 Rack Installation Guide cable-management arm assembly slide assemblies with your PowerApp appliance, the slide assemblies may be preinstalled in the rack.
NOTE: If you purchased a Dell rack along with mounting brackets (1 pair) 1-U template 10-32 x 0.5-inch pan-head Phillips screws (4) 10-24 x 0.375inch pan-head Phillips screws (6) Figure 1-10. Four-Post Rack Kit Contents 1-12 Rack Installation Guide cable-management arm assembly slide assemblies with your PowerApp appliance, the slide assemblies may be preinstalled in the rack.
Rack Installation Guide
Page 21
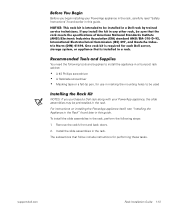
... tape or a felt-tip pen, for use in marking the mounting holes to be sure that follow include instructions for each Dell server, storage system, or appliance that is intended to be used Installing the Rack Kit NOTES: If you purchased a Dell rack along with your PowerApp appliance in the rack, carefully read "Safety Instructions", found later in a rack. Remove the rack's front and back doors. 2. Before You...
... tape or a felt-tip pen, for use in marking the mounting holes to be sure that follow include instructions for each Dell server, storage system, or appliance that is intended to be used Installing the Rack Kit NOTES: If you purchased a Dell rack along with your PowerApp appliance in the rack, carefully read "Safety Instructions", found later in a rack. Remove the rack's front and back doors. 2. Before You...
Rack Installation Guide
Page 22
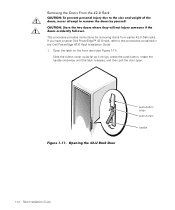
If you have a newer Dell PowerEdge™ 4210 rack, refer to remove the doors by yourself. Opening the 42-U Rack Door push-button cover push button handle 1-14 Rack Installation Guide Slide the button cover up as far as it will not injure someone if the doors accidently fall over. Figure 1-11. This procedure provides instructions for removing doors from earlier 42-U Dell racks. CAUTION: Store the two doors...
If you have a newer Dell PowerEdge™ 4210 rack, refer to remove the doors by yourself. Opening the 42-U Rack Door push-button cover push button handle 1-14 Rack Installation Guide Slide the button cover up as far as it will not injure someone if the doors accidently fall over. Figure 1-11. This procedure provides instructions for removing doors from earlier 42-U Dell racks. CAUTION: Store the two doors...
Rack Installation Guide
Page 31
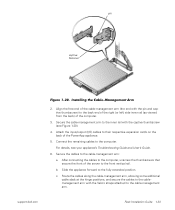
... appliance's Troubleshooting Guide and User's Guide. 6. b. For details, see Figure 1-20). 4. After connecting the cables to the front vertical rail. Secure the cable-management arm to the fully extended position. Slide the appliance forward to the inner rail with the Velcro straps attached to the cable-management arm: a. Installing the Cable-Management Arm 2. Attach the input/output (I/O) cables to the computer. support.dell.com Rack Installation Guide 1-23 Connect the remaining cables to...
... appliance's Troubleshooting Guide and User's Guide. 6. b. For details, see Figure 1-20). 4. After connecting the cables to the front vertical rail. Secure the cable-management arm to the fully extended position. Slide the appliance forward to the inner rail with the Velcro straps attached to the cable-management arm: a. Installing the Cable-Management Arm 2. Attach the input/output (I/O) cables to the computer. support.dell.com Rack Installation Guide 1-23 Connect the remaining cables to...
Rack Installation Guide
Page 33
...two-post center-mount kit, 1-4 two-post flush-mount kit, 1-8 C cable-management arm installation four-post rack, 1-22 cables routing, 1-23 cautions, iii contents illustrated four-post kit, 1-12 two-post center-mount kit, 1-2 two-post flush-mount kit, 1-6 contents listed four-post kit, 1-11 two-post center-mount kit, 1-2 two-post flush-mount kit, 1-5 D Dell Web site, 1-18 doors removing 24-U, 1-16 42-U, 1-15 replacing 24-U rack, 1-24 42-U rack, 1-24 F four-post Dell rack installation, 1-11 H hole spacing two-post rack kit, 1-3 I inner rails installing, 1-9, 1-21 installation four-post rack kit...
...two-post center-mount kit, 1-4 two-post flush-mount kit, 1-8 C cable-management arm installation four-post rack, 1-22 cables routing, 1-23 cautions, iii contents illustrated four-post kit, 1-12 two-post center-mount kit, 1-2 two-post flush-mount kit, 1-6 contents listed four-post kit, 1-11 two-post center-mount kit, 1-2 two-post flush-mount kit, 1-5 D Dell Web site, 1-18 doors removing 24-U, 1-16 42-U, 1-15 replacing 24-U rack, 1-24 42-U rack, 1-24 F four-post Dell rack installation, 1-11 H hole spacing two-post rack kit, 1-3 I inner rails installing, 1-9, 1-21 installation four-post rack kit...

