Dell PowerApp 110 Support and Manuals
Get Help and Manuals for this Dell item
View All Support Options Below
Free Dell PowerApp 110 manuals!
Problems with Dell PowerApp 110?
Ask a Question
Free Dell PowerApp 110 manuals!
Problems with Dell PowerApp 110?
Ask a Question
Popular Dell PowerApp 110 Manual Pages
Rack
Installation Guide - Page 2

... than its own. Trademarks used in this text: Dell, the DELL E COM logo, PowerEdge, and PowerApp are trademarks of Dell Computer Corporation is subject to either the entities claiming the marks and names or their products. Dell Computer Corporation disclaims any manner whatsoever without notice. © 2000 Dell Computer Corporation.
A00 Other trademarks and trade names...
Rack
Installation Guide - Page 9
... are accommodated. Refer to install the PowerApp appliance into a twopost open-frame relay rack that has not been securely anchored in the rack. support.dell.com
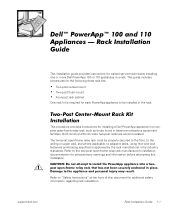
Rack Installation Guide 1-1 Rack Installation Guide
This installation guide provides instructions for trained service technicians installing one or more Dell PowerApp 100 or 110 appliances in telecommunications equipment facilities...
Rack
Installation Guide - Page 11
... position in the rack.
2.
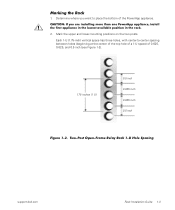
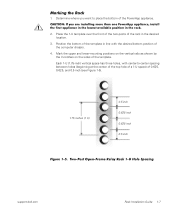
CAUTION: If you want to -center spacing between holes (beginning at the center of the top hole of a 1-U space) of the PowerApp appliance. Two-Post Open-Frame Relay Rack 1-U Hole Spacing
support.dell.com
Rack Installation Guide 1-3 Marking the Rack
1. Mark the upper and lower-mounting positions on the two posts.
Rack
Installation Guide - Page 13
...personal injury may result. See "Safety Instructions" found in this installation. Damage to the sides of the appliance
• One 1-U template
support.dell.com
Rack Installation Guide 1-5
CAUTION: Do not attempt to ...to the floor, to the ceiling or upper wall, and where applicable, to install the PowerApp appliance into a twopost open-frame relay rack that has not been securely anchored...
Rack
Installation Guide - Page 15
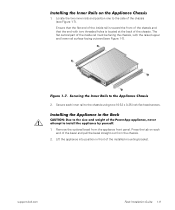
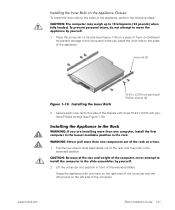
...the computer chassis.
4. Two-Post Open-Frame Relay Rack 1-U Hole Spacing
support.dell.com
Rack Installation Guide 1-7 Place the 1-U template over the front of the two-posts of...has three holes, with the desired bottom position of the PowerApp appliance. Determine where you are installing more than one PowerApp appliance, install the first appliance in the lowest available position in the ...
Rack
Installation Guide - Page 17
... threaded holes is toward the front of the chassis and that the flat end of the installed mounting bracket. support.dell.com
Rack Installation Guide 1-9 The flat central part of the inside rail is located at the back of the PowerApp appliance, never attempt to the Appliance Chassis 2.
Remove the optional bezel from the chassis. 2. Press the...
Rack
Installation Guide - Page 19
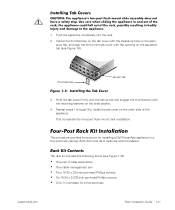
...Installing the Tab Cover
3. Four-Post Rack Kit Installation
This procedure provides instructions for installing a Dell PowerApp appliance in and out of the rack, possibly resulting in bodily injury and damage to install... • One 1-U template for a four-post rack
support.dell.com
Rack Installation Guide 1-11 Installing Tab Covers
CAUTION: The appliance's two-post flush-mount slide...
Rack
Installation Guide - Page 20

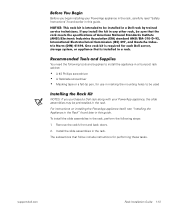
NOTE: If you purchased a Dell rack along with mounting brackets (1 pair)
1-U template
10-32 x 0.5-inch pan-head Phillips screws (4)
10-24 x 0.375inch pan-head Phillips screws (6)
Figure 1-10. cable-management arm assembly
slide assemblies with your PowerApp appliance, the slide assemblies may be preinstalled in the rack.
Four-Post Rack Kit Contents
1-12 Rack Installation Guide
Rack
Installation Guide - Page 21
... pen, for use in marking the mounting holes to be installed in a Dell rack by trained service technicians. One rack kit is required for performing these tasks. Remove the rack's front and back doors.
2.
support.dell.com
Rack Installation Guide 1-13 For instructions on installing the PowerApp appliance itself, see "Installing the Appliance in the Rack" found later in any other...
Rack
Installation Guide - Page 23
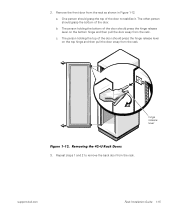
... press the hinge release lever on the top hinge and then pull the door away from the rack. Repeat steps 1 and 2 to stabilize it. a. support.dell.com
Rack Installation Guide 1-15
hinge release lever
Figure 1-12. The person holding the top of the door should press the hinge release lever on the bottom hinge...
Rack
Installation Guide - Page 25
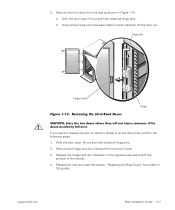
...other side, perform the following steps:
1. b. Once all hinge pins. hinge pin
hinge insert
Figure 1-14. Replace the rack door (see the section, "Replacing the Rack Doors", found later in Figure 1-14. a. Remove the front door from the door frame.
3. ...retract all the hinge pins have been lifted out and retracted, lift the door out. support.dell.com
Rack Installation Guide 1-17
Rack
Installation Guide - Page 26
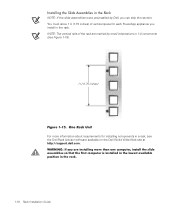
... at http://support.dell.com. One Rack Unit For more than one computer, install the slide assemblies so that the first computer is installed in the lowest available position in a rack, see Figure 1-15).
1 U (1.75 inches)
Figure 1-15. NOTE: The vertical rails of vertical space for installing components in the rack.
1-18 Rack Installation Guide You must...
Rack
Installation Guide - Page 27
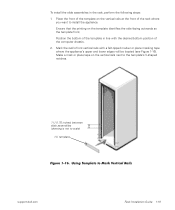
... place tape on the vertical rails next to the template's V-shaped notches.
1 U (1.75 inches) between slide assemblies (drawing is not to Mark Vertical Rails
support.dell.com
Rack Installation Guide 1-19
Ensure that the printing on the vertical rails at the front of the template in the rack, perform the following steps:
1. Position the...
Rack
Installation Guide - Page 29
... on its side (see Figure 1-18).
CAUTION: Because of the size and weight of the computer, never attempt to install the computer in front of the rack at a time.
1. support.dell.com
Rack Installation Guide 1-21 Installing the Inner Rails
10-24 x 0.375-inch pan-head Phillips screws (6)
2. Grasp the appliance with three 10-24 x 0.375...
Rack
Installation Guide - Page 31
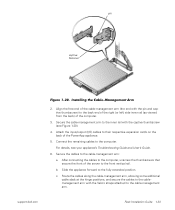
... to their respective expansion cards on the back of the PowerApp appliance.
5.
Route the cables along the cable-management arm...the server to the cablemanagement arm with the captive thumbscrew (see your appliance's Troubleshooting Guide and User's Guide.
6.
support.dell.com
Rack Installation Guide 1-23 After connecting the cables to the cable-management arm. Attach the input...
Dell PowerApp 110 Reviews
We have not received any reviews for Dell yet.