

User Guide
Page 1
... in this text: Dell, the DELL, and Dell Ink Management System are either potential damage to hardware or loss of data and tells you have the Dell printer Service Tag available. August 2008 Rev. Dell™ Photo P703w All-In-One Printer User's Guide To order ink or supplies from Dell: 1. All rights reserved. Visit Dell's website, or order Dell printer supplies by the...
... in this text: Dell, the DELL, and Dell Ink Management System are either potential damage to hardware or loss of data and tells you have the Dell printer Service Tag available. August 2008 Rev. Dell™ Photo P703w All-In-One Printer User's Guide To order ink or supplies from Dell: 1. All rights reserved. Visit Dell's website, or order Dell printer supplies by the...

User Guide
Page 2
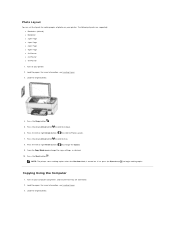
... 1 Scanner lid Upper cover of tasks. Printing without a connection to a computer. l If the printer is through card slot or PictBridge port only. Back to Contents Page About Your Printer Dell™ Photo P703w All-In-One Printer User's Guide Understanding the Printer Parts Understanding the Operator Panel You can use your printer to a computer to print, copy, and scan.
... 1 Scanner lid Upper cover of tasks. Printing without a connection to a computer. l If the printer is through card slot or PictBridge port only. Back to Contents Page About Your Printer Dell™ Photo P703w All-In-One Printer User's Guide Understanding the Printer Parts Understanding the Operator Panel You can use your printer to a computer to print, copy, and scan.

User Guide
Page 3
...to enter Scan mode. Flashes amber when printer is in the USB cable. When in preview mode. The other end of 5X. When in thumbnail view, displays the current photo in Photo Preview mode, magnifies the photo to Contents Page To Display photos, messages, status, and menus. Lights.... Start copy, print, or scan operation. Press to enter Photo mode. Lights up when in Scan mode. Display the main menu screen. 17 USB connector Connector into your printer on the display, clockwise, 90 degrees. When the printer is in button 4 Copy button 5 Scan button 6 Start ...
...to enter Scan mode. Flashes amber when printer is in the USB cable. When in preview mode. The other end of 5X. When in thumbnail view, displays the current photo in Photo Preview mode, magnifies the photo to Contents Page To Display photos, messages, status, and menus. Lights.... Start copy, print, or scan operation. Press to enter Photo mode. Lights up when in Scan mode. Display the main menu screen. 17 USB connector Connector into your printer on the display, clockwise, 90 degrees. When the printer is in button 4 Copy button 5 Scan button 6 Start ...

User Guide
Page 4
... Service Code to route the call 1-800-624-9896. 3. Back to Contents Page Appendix Dell™ Photo P703w All-In-One Printer User's Guide Dell Technical Support Policy Technical Assistance Obtaining Assistance Product Information Before You Call Contacting Dell Warranty and Return Policy Dell Technical Support Policy Technician-assisted technical support requires the cooperation and participation of the...
... Service Code to route the call 1-800-624-9896. 3. Back to Contents Page Appendix Dell™ Photo P703w All-In-One Printer User's Guide Dell Technical Support Policy Technical Assistance Obtaining Assistance Product Information Before You Call Contacting Dell Warranty and Return Policy Dell Technical Support Policy Technician-assisted technical support requires the cooperation and participation of the...
User Guide
Page 5
... detailed information during operations, or try other troubleshooting steps possible only at or near the printer. CAUTION: Before working inside your printer, follow the safety instructions in your call from a telephone at the printer itself. The code helps Dell's automated-support telephone system direct your area. You may be asked for sales, technical support...
... detailed information during operations, or try other troubleshooting steps possible only at or near the printer. CAUTION: Before working inside your printer, follow the safety instructions in your call from a telephone at the printer itself. The code helps Dell's automated-support telephone system direct your area. You may be asked for sales, technical support...

User Guide
Page 7
... type of the following security types are 64 characters long. Press the Power button . Back to Contents Page Configuring Wireless Dell™ Photo P703w All-In-One Printer User's Guide Minimum Requirements for Setup l Dell™ Photo P703w AIO Printer l An existing wireless network l Drivers and Utilities CD that shipped with either 128-bit TKIP encryption engine, or 128...
... type of the following security types are 64 characters long. Press the Power button . Back to Contents Page Configuring Wireless Dell™ Photo P703w All-In-One Printer User's Guide Minimum Requirements for Setup l Dell™ Photo P703w AIO Printer l An existing wireless network l Drivers and Utilities CD that shipped with either 128-bit TKIP encryption engine, or 128...
User Guide
Page 8
...default the USB connection option is on -screen instructions until you are using your printer with a new Dell computer: Go to step 11. 10. Press the down Arrow button to scroll to on the ...back of the printer and the computer. 12. The CD launches automatically. Follow ... download the software. 11. NOTE: If you do not have to be disabled before you are using your printer with an existing computer: Go to Network. 5. At your computer: 9. Press the down Arrow button to scroll...
...default the USB connection option is on -screen instructions until you are using your printer with a new Dell computer: Go to step 11. 10. Press the down Arrow button to scroll to on the ...back of the printer and the computer. 12. The CD launches automatically. Follow ... download the software. 11. NOTE: If you do not have to be disabled before you are using your printer with an existing computer: Go to Network. 5. At your computer: 9. Press the down Arrow button to scroll...

User Guide
Page 9
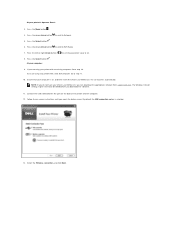
... Config Utility For configuring wireless after installing Dell Imaging Toolbox: Click Start® Programs® Dell Printers® Dell Photo P703w AIO Printer® WiFi Config Utility. NOTE: Ensure that your computer is already connected to a wireless network. Configure Wireless Printer window opens. 14. or Select Keep wireless settings of your printer is connected to the same network. Click...
... Config Utility For configuring wireless after installing Dell Imaging Toolbox: Click Start® Programs® Dell Printers® Dell Photo P703w AIO Printer® WiFi Config Utility. NOTE: Ensure that your computer is already connected to a wireless network. Configure Wireless Printer window opens. 14. or Select Keep wireless settings of your printer is connected to the same network. Click...

User Guide
Page 10
... The blue Wi-Fi indicator LED starts flashing blue. If you must know the router's IP address. Before configuring your printer using . At your router's IP address and press the Enter key. Using an Internet browser type your computer: 1....is only recommended for the WPS logo. At your printer's wireless settings using a temporary USB cable. Press the down Arrow button to scroll to configure your printer's Operator Panel: 3. Click Dell Photo P703w AIO Printer® WiFi Config Utility. If you are not... to scroll to the WPS section. WPS is turned On. b. Click Dell Printers.
... The blue Wi-Fi indicator LED starts flashing blue. If you must know the router's IP address. Before configuring your printer using . At your router's IP address and press the Enter key. Using an Internet browser type your computer: 1....is only recommended for the WPS logo. At your printer's wireless settings using a temporary USB cable. Press the down Arrow button to scroll to configure your printer's Operator Panel: 3. Click Dell Photo P703w AIO Printer® WiFi Config Utility. If you are not... to scroll to the WPS section. WPS is turned On. b. Click Dell Printers.

User Guide
Page 11
...search on the router. This may take few minutes. Complete step 9 within 2 minutes of the printer close to WPS Pin, then press the Select button. 7. This may take few minutes. NOTE: Your printer's internal wireless antenna is unsuccessful or times out, wait for the configuration to initiate the process at... the printer. 10. Move the printer closer to the router with step 11. Return to stop flashing and turn solid blue. Do NOT press the Select button . Wait for a...
...search on the router. This may take few minutes. Complete step 9 within 2 minutes of the printer close to WPS Pin, then press the Select button. 7. This may take few minutes. NOTE: Your printer's internal wireless antenna is unsuccessful or times out, wait for the configuration to initiate the process at... the printer. 10. Move the printer closer to the router with step 11. Return to stop flashing and turn solid blue. Do NOT press the Select button . Wait for a...

User Guide
Page 12
NOT 0.0.0.0). Proceed from support.dell.com. 15. Insert the Drivers and Utilities CD if you have already installed your printer on your Drivers and Utilities CD, you reach the below screen. Return to install the printer drivers on your computer, launch the installed Wi-Fi Config Utility program. NOTE:... appropriate software from step 14 to your computer: 13. Select the Wireless connection, and click Next. If the printer IP address has not been assigned restart the printer and re-check. Skip to Status, then press the Select button . Press the up or down Arrow button ...
NOT 0.0.0.0). Proceed from support.dell.com. 15. Insert the Drivers and Utilities CD if you have already installed your printer on your Drivers and Utilities CD, you reach the below screen. Return to install the printer drivers on your computer, launch the installed Wi-Fi Config Utility program. NOTE:... appropriate software from step 14 to your computer: 13. Select the Wireless connection, and click Next. If the printer IP address has not been assigned restart the printer and re-check. Skip to Status, then press the Select button . Press the up or down Arrow button ...

User Guide
Page 13
Select Keep wireless settings of my printer, and click Next. 18. Select your computer is connected to the same network. 17. NOTE: Ensure that your printer, and click Next. Configure Wireless Printer window opens.
Select Keep wireless settings of my printer, and click Next. 18. Select your computer is connected to the same network. 17. NOTE: Ensure that your printer, and click Next. Configure Wireless Printer window opens.

User Guide
Page 15
Load the original photo. 4. Press the Start button . Fit to Same Size. 7. For more information, see Loading Paper. 3. Load the paper. From the Copy Mode menu change the copy ... to Page 1. Press the Copy button . 5. For more information, see Loading Paper. 3. Press the down Arrow button to scroll to Contents Page Copying Dell™ Photo P703w All-In-One Printer User's Guide Copying Using the Operator Panel Copying Using the Computer Copying From a Thick Book Changing Copy Settings Copying Using the Operator Panel Same...
Load the original photo. 4. Press the Start button . Fit to Same Size. 7. For more information, see Loading Paper. 3. Load the paper. From the Copy Mode menu change the copy ... to Page 1. Press the Copy button . 5. For more information, see Loading Paper. 3. Press the down Arrow button to scroll to Contents Page Copying Dell™ Photo P703w All-In-One Printer User's Guide Copying Using the Operator Panel Copying Using the Computer Copying From a Thick Book Changing Copy Settings Copying Using the Operator Panel Same...

User Guide
Page 16
From the Copy Mode menu change the size (10-500). 9. Load the original photo. 4. Press the left or right Arrow button to Page. 7. Turn on . Press the left or right Arrow button to scroll to Fit to change the ... the paper. Press the down Arrow button to scroll to Scale Percent. 7. Press the Start button . For more information, see Loading Paper. 3. NOTE: The printer starts making copies unless the Preview Mode is turned on. Press the down Arrow button to scroll to begin making copies. Press the down Arrow ...
From the Copy Mode menu change the size (10-500). 9. Load the original photo. 4. Press the left or right Arrow button to Page. 7. Turn on . Press the left or right Arrow button to scroll to Fit to change the ... the paper. Press the down Arrow button to scroll to Scale Percent. 7. Press the Start button . For more information, see Loading Paper. 3. NOTE: The printer starts making copies unless the Preview Mode is turned on. Press the down Arrow button to scroll to begin making copies. Press the down Arrow ...
User Guide
Page 17
...more information, see Loading Paper. 3. Load the original photo. 4. Press the left or right Arrow button to scroll to Photo Layouts. 7. Load the original photo. Press the down Arrow button to scroll to Output. 6. NOTE: The printer starts making copies unless the Preview Mode is turned on ...your printer. Load the paper. Photo Layout You can set the layout for making copies of photos on . The following layouts are connected. 2. Turn on your printer. 2. Press the left or ...
...more information, see Loading Paper. 3. Load the original photo. 4. Press the left or right Arrow button to scroll to Photo Layouts. 7. Load the original photo. Press the down Arrow button to scroll to Output. 6. NOTE: The printer starts making copies unless the Preview Mode is turned on ...your printer. Load the paper. Photo Layout You can set the layout for making copies of photos on . The following layouts are connected. 2. Turn on your printer. 2. Press the left or ...

User Guide
Page 18
c. The Dell Imaging Toolbox opens. 6. The Basic Copy window opens. Click Dell Printers. From Dell Imaging Toolbox, click Copy to open the Copy Pictures window. Click Start® Programs or All Programs® Dell Printers® Dell Photo P703w AIO Printer. In Windows Vista®: a. Select Dell Imaging Toolbox. Click Dell Photo P703w AIO Printer. 5. Click ® Programs. b. 4.
c. The Dell Imaging Toolbox opens. 6. The Basic Copy window opens. Click Dell Printers. From Dell Imaging Toolbox, click Copy to open the Copy Pictures window. Click Start® Programs or All Programs® Dell Printers® Dell Photo P703w AIO Printer. In Windows Vista®: a. Select Dell Imaging Toolbox. Click Dell Photo P703w AIO Printer. 5. Click ® Programs. b. 4.

User Guide
Page 20
... the Start button . For more information, see Loading Paper. 3. Press the left or right Arrow button to Page/Scale Percent/Photo Layout. 7. When you finish customizing your printer. 2. Press the left or right Arrow button to scroll to Same Size/Fit to change the copy settings, as desired. 10...10-500). 9. Turn on . Press the down Arrow button to scroll to Output. 6. Press the down Arrow button to scroll to Size. 8. Your printer functions normally even with a white blank paper, if the size of the copy. Click Next > to go to undo the changes made. 18. NOTE...
... the Start button . For more information, see Loading Paper. 3. Press the left or right Arrow button to Page/Scale Percent/Photo Layout. 7. When you finish customizing your printer. 2. Press the left or right Arrow button to scroll to Same Size/Fit to change the copy settings, as desired. 10...10-500). 9. Turn on . Press the down Arrow button to scroll to Output. 6. Press the down Arrow button to scroll to Size. 8. Your printer functions normally even with a white blank paper, if the size of the copy. Click Next > to go to undo the changes made. 18. NOTE...

User Guide
Page 21
... Dell Printers. Using the Computer Output Quality Photo quality is automatically selected when photo paper is detected in the photo input trays. Select Dell Imaging Toolbox. Click Dell Photo P703w AIO Printer. 2. From the Dell Imaging Toolbox window, select Settings. 4. Click Copy tab. For more information about settings, see Copy Mode. Click Start® Programs or All Programs® Dell Printers® Dell Photo P703w AIO Printer...
... Dell Printers. Using the Computer Output Quality Photo quality is automatically selected when photo paper is detected in the photo input trays. Select Dell Imaging Toolbox. Click Dell Photo P703w AIO Printer. 2. From the Dell Imaging Toolbox window, select Settings. 4. Click Copy tab. For more information about settings, see Copy Mode. Click Start® Programs or All Programs® Dell Printers® Dell Photo P703w AIO Printer...

User Guide
Page 22
.... Click OK or Apply. Click OK or Apply. c. Select the check box Print colors as grayscale, if desired. 10. Copy Options 1. Click ® Programs. b. Click Dell Photo P703w AIO Printer. 2. NOTE: The Size option gets disabled or enabled depending on the type of Output... selected. 7. In Windows Vista®: a. Select the Quantity (1-99). 9. The Dell Imaging Toolbox opens. 3. Click Start® Programs or All Programs® Dell Printers® Dell Photo P703w AIO Printer. Click Copy tab. 6. Adjust the brightness by sliding the slider with the mouse. 8....
.... Click OK or Apply. Click OK or Apply. c. Select the check box Print colors as grayscale, if desired. 10. Copy Options 1. Click ® Programs. b. Click Dell Photo P703w AIO Printer. 2. NOTE: The Size option gets disabled or enabled depending on the type of Output... selected. 7. In Windows Vista®: a. Select the Quantity (1-99). 9. The Dell Imaging Toolbox opens. 3. Click Start® Programs or All Programs® Dell Printers® Dell Photo P703w AIO Printer. Click Copy tab. 6. Adjust the brightness by sliding the slider with the mouse. 8....

User Guide
Page 23
... number Service Tag number This label is located on the printer (see below ). Back to Contents Page Finding Information Dell™ Photo P703w All-In-One Printer User's Guide What are you purchased your Dell™ computer and printer at the same time, documentation and drivers for your printer are already installed on your computer. You can use the...
... number Service Tag number This label is located on the printer (see below ). Back to Contents Page Finding Information Dell™ Photo P703w All-In-One Printer User's Guide What are you purchased your Dell™ computer and printer at the same time, documentation and drivers for your printer are already installed on your computer. You can use the...


