

User Guide
Page 1
Dell™ Photo P703w All-In-One Printer User's Guide To order ink or supplies from Dell: 1. NOTICE: A NOTICE indicates either potential damage to hardware or loss of Dell Inc. CAUTION: A CAUTION indicates a potential for property damage, personal injury, or death. Reproduction of these materials in any proprietary interest in this document to refer ...
Dell™ Photo P703w All-In-One Printer User's Guide To order ink or supplies from Dell: 1. NOTICE: A NOTICE indicates either potential damage to hardware or loss of Dell Inc. CAUTION: A CAUTION indicates a potential for property damage, personal injury, or death. Reproduction of these materials in any proprietary interest in this document to refer ...

User Guide
Page 2
... you scan it. 2 LCD display Displays photos, messages, status, and menus. 3 Operator panel Panel on the printer you use to control copying, scanning, and printing. 4 Wi-Fi LED Indicates Wi-Fi setup status. Back to Contents Page About Your Printer Dell™ Photo P703w All-In-One Printer User's Guide Understanding the Printer Parts Understanding the Operator Panel You...
... you scan it. 2 LCD display Displays photos, messages, status, and menus. 3 Operator panel Panel on the printer you use to control copying, scanning, and printing. 4 Wi-Fi LED Indicates Wi-Fi setup status. Back to Contents Page About Your Printer Dell™ Photo P703w All-In-One Printer User's Guide Understanding the Printer Parts Understanding the Operator Panel You...

User Guide
Page 3
... mode. Power light flashes white when starting up when in Photo mode. Rotate picture on or off. When the printer is in 0.25X increments to Contents Page To Display photos, messages, status, and menus. When a photo has been magnified with the arrow button. Cancel the current ... the display, clockwise, 90 degrees. Flashes amber when printer is in button 4 Copy button 5 Scan button 6 Start button 7 Power button 8 Power light 9 Menu button 10 Cancel button 11 Select button 12 Arrow buttons 13 Photo button 14 Rotate button 15 Zoom out button Back to...
... mode. Power light flashes white when starting up when in Photo mode. Rotate picture on or off. When the printer is in 0.25X increments to Contents Page To Display photos, messages, status, and menus. When a photo has been magnified with the arrow button. Cancel the current ... the display, clockwise, 90 degrees. Flashes amber when printer is in button 4 Copy button 5 Scan button 6 Start button 7 Power button 8 Power light 9 Menu button 10 Cancel button 11 Select button 12 Arrow buttons 13 Photo button 14 Rotate button 15 Zoom out button Back to...

User Guide
Page 4
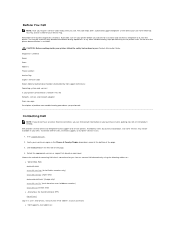
... and/or installed through Software & Peripherals (DellWare), ReadyWare, and Custom Factory Integration (CFI/DellPlus). NOTE: Dell's Express Service Code system may not be available in all Dell-installed hardware. Back to Contents Page Appendix Dell™ Photo P703w All-In-One Printer User's Guide Dell Technical Support Policy Technical Assistance Obtaining Assistance Product Information Before You Call Contacting...
... and/or installed through Software & Peripherals (DellWare), ReadyWare, and Custom Factory Integration (CFI/DellPlus). NOTE: Dell's Express Service Code system may not be available in all Dell-installed hardware. Back to Contents Page Appendix Dell™ Photo P703w All-In-One Printer User's Guide Dell Technical Support Policy Technical Assistance Obtaining Assistance Product Information Before You Call Contacting...
User Guide
Page 5
...options. Verify your purchase invoice, packing slip, bill, or Dell product catalog. l Dell Support e-mail addresses The code helps Dell's automated-support telephone system direct your need. CAUTION: Before working inside your printer, follow the safety instructions in the Choose A Country/Region ... or region in your Service Tag. Choose the method of contacting Dell that the printer documentation is convenient for sales, technical support, or customer service issues: 1. Availability varies by Dell support technician): Operating system and version: Is your Express Service Code...
...options. Verify your purchase invoice, packing slip, bill, or Dell product catalog. l Dell Support e-mail addresses The code helps Dell's automated-support telephone system direct your need. CAUTION: Before working inside your printer, follow the safety instructions in the Choose A Country/Region ... or region in your Service Tag. Choose the method of contacting Dell that the printer documentation is convenient for sales, technical support, or customer service issues: 1. Availability varies by Dell support technician): Operating system and version: Is your Express Service Code...

User Guide
Page 7
... supported: l No security l WEP with either 64-bit or 128-bit key l WPA with your printer l A computer running one of wireless network you use anywhere from one wireless client, installing the base station near the client is like a password and must meet the following... If you may be needed to configure the adapter that you have only one to Contents Page Configuring Wireless Dell™ Photo P703w All-In-One Printer User's Guide Minimum Requirements for Setup l Dell™ Photo P703w AIO Printer l An existing wireless network l Drivers and Utilities CD that shipped with either...
... supported: l No security l WEP with either 64-bit or 128-bit key l WPA with your printer l A computer running one of wireless network you use anywhere from one wireless client, installing the base station near the client is like a password and must meet the following... If you may be needed to configure the adapter that you have only one to Contents Page Configuring Wireless Dell™ Photo P703w All-In-One Printer User's Guide Minimum Requirements for Setup l Dell™ Photo P703w AIO Printer l An existing wireless network l Drivers and Utilities CD that shipped with either...
User Guide
Page 8
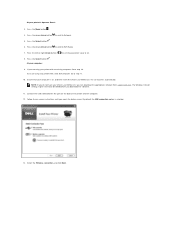
...on . 8. If you are using your Drivers and Utilities CD, you can download the appropriate software from support.dell.com. The Windows firewall settings might have your printer with an existing computer: Go to step 11. 10. If you reach the below screen. Connect the USB ...13. Select the Wireless connection, and click Next. Press the Select button . 6. Ensure that your printer with a new Dell computer: Go to step 10. Press the Select button . At your printer's Operator Panel: 3. Press the left or right Arrow button to set the parameter value to be disabled...
...on . 8. If you are using your Drivers and Utilities CD, you can download the appropriate software from support.dell.com. The Windows firewall settings might have your printer with an existing computer: Go to step 11. 10. If you reach the below screen. Connect the USB ...13. Select the Wireless connection, and click Next. Press the Select button . 6. Ensure that your printer with a new Dell computer: Go to step 10. Press the Select button . At your printer's Operator Panel: 3. Press the left or right Arrow button to set the parameter value to be disabled...

User Guide
Page 9
... would like to a different network. 15. Configuring Wireless Using Wi-Fi Config Utility For configuring wireless after installing Dell Imaging Toolbox: Click Start® Programs® Dell Printers® Dell Photo P703w AIO Printer® WiFi Config Utility. Configure Wireless Printer window opens. 14. NOTE: Ensure that your computer is already connected to complete the setup. or Select...
... would like to a different network. 15. Configuring Wireless Using Wi-Fi Config Utility For configuring wireless after installing Dell Imaging Toolbox: Click Start® Programs® Dell Printers® Dell Photo P703w AIO Printer® WiFi Config Utility. Configure Wireless Printer window opens. 14. NOTE: Ensure that your computer is already connected to complete the setup. or Select...

User Guide
Page 10
Click Dell Printers. Advanced Users Only Follow these instructions carefully to the WPS section. Before configuring your printer using WPS, you are using a temporary USB cable. Your router's web page opens. If you must know the router's IP address. Press the... settings using Wi-Fi Protected Setup (WPS) - Press the down Arrow button to scroll to WiFi Radio and ensure that your printer's Operator Panel: 3. Click Dell Photo P703w AIO Printer® WiFi Config Utility. Press the down Arrow button to scroll to the wireless network. b. NOTE: Ensure that it is connected...
Click Dell Printers. Advanced Users Only Follow these instructions carefully to the WPS section. Before configuring your printer using WPS, you are using a temporary USB cable. Your router's web page opens. If you must know the router's IP address. Press the... settings using Wi-Fi Protected Setup (WPS) - Press the down Arrow button to scroll to WiFi Radio and ensure that your printer's Operator Panel: 3. Click Dell Photo P703w AIO Printer® WiFi Config Utility. Press the down Arrow button to scroll to the wireless network. b. NOTE: Ensure that it is connected...

User Guide
Page 11
... or down the PIN shown on the right side of initiating WPS search on your router's WPS page and initiate the WPS search on the printer to WPS Pin, then press the Select button. 7. If setup is unsuccessful or times out, wait for the configuration to the... printer within 2 minutes. At your printer's Operator Panel: 9. Return to complete. If setup is successful, the following screen appears on the web page and press the Select button to the router ...
... or down the PIN shown on the right side of initiating WPS search on your router's WPS page and initiate the WPS search on the printer to WPS Pin, then press the Select button. 7. If setup is unsuccessful or times out, wait for the configuration to the... printer within 2 minutes. At your printer's Operator Panel: 9. Return to complete. If setup is successful, the following screen appears on the web page and press the Select button to the router ...

User Guide
Page 12
... and Utilities CD if you have already installed your printer on your computer, launch the installed Wi-Fi Config Utility program. NOTE: If you reach the below screen. By default the USB connection option is not assigned, repeat from support.dell.com. 15. Proceed from step 14 to step 16.... Skip to install the printer drivers on -screen instructions until you have not already done so. NOTE: If you can download the ...
... and Utilities CD if you have already installed your printer on your computer, launch the installed Wi-Fi Config Utility program. NOTE: If you reach the below screen. By default the USB connection option is not assigned, repeat from support.dell.com. 15. Proceed from step 14 to step 16.... Skip to install the printer drivers on -screen instructions until you have not already done so. NOTE: If you can download the ...

User Guide
Page 13
Select your computer is connected to the same network. 17. Configure Wireless Printer window opens. Select Keep wireless settings of my printer, and click Next. 18. NOTE: Ensure that your printer, and click Next.
Select your computer is connected to the same network. 17. Configure Wireless Printer window opens. Select Keep wireless settings of my printer, and click Next. 18. NOTE: Ensure that your printer, and click Next.

User Guide
Page 15
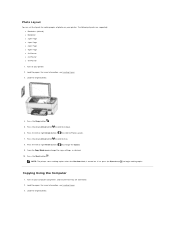
...For more information, see Loading Paper. 3. Press the left or right Arrow button to scroll to Contents Page Copying Dell™ Photo P703w All-In-One Printer User's Guide Copying Using the Operator Panel Copying Using the Computer Copying From a Thick Book Changing Copy Settings Copying ...to begin making copies unless the Preview Mode is turned on. Turn on your printer. 2. Press the Start button . Fit to Output. 6. For more information, see Loading Paper. 3. Turn on your printer. 2. Load the original photo. 4. NOTE: The printer starts making copies. Load the original...
...For more information, see Loading Paper. 3. Press the left or right Arrow button to scroll to Contents Page Copying Dell™ Photo P703w All-In-One Printer User's Guide Copying Using the Operator Panel Copying Using the Computer Copying From a Thick Book Changing Copy Settings Copying ...to begin making copies unless the Preview Mode is turned on. Turn on your printer. 2. Press the Start button . Fit to Output. 6. For more information, see Loading Paper. 3. Turn on your printer. 2. Load the original photo. 4. NOTE: The printer starts making copies. Load the original...

User Guide
Page 16
Press the Copy button . 5. Press the down Arrow button to scroll to Scale Percent. 7. Load the paper. Load the original photo. 4. Press the Start button . Press the left or right Arrow button to scroll to Output. 6. Press the Copy button . 5. Press the down... the Copy Mode menu change the size (10-500). 9. NOTE: The printer starts making copies unless the Preview Mode is turned on your printer. 2. Scale Percent 1. Press the left or right Arrow button to Size. 8. NOTE: The printer starts making copies unless the Preview Mode is turned on. Press the Start...
Press the Copy button . 5. Press the down Arrow button to scroll to Scale Percent. 7. Load the paper. Load the original photo. 4. Press the Start button . Press the left or right Arrow button to scroll to Output. 6. Press the Copy button . 5. Press the down... the Copy Mode menu change the size (10-500). 9. NOTE: The printer starts making copies unless the Preview Mode is turned on your printer. 2. Scale Percent 1. Press the left or right Arrow button to Size. 8. NOTE: The printer starts making copies unless the Preview Mode is turned on. Press the Start...
User Guide
Page 17
...Loading Paper. 3. From the Copy Mode menu change the layout. 9. Load the original photo. Load the original photo. 4. Press the Copy button . 5. Photo Layout You can set the layout for making copies of photos on your computer and printer, and ensure that they are supported: l Borderless (default) l Bordered l 2 per ...If so, press the Start button to begin making copies unless the Preview Mode is turned on your printer. 2. Press the left or right Arrow button to Photo Layouts. 7. Press the Start button . Load the paper. Press the left or right Arrow button to...
...Loading Paper. 3. From the Copy Mode menu change the layout. 9. Load the original photo. Load the original photo. 4. Press the Copy button . 5. Photo Layout You can set the layout for making copies of photos on your computer and printer, and ensure that they are supported: l Borderless (default) l Bordered l 2 per ...If so, press the Start button to begin making copies unless the Preview Mode is turned on your printer. 2. Press the left or right Arrow button to Photo Layouts. 7. Press the Start button . Load the paper. Press the left or right Arrow button to...

User Guide
Page 18
Click Start® Programs or All Programs® Dell Printers® Dell Photo P703w AIO Printer. c. From Dell Imaging Toolbox, click Copy to open the Copy Pictures window. The Basic Copy window opens. In Windows Vista®: a. Click Dell Printers. Click Dell Photo P703w AIO Printer. 5. The Dell Imaging Toolbox opens. 6. 4. Click ® Programs. b. Select Dell Imaging Toolbox.
Click Start® Programs or All Programs® Dell Printers® Dell Photo P703w AIO Printer. c. From Dell Imaging Toolbox, click Copy to open the Copy Pictures window. The Basic Copy window opens. In Windows Vista®: a. Click Dell Printers. Click Dell Photo P703w AIO Printer. 5. The Dell Imaging Toolbox opens. 6. 4. Click ® Programs. b. Select Dell Imaging Toolbox.

User Guide
Page 20
... a Thick Book 1. Press the left or right Arrow button to Output. 6. From the Copy Mode menu change the size (10-500). 9. Your printer functions normally even with a white blank paper, if the size of the copy. Press the Start button . Changing Copy Settings The picture(s) are scanned ... progress information appears that shows the progress of the book is turned on your settings, click Copy or Finish. When you finish customizing your printer. 2. If so, press Start to begin making copies unless the Preview Mode is lesser than the scanner glass. 4. NOTE: Click Cancel...
... a Thick Book 1. Press the left or right Arrow button to Output. 6. From the Copy Mode menu change the size (10-500). 9. Your printer functions normally even with a white blank paper, if the size of the copy. Press the Start button . Changing Copy Settings The picture(s) are scanned ... progress information appears that shows the progress of the book is turned on your settings, click Copy or Finish. When you finish customizing your printer. 2. If so, press Start to begin making copies unless the Preview Mode is lesser than the scanner glass. 4. NOTE: Click Cancel...

User Guide
Page 21
Click Dell Printers. Click Dell Photo P703w AIO Printer. 2. Click AIO Printer. 5. Click Start® Programs or All Programs® Dell Printers® Dell Photo P703w AIO Printer. c. Click Copy tab. Click ® Programs. b. From the Dell Imaging Toolbox window, select Settings. 4. Using the Operator Panel If you are using your printer as a standalone copier, you can change the copy settings from the Copy Mode menus...
Click Dell Printers. Click Dell Photo P703w AIO Printer. 2. Click AIO Printer. 5. Click Start® Programs or All Programs® Dell Printers® Dell Photo P703w AIO Printer. c. Click Copy tab. Click ® Programs. b. From the Dell Imaging Toolbox window, select Settings. 4. Using the Operator Panel If you are using your printer as a standalone copier, you can change the copy settings from the Copy Mode menus...

User Guide
Page 22
Click ® Programs. b. Select the check box Print colors as grayscale, if desired. 10. Click OK or Apply. The Dell Imaging Toolbox opens. 3. Back to Contents Page Copy Options 1. Click Start® Programs or All Programs® Dell Printers® Dell Photo P703w AIO Printer. In Windows Vista®: a. Click Dell Photo P703w AIO Printer. 2. From the Output and Size drop-down lists...
Click ® Programs. b. Select the check box Print colors as grayscale, if desired. 10. Click OK or Apply. The Dell Imaging Toolbox opens. 3. Back to Contents Page Copy Options 1. Click Start® Programs or All Programs® Dell Printers® Dell Photo P703w AIO Printer. In Windows Vista®: a. Click Dell Photo P703w AIO Printer. 2. From the Output and Size drop-down lists...

User Guide
Page 23
... technical changes to your documentation. This label is located on the printer (see below ). Back to Contents Page Finding Information Dell™ Photo P703w All-In-One Printer User's Guide What are you purchased your Dell™ computer and printer at the same time, documentation and drivers for your printer are already installed on your computer. l Drivers for my...
... technical changes to your documentation. This label is located on the printer (see below ). Back to Contents Page Finding Information Dell™ Photo P703w All-In-One Printer User's Guide What are you purchased your Dell™ computer and printer at the same time, documentation and drivers for your printer are already installed on your computer. l Drivers for my...


