

User Guide
Page 1
... Information About Your Printer Understanding the Operator Panel Menus Loading Paper and Originals Printing Printing From a Memory Card or USB Key Copying Scanning Understanding the Software Configuring Wireless Maintenance Troubleshooting Specifications Ordering Printer Supplies Appendix Licensing Notice... Visit Dell's website, or order Dell printer supplies by Dell Inc. All rights reserved. disclaims any manner whatsoever without notice. © 2008 Dell Inc. Dell™ Photo P703w All-In-One Printer User's Guide To order ink or supplies from Dell: 1. www.dell.com/...
... Information About Your Printer Understanding the Operator Panel Menus Loading Paper and Originals Printing Printing From a Memory Card or USB Key Copying Scanning Understanding the Software Configuring Wireless Maintenance Troubleshooting Specifications Ordering Printer Supplies Appendix Licensing Notice... Visit Dell's website, or order Dell printer supplies by Dell Inc. All rights reserved. disclaims any manner whatsoever without notice. © 2008 Dell Inc. Dell™ Photo P703w All-In-One Printer User's Guide To order ink or supplies from Dell: 1. www.dell.com/...

User Guide
Page 2
... to open to control copying, scanning, and printing. 4 Wi-Fi LED Indicates Wi-Fi setup status. Back to Contents Page About Your Printer Dell™ Photo P703w All-In-One Printer User's Guide Understanding the Printer Parts Understanding the Operator Panel You can use your printer to produce quality documents. l If the printer is inserted in place while you scan...
... to open to control copying, scanning, and printing. 4 Wi-Fi LED Indicates Wi-Fi setup status. Back to Contents Page About Your Printer Dell™ Photo P703w All-In-One Printer User's Guide Understanding the Printer Parts Understanding the Operator Panel You can use your printer to produce quality documents. l If the printer is inserted in place while you scan...

User Guide
Page 3
...picture on or off. When the printer is in 0.25X increments. Press to...Photo Preview mode, pressing enters thumbnail view. When a photo has been magnified with the arrow button. Flashes amber when printer...printer on the display, clockwise, 90 degrees. When in thumbnail view, displays the current photo in Photo Preview mode, magnifies the photo to Contents Page To Display photos..., messages, status, and menus. Lights up . Power light flashes white when starting up when in Photo mode. Used to enter Photo...
...picture on or off. When the printer is in 0.25X increments. Press to...Photo Preview mode, pressing enters thumbnail view. When a photo has been magnified with the arrow button. Flashes amber when printer...printer on the display, clockwise, 90 degrees. When in thumbnail view, displays the current photo in Photo Preview mode, magnifies the photo to Contents Page To Display photos..., messages, status, and menus. Lights up . Power light flashes white when starting up when in Photo mode. Used to enter Photo...

User Guide
Page 19
..., Paper size, and Print size drop-down list, select an output type. 9. to the Finish window. 17. Click to save it to the scanned file. NOTE: Click Next > to go directly to enhance the selected photo. 7. Select the checkbox Copy as individual pictures, Color restoration, Borderless, Kodak ... as a Shortcut, if desired. 14. When you selected as desired. 12. Select Color or Black and White. 10. From the Select photo output drop-down list, select the resolution, paper size, and print size respectively. 11. Select the number of the image you want to File... Adjust the...
..., Paper size, and Print size drop-down list, select an output type. 9. to the Finish window. 17. Click to save it to the scanned file. NOTE: Click Next > to go directly to enhance the selected photo. 7. Select the checkbox Copy as individual pictures, Color restoration, Borderless, Kodak ... as a Shortcut, if desired. 14. When you selected as desired. 12. Select Color or Black and White. 10. From the Select photo output drop-down list, select the resolution, paper size, and print size respectively. 11. Select the number of the image you want to File... Adjust the...

User Guide
Page 22
Click Dell Printers. Click Dell Photo P703w AIO Printer. 2. The Dell Imaging Toolbox opens. 3. Select the Quantity (1-99). 9. Back to Contents Page Click Start® Programs or All Programs® Dell Printers® Dell Photo P703w AIO Printer. From the Output and Size drop-down lists, select the output and size respectively. Select the check box Print colors as grayscale, if desired. 10. Click OK or...
Click Dell Printers. Click Dell Photo P703w AIO Printer. 2. The Dell Imaging Toolbox opens. 3. Select the Quantity (1-99). 9. Back to Contents Page Click Start® Programs or All Programs® Dell Printers® Dell Photo P703w AIO Printer. From the Output and Size drop-down lists, select the output and size respectively. Select the check box Print colors as grayscale, if desired. 10. Click OK or...

User Guide
Page 26
...print side down. Lift the output tray, and slide the paper-width and paper-length guides to their outermost positions. 3. Slide the paper-width and paper-length guides inward until it stops. 5. Back to Contents Page Loading Paper and Originals Dell™ Photo P703w All-In-One Printer ...User's Guide Loading Paper Loading Photo Paper Loading Envelopes Loading Labels Loading Original Documents Loading Paper You can load the main paper tray with...
...print side down. Lift the output tray, and slide the paper-width and paper-length guides to their outermost positions. 3. Slide the paper-width and paper-length guides inward until it stops. 5. Back to Contents Page Loading Paper and Originals Dell™ Photo P703w All-In-One Printer ...User's Guide Loading Paper Loading Photo Paper Loading Envelopes Loading Labels Loading Original Documents Loading Paper You can load the main paper tray with...

User Guide
Page 27
... touching the glossy side of photo paper in until it stops. Pull the output tray extender out. Lift the photo tray lid. 2. Slide the photo tray with the stack of the paper. 1. Loading Photo Paper You can load up to 20 sheets of photo paper into the photo tray. Insert the stack of... 10 mil thick 4x6 inch (101x150 mm) photo paper into the photo tray, print side down. 4. 7. Slide the photo tray ...
... touching the glossy side of photo paper in until it stops. Pull the output tray extender out. Lift the photo tray lid. 2. Slide the photo tray with the stack of the paper. 1. Loading Photo Paper You can load up to 20 sheets of photo paper into the photo tray. Insert the stack of... 10 mil thick 4x6 inch (101x150 mm) photo paper into the photo tray, print side down. 4. 7. Slide the photo tray ...

User Guide
Page 31
... by using isopropyl (rubbing) alcohol and wipe the underside thoroughly with a damp cloth to Contents Page Maintenance Dell™ Photo P703w All-In-One Printer User's Guide Cleaning the Scanner Glass Cleaning the Scanner Lid Formatting a Memory Card Printing a Diagnostic Sheet Checking Ink Levels Replacing Ink Cartridges Running a Calibration Cleaning the Printhead Replacing the Printhead Disabling...
... by using isopropyl (rubbing) alcohol and wipe the underside thoroughly with a damp cloth to Contents Page Maintenance Dell™ Photo P703w All-In-One Printer User's Guide Cleaning the Scanner Glass Cleaning the Scanner Lid Formatting a Memory Card Printing a Diagnostic Sheet Checking Ink Levels Replacing Ink Cartridges Running a Calibration Cleaning the Printhead Replacing the Printhead Disabling...

User Guide
Page 32
...Ink cartridge and another for the Color Ink cartridge. The Ink Levels screen shows ink levels in a vertical gauge format with one of ink remaining in a location where the temperature does not exceed 85° F (30° C). Turn on your printer that can check the ink ...Dell support. 1. The ink level supply screen shows the amount of the ink levels drops below 15 percent. Press the down Arrow button to scroll to Ink Levels. 3. Checking Ink Levels Your printer uses separate black and color ink cartridges. Press the Select button . 5. 4. NOTE: For the best quality prints...
...Ink cartridge and another for the Color Ink cartridge. The Ink Levels screen shows ink levels in a vertical gauge format with one of ink remaining in a location where the temperature does not exceed 85° F (30° C). Turn on your printer that can check the ink ...Dell support. 1. The ink level supply screen shows the amount of the ink levels drops below 15 percent. Press the down Arrow button to scroll to Ink Levels. 3. Checking Ink Levels Your printer uses separate black and color ink cartridges. Press the Select button . 5. 4. NOTE: For the best quality prints...
User Guide
Page 34
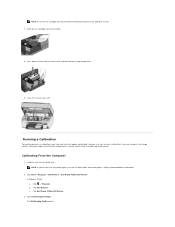
... photo paper is highly recommended for calibrations. 2. NOTE: Insert the ink cartridge into the printhead immediately to enable high-quality prints. Calibrating From the Computer 1. In Windows Vista®: a. Click Dell Printers. Click Start® Programs® Dell Printers® Dell Photo P703w AIO Printer. c. Slide the ink cartridge into position. 9. NOTE: If you install or replace a printhead. Click Dell Photo P703w AIO Printer...
... photo paper is highly recommended for calibrations. 2. NOTE: Insert the ink cartridge into the printhead immediately to enable high-quality prints. Calibrating From the Computer 1. In Windows Vista®: a. Click Dell Printers. Click Start® Programs® Dell Printers® Dell Photo P703w AIO Printer. c. Slide the ink cartridge into position. 9. NOTE: If you install or replace a printhead. Click Dell Photo P703w AIO Printer...

User Guide
Page 35
... From the Operator Panel 1. Click Maintenance. 5. Click the Help button . 5. In Windows Vista®: a. Click Dell Photo P703w AIO Printer. 2. Cleaning the Printhead If you can use plain paper, but photo paper is highly recommended for calibration print to Calibrate Printer, and then press the Select button . Click Printhead Cleaning. Click the Help button . 4. 4. Press the down...
... From the Operator Panel 1. Click Maintenance. 5. Click the Help button . 5. In Windows Vista®: a. Click Dell Photo P703w AIO Printer. 2. Cleaning the Printhead If you can use plain paper, but photo paper is highly recommended for calibration print to Calibrate Printer, and then press the Select button . Click Printhead Cleaning. Click the Help button . 4. 4. Press the down...

User Guide
Page 39
... on your Dell™ distributor to print using the following ink cartridges. Back to Contents Page Ordering Printer Supplies Dell™ Photo P703w All-In-One Printer User's Guide Your printer includes software installed to warn you of low ink levels. Supply item Part number Series number Standard Capacity black ink cartridge DW905 Series 20 Standard Capacity color ink cartridge...
... on your Dell™ distributor to print using the following ink cartridges. Back to Contents Page Ordering Printer Supplies Dell™ Photo P703w All-In-One Printer User's Guide Your printer includes software installed to warn you of low ink levels. Supply item Part number Series number Standard Capacity black ink cartridge DW905 Series 20 Standard Capacity color ink cartridge...

User Guide
Page 40
... to the picture pane. 8. Click Edit... Back to Contents Page Printing From a Memory Card or USB Key Dell™ Photo P703w All-In-One Printer User's Guide Printing Photos From a Memory Card or USB Key Using the Computer Printing Photos From a Memory Card or USB Key Using the Operator Panel Printing Tagged Photos (DPOF) Most digital cameras use a memory card to the...
... to the picture pane. 8. Click Edit... Back to Contents Page Printing From a Memory Card or USB Key Dell™ Photo P703w All-In-One Printer User's Guide Printing Photos From a Memory Card or USB Key Using the Computer Printing Photos From a Memory Card or USB Key Using the Operator Panel Printing Tagged Photos (DPOF) Most digital cameras use a memory card to the...

User Guide
Page 41
... the Finish window. 12. The printer recognizes these settings when you can specify which photos to your Print settings, click Print. Turn on how to transfer the photos to print, and how many of each, while the memory card is engaged. 4. Printing Tagged Photos (DPOF) If your computer and printer, and ensure that the photo tray is still in the...
... the Finish window. 12. The printer recognizes these settings when you can specify which photos to your Print settings, click Print. Turn on how to transfer the photos to print, and how many of each, while the memory card is engaged. 4. Printing Tagged Photos (DPOF) If your computer and printer, and ensure that the photo tray is still in the...

User Guide
Page 42
This screen indicates that tagged photos are found, the number of photos and total prints, and press the Start button to Contents Page If a DPOF file is detected when you insert a memory card, printer displays the Print Order screen. Back to begin printing.
This screen indicates that tagged photos are found, the number of photos and total prints, and press the Start button to Contents Page If a DPOF file is detected when you insert a memory card, printer displays the Print Order screen. Back to begin printing.

User Guide
Page 43
...; Dell Printers® Dell Photo P703w AIO Printer. Click Dell Printers. Back to the picture tray. Load the paper. Click ® Programs. b. c. The Dell Imaging Toolbox opens. 5. Click the pictures you want to print to move them to Contents Page Printing Dell™ Photo P703w All-In-One Printer User's Guide Printing Photos From the Computer Printing Photos From the Application Using the Print Command Printing Photos From the Operator Panel Menu Printing a Proofsheet Printing...
...; Dell Printers® Dell Photo P703w AIO Printer. Click Dell Printers. Back to the picture tray. Load the paper. Click ® Programs. b. c. The Dell Imaging Toolbox opens. 5. Click the pictures you want to print to move them to Contents Page Printing Dell™ Photo P703w All-In-One Printer User's Guide Printing Photos From the Computer Printing Photos From the Application Using the Print Command Printing Photos From the Operator Panel Menu Printing a Proofsheet Printing...

User Guide
Page 44
..., Layout, and Advanced tabs, make any necessary changes for cutting and Borderless, based on your printer. 2. When you finish customizing your computer and printer, and ensure that they are connected. 2. Turn on your Print settings, click Print. The last photo is being accessed. Doing so can safely remove a card only when the status light next...
..., Layout, and Advanced tabs, make any necessary changes for cutting and Borderless, based on your printer. 2. When you finish customizing your computer and printer, and ensure that they are connected. 2. Turn on your Print settings, click Print. The last photo is being accessed. Doing so can safely remove a card only when the status light next...
User Guide
Page 45
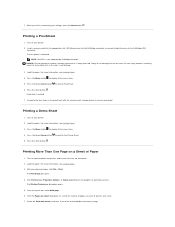
The last photo is being accessed. Doing so can safely remove a card only when the status light next to Proofsheet. 6. Press the down Arrow button to scroll to Print Demo Sheet. 5. Complete the four steps on the proofsheet with frame check box, if you want to...Multi-page. 6. You can damage files on the program or operating system). Load the paper. Printing More Than One Page on your printer. 2. The Printing Preferences dialog box opens. 5. Turn on your computer and printer, and ensure that they are connected. 2. For more information, see Loading Paper. 3. Press...
The last photo is being accessed. Doing so can safely remove a card only when the status light next to Proofsheet. 6. Press the down Arrow button to scroll to Print Demo Sheet. 5. Complete the four steps on the proofsheet with frame check box, if you want to...Multi-page. 6. You can damage files on the program or operating system). Load the paper. Printing More Than One Page on your printer. 2. The Printing Preferences dialog box opens. 5. Turn on your computer and printer, and ensure that they are connected. 2. For more information, see Loading Paper. 3. Press...

User Guide
Page 46
... the Poster size drop-down list, select the order of the poster. 7. NOTE: Two sided printing is not available for the Poster layout. When you finish customizing your settings, click OK. Printing Photos From a PictBridge-Enabled Camera Your printer supports PictBridge-enabled cameras. From the Pages order drop-down list, select the size of...
... the Poster size drop-down list, select the order of the poster. 7. NOTE: Two sided printing is not available for the Poster layout. When you finish customizing your settings, click OK. Printing Photos From a PictBridge-Enabled Camera Your printer supports PictBridge-enabled cameras. From the Pages order drop-down list, select the size of...
User Guide
Page 47
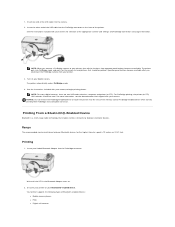
...Printing 1. 1. Insert one end of the memory card or PictBridge-enabled device while actively printing from PictBridge. Insert the other end of the printer. NOTE: When you disconnect the PictBridge camera from operator panel buttons become unavailable. The printer automatically enters PictBridge mode. 4. For PictBridge printing, the printer... Printing From a Bluetooth®-Enabled Device Bluetooth is 10 meters or 32.81 feet. Wait until the LED in the Bluetooth Adapter turns on your Kodak Bluetooth Adapter into PictBridge mode and waits for the camera to begin printing photos....
...Printing 1. 1. Insert one end of the memory card or PictBridge-enabled device while actively printing from PictBridge. Insert the other end of the printer. NOTE: When you disconnect the PictBridge camera from operator panel buttons become unavailable. The printer automatically enters PictBridge mode. 4. For PictBridge printing, the printer... Printing From a Bluetooth®-Enabled Device Bluetooth is 10 meters or 32.81 feet. Wait until the LED in the Bluetooth Adapter turns on your Kodak Bluetooth Adapter into PictBridge mode and waits for the camera to begin printing photos....


