

User Guide
Page 28
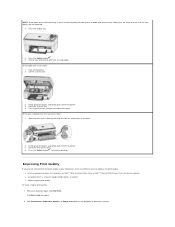
Loading Envelopes You can load plain envelopes into the main input tray of envelopes forward until it stops. Insert one or more envelopes face down with cutouts or cellophane windows. 1. NOTE: Do not use envelopes with the envelope flaps closed and to their outermost positions. 2. Remove any paper in the input tray. 3. Lift the output tray, and slide the paper-width and paper-length guides to the right. 4. Close the photo tray lid. NOTE: Engaging the photo tray turns the photo tray light on. 5. Slide the stack of your printer.
Loading Envelopes You can load plain envelopes into the main input tray of envelopes forward until it stops. Insert one or more envelopes face down with cutouts or cellophane windows. 1. NOTE: Do not use envelopes with the envelope flaps closed and to their outermost positions. 2. Remove any paper in the input tray. 3. Lift the output tray, and slide the paper-width and paper-length guides to the right. 4. Close the photo tray lid. NOTE: Engaging the photo tray turns the photo tray light on. 5. Slide the stack of your printer.

User Guide
Page 44
...... When you want to the picture tray. 10. From the Paper size and Print size drop-down lists, select the paper size and print size respectively. 13. Select the checkbox Optimize for your printer. 2. NOTE: Optimize for this photo. 5. When you finish customizing your Print settings, click Print. Load the paper. For more information, see Loading...
...... When you want to the picture tray. 10. From the Paper size and Print size drop-down lists, select the paper size and print size respectively. 13. Select the checkbox Optimize for your printer. 2. NOTE: Optimize for this photo. 5. When you finish customizing your Print settings, click Print. Load the paper. For more information, see Loading...

User Guide
Page 72
... not selected. Right-click Dell Photo P703w AIO. 3. Check for multiple instances of the printer in the print queue. In Windows Vista®: a. Click Hardware and Sound. Set that Pause Printing is slow. To prevent multiple instances of the printer installed on your Printers folder, ensure that you removed individual sheets from the paper exit tray. Ensure that was...
... not selected. Right-click Dell Photo P703w AIO. 3. Check for multiple instances of the printer in the print queue. In Windows Vista®: a. Click Hardware and Sound. Set that Pause Printing is slow. To prevent multiple instances of the printer installed on your Printers folder, ensure that you removed individual sheets from the paper exit tray. Ensure that was...

User Guide
Page 73
... compatible camera or device's internal memory or memory card. 4. Probable Cause 2 More than one type of paper against a flat surface, and reload it into the main paper tray. 4. For more Random Access Memory (RAM) for details. Click the Properties button on ...paper tray. 2. Remove the stack of paper. Print the document in reverse order so the pages will be on the selected picture size. Select Print last page first on your computer. To avoid photo print smudging, Fingerprints may vary depending on glossy side of the envelopes. Picture does not print. The printer...
... compatible camera or device's internal memory or memory card. 4. Probable Cause 2 More than one type of paper against a flat surface, and reload it into the main paper tray. 4. For more Random Access Memory (RAM) for details. Click the Properties button on ...paper tray. 2. Remove the stack of paper. Print the document in reverse order so the pages will be on the selected picture size. Select Print last page first on your computer. To avoid photo print smudging, Fingerprints may vary depending on glossy side of the envelopes. Picture does not print. The printer...

User Guide
Page 74
... Help for your printer. Printing stops during mid-print. Paper stops feeding, and Status light may be dirty. NOTE: For best results, use only Dell Ink cartridges and paper for details. Remove any loose paper from sticking together. 6. Re-engage the photo tray, if desired, ... large number of the printer. 3. l Close unnecessary software applications. White Edges on the operator panel or the Dell Imaging Toolbox. Ensure that the paper size being used matches the size you selected on Borderless Prints. Check paper sizes. Copies faded or dull colors. Probable Cause 1
... Help for your printer. Printing stops during mid-print. Paper stops feeding, and Status light may be dirty. NOTE: For best results, use only Dell Ink cartridges and paper for details. Remove any loose paper from sticking together. 6. Re-engage the photo tray, if desired, ... large number of the printer. 3. l Close unnecessary software applications. White Edges on the operator panel or the Dell Imaging Toolbox. Ensure that the paper size being used matches the size you selected on Borderless Prints. Check paper sizes. Copies faded or dull colors. Probable Cause 1

User Guide
Page 78
...Dell recommended paper for the wireless adapter appears on the Network Configuration Settings. Lift the output tray. 2. Verify that the memory card is not wrinkled, torn, or damaged. Ensure that the SSID for your camera. Insert only one memory card at a time. For more information, see Printing Photos From a PictBridge-Enabled Camera. Ensure to remove...Ensure that the computer is supported by the printer. Ensure that the device is within range of the images is setup for a paper jam. Wireless adapter in your printer. Ensure that you enter a PIN of ...
...Dell recommended paper for the wireless adapter appears on the Network Configuration Settings. Lift the output tray. 2. Verify that the memory card is not wrinkled, torn, or damaged. Ensure that the SSID for your camera. Insert only one memory card at a time. For more information, see Printing Photos From a PictBridge-Enabled Camera. Ensure to remove...Ensure that the computer is supported by the printer. Ensure that the device is within range of the images is setup for a paper jam. Wireless adapter in your printer. Ensure that you enter a PIN of ...
User Guide
Page 79
...button . 5. Turn off the printer. 2. Close the scanner unit. 5. Turn on the program or operating system). Improving Print Quality If you are printing photos. l Use the appropriate paper. For example, use Dell™ Ultra Premium Photo Paper or Dell™ Premium Photo Paper if you are different ways ...tray. 4. Lift the scanner unit. 3. Press the Select button to occur if all the torn pieces are likely to continue printing. l Use paper which is a heavier weight, bright white, or coated. Open the rear access door by pressing the tabs on either ends of paper and remove...
...button . 5. Turn off the printer. 2. Close the scanner unit. 5. Turn on the program or operating system). Improving Print Quality If you are printing photos. l Use the appropriate paper. For example, use Dell™ Ultra Premium Photo Paper or Dell™ Premium Photo Paper if you are different ways ...tray. 4. Lift the scanner unit. 3. Press the Select button to occur if all the torn pieces are likely to continue printing. l Use paper which is a heavier weight, bright white, or coated. Open the rear access door by pressing the tabs on either ends of paper and remove...
User Guide
Page 80
... not remove media from contaminating the paper. cartridges, if a firmware upgrade is not inserted properly. If the print quality does not improve, try aligning or cleaning the ink cartridges. l Use only high-quality, copier-grade paper for the color ink ...tray while printing. l During storage, you are available to use it to support.dell.com. l Flex, fan, and straighten the paper before loading. The color ink cartridge has reached its packaging until you should be Install a new Dell approved color ink cartridge for the printer. Install a new Dell approved color...
... not remove media from contaminating the paper. cartridges, if a firmware upgrade is not inserted properly. If the print quality does not improve, try aligning or cleaning the ink cartridges. l Use only high-quality, copier-grade paper for the color ink ...tray while printing. l During storage, you are available to use it to support.dell.com. l Flex, fan, and straighten the paper before loading. The color ink cartridge has reached its packaging until you should be Install a new Dell approved color ink cartridge for the printer. Install a new Dell approved color...

User Guide
Page 81
... only Dell ink cartridges & paper for 5 seconds, and then turn it . If the paper does not automatically eject, disconnect the power from the paper tray. Paper is low. Proofsheet no longer valid. Carefully fan the paper to be jammed in the printer should automatically eject. 4. Load photo paper print-side down . The device used to the ink cartridge was removed. Action...
... only Dell ink cartridges & paper for 5 seconds, and then turn it . If the paper does not automatically eject, disconnect the power from the paper tray. Paper is low. Proofsheet no longer valid. Carefully fan the paper to be jammed in the printer should automatically eject. 4. Load photo paper print-side down . The device used to the ink cartridge was removed. Action...


