

Advanced Projector - SNMP Command Set Document
Page 1
...(On) 7 (Standby) Dell P519HL SNMP Protocol Document Control Commands List Name Feature Oid...Instructions...Dell Projector .1.3.6.1.4.1.674.10901.200.18 Operation hours * hours * minutes * seconds If meet web management (system status) If meet web management (Group Name + Projector Name) If meet web management (system status) DEFVAL { 72 } DEFVAL { 1 } String R String R String R/W Dell P519HL Check PPID number (the latter 7 yards) Range (0~63 byte) String R DEFVAL { " " } String R/W Range (0~255 byte) Integer R Integer R String R Check display hours Everytime Projector power on, check...
...(On) 7 (Standby) Dell P519HL SNMP Protocol Document Control Commands List Name Feature Oid...Instructions...Dell Projector .1.3.6.1.4.1.674.10901.200.18 Operation hours * hours * minutes * seconds If meet web management (system status) If meet web management (Group Name + Projector Name) If meet web management (system status) DEFVAL { 72 } DEFVAL { 1 } String R String R String R/W Dell P519HL Check PPID number (the latter 7 yards) Range (0~63 byte) String R DEFVAL { " " } String R/W Range (0~255 byte) Integer R Integer R String R Check display hours Everytime Projector power on, check...

Advanced Projector - SNMP Command Set Document
Page 3
HDMI 1 14. USB-Settings 100 100 DEFVAL { 0 } DEFVAL { 0 } DEFVAL { 0 } DEFVAL { 100 } 100 100 31 3. Custom 4. Not Muted 3. HDMI 2 16.Network 18. Mid 6. Muted 2. Off -> Normal USB-Video 19. USB-Photo 21. Failed ECO Mode 4. Okay 4. USB-Document 22. High DEFVAL { 50 } DEFVAL { 50 } DEFVAL { 50 } DEFVAL { 0 } Blank Screen 1. USB-Music 20. pdmDisplayCap pdmDisplayCap pdmDisplayCap pdmDisplaySet pdmDisplaySet esolutionH pdmDisplayCapR .1.3.6.1.4.1.2699.2.4.1.5.2.0 esolutionV pdmDisplayCapP .1.3.6.1.4.1.2699.2.4.1.5.3.0 hysSizeH pdmDisplayCapP...
HDMI 1 14. USB-Settings 100 100 DEFVAL { 0 } DEFVAL { 0 } DEFVAL { 0 } DEFVAL { 100 } 100 100 31 3. Custom 4. Not Muted 3. HDMI 2 16.Network 18. Mid 6. Muted 2. Off -> Normal USB-Video 19. USB-Photo 21. Failed ECO Mode 4. Okay 4. USB-Document 22. High DEFVAL { 50 } DEFVAL { 50 } DEFVAL { 50 } DEFVAL { 0 } Blank Screen 1. USB-Music 20. pdmDisplayCap pdmDisplayCap pdmDisplayCap pdmDisplaySet pdmDisplaySet esolutionH pdmDisplayCapR .1.3.6.1.4.1.2699.2.4.1.5.2.0 esolutionV pdmDisplayCapP .1.3.6.1.4.1.2699.2.4.1.5.3.0 hysSizeH pdmDisplayCapP...

Advanced Projector - SNMP Command Set Document
Page 5
... R String R String R String R String R String R Integer R Integer R Integer R Integer R Integer R Integer R Integer R 2 3 4 5 6 7 8 9 10 11 12 13 14 15 16 17 18 19 20 21 22 VGA HDMI1 HDMI2 Network USB-Video USB-Music USB-Photo USB-Document USB-Settings 3 (See Note 2) 3 10 13 6 12 21
... R String R String R String R String R String R Integer R Integer R Integer R Integer R Integer R Integer R Integer R 2 3 4 5 6 7 8 9 10 11 12 13 14 15 16 17 18 19 20 21 22 VGA HDMI1 HDMI2 Network USB-Video USB-Music USB-Photo USB-Document USB-Settings 3 (See Note 2) 3 10 13 6 12 21

Advanced Projector - SNMP Command Set Document
Page 7
... default. c) If there is a Lamp Fail alert, the table is no any current alert, all of the OID in the alert table will respond default. pdmAlertGroupType =" " pdmAlertGroupID = 0 pdmAlertSeverity = other (1) The reset Object will respond default. Note 2: 1. Unknown 3. DVI-I Not Muted DEFVAL { 0 } DEFVAL { 0 } DEFVAL { 0 } 1 See Note 1 See Note 1 DEFVAL { "" } Alert's condition has lamp Fail, Lamp hours running out, Projector Overheating, Lamp Overheating and Fan Error...
... default. c) If there is a Lamp Fail alert, the table is no any current alert, all of the OID in the alert table will respond default. pdmAlertGroupType =" " pdmAlertGroupID = 0 pdmAlertSeverity = other (1) The reset Object will respond default. Note 2: 1. Unknown 3. DVI-I Not Muted DEFVAL { 0 } DEFVAL { 0 } DEFVAL { 0 } 1 See Note 1 See Note 1 DEFVAL { "" } Alert's condition has lamp Fail, Lamp hours running out, Projector Overheating, Lamp Overheating and Fan Error...

Advanced Projector - RS232 Command Set Document
Page 3
Keystone Read Auto Keystone Write Power-Mode-ECO Power-Mode-Nor mal Auto Source On Auto Source Off Factory Reset Operating Hour Firmware Version Auto Keystone Read 0xefbe 0xefbe 0xefbe 0xefbe 0xefbe 0xefbe 0xefbe 0xefbe 0xefbe 0xefbe 0x10...Source 0xefbe 0x10 0x0005 0xbfdc 0x1111 V. Zoom In Zoom Out Mute On Freeze Hide Video Mode V. Keystone Up V. Ex: Version M0R001 "M0R001" 0x4d, 0x30, 0x52, 0x30, 0x30, 0x31 (Success, the Command Code of FW Version, 6 Bytes ASCII Code: "M0RXXX") Control Commands List Command Description Power On Menu Up Down Left Right R-sync Source...
Keystone Read Auto Keystone Write Power-Mode-ECO Power-Mode-Nor mal Auto Source On Auto Source Off Factory Reset Operating Hour Firmware Version Auto Keystone Read 0xefbe 0xefbe 0xefbe 0xefbe 0xefbe 0xefbe 0xefbe 0xefbe 0xefbe 0xefbe 0x10...Source 0xefbe 0x10 0x0005 0xbfdc 0x1111 V. Zoom In Zoom Out Mute On Freeze Hide Video Mode V. Keystone Up V. Ex: Version M0R001 "M0R001" 0x4d, 0x30, 0x52, 0x30, 0x30, 0x31 (Success, the Command Code of FW Version, 6 Bytes ASCII Code: "M0RXXX") Control Commands List Command Description Power On Menu Up Down Left Right R-sync Source...

Advanced Projector - Users Guide
Page 3
... Your Dell Projector 4 Projector Box Contents 4 Projector Top and Bottom View 5 Projector Connections 6 Remote Control 9 2 Adjusting Projector Image 12 Adjusting Projected Zoom 12 Adjusting Projector Position 13 Adjusting Image Corners 15 Adjusting Image Size 16 3 Using Your Projector 18 Using Network Display 18 Connecting a Computer Using Optional Wireless Dongle 22 Using PC-Free Presentation 40 4 Troubleshooting 55 Troubleshooting Tips 55 Guiding Signals 58 5 Maintenance 59 Replacing the Remote Control Battery 59 6 Specifications 60 Compatibility Mode (Digital / Analog...
... Your Dell Projector 4 Projector Box Contents 4 Projector Top and Bottom View 5 Projector Connections 6 Remote Control 9 2 Adjusting Projector Image 12 Adjusting Projected Zoom 12 Adjusting Projector Position 13 Adjusting Image Corners 15 Adjusting Image Size 16 3 Using Your Projector 18 Using Network Display 18 Connecting a Computer Using Optional Wireless Dongle 22 Using PC-Free Presentation 40 4 Troubleshooting 55 Troubleshooting Tips 55 Guiding Signals 58 5 Maintenance 59 Replacing the Remote Control Battery 59 6 Specifications 60 Compatibility Mode (Digital / Analog...
Advanced Projector - Users Guide
Page 7
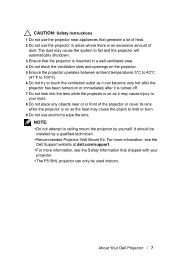
... the projector or cover its lens while the projector is on as it is turned off. 7 Do not look into the lens while the projector is on as it can only be installed by yourself. NOTE: •Do not attempt to ceiling mount the projector by a qualified technician. •Recommended Projector Wall Mount Kit. For more information, see the Dell Support website at dell.com/support. •...
... the projector or cover its lens while the projector is on as it is turned off. 7 Do not look into the lens while the projector is on as it can only be installed by yourself. NOTE: •Do not attempt to ceiling mount the projector by a qualified technician. •Recommended Projector Wall Mount Kit. For more information, see the Dell Support website at dell.com/support. •...
Advanced Projector - Users Guide
Page 8
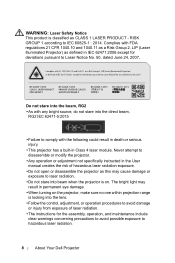
... attempt to disassemble or modify the projector. •Any operation or adjustment not specifically instructed in the User manual creates the risk of laser radiation. •The instructions for deviations pursuant to avoid damage or injury from exposure of hazardous laser radiation exposure. •Do not open or disassemble the projector as CLASS 1 LASER PRODUCT - WARNING: Laser Safety Notice This product...
... attempt to disassemble or modify the projector. •Any operation or adjustment not specifically instructed in the User manual creates the risk of laser radiation. •The instructions for deviations pursuant to avoid damage or injury from exposure of hazardous laser radiation exposure. •Do not open or disassemble the projector as CLASS 1 LASER PRODUCT - WARNING: Laser Safety Notice This product...

Advanced Projector - Users Guide
Page 13
...) from the projection screen. • Position the projector to the required distance from the lens of the projector to the screen, the zoom setting, and the video format determine the size of your power outlets, and the distance between the projector and the rest of the projected image. • Lens throw ratio: 0.52 You can set up or install the P519HL in the following ways: Case A Case B Table Top Projection Ceiling Mount Projection Adjusting Projector Image 13
...) from the projection screen. • Position the projector to the required distance from the lens of the projector to the screen, the zoom setting, and the video format determine the size of your power outlets, and the distance between the projector and the rest of the projected image. • Lens throw ratio: 0.52 You can set up or install the P519HL in the following ways: Case A Case B Table Top Projection Ceiling Mount Projection Adjusting Projector Image 13

Advanced Projector - Users Guide
Page 18
NOTE: Use , , and buttons to navigate and to the Network 1 Connect the power cable and turn on the projector by pressing the power button. 2 Press the Menu button on your projector control panel or remote control. 3 Using Your Projector Using Network Display Configure Your Projector for Network Display Connect Projector to select. 18 Using Your Projector
NOTE: Use , , and buttons to navigate and to the Network 1 Connect the power cable and turn on the projector by pressing the power button. 2 Press the Menu button on your projector control panel or remote control. 3 Using Your Projector Using Network Display Configure Your Projector for Network Display Connect Projector to select. 18 Using Your Projector

Advanced Projector - Users Guide
Page 29
NOTE: If the DHCP setting is set to On, the IP sharing device will automatically assign a set of LAN Settings switches to On. Using Your Projector 29 B.Network switch 4 Connect the LAN cable to the projector and the computer. Connect Projector Directly to the Computer A.Direct cable connection 3 Connect the LAN cable to the projector and the computer via the network switch/hub. 5 DHCP of IP Address, Subnet Mask, and Gateway.
NOTE: If the DHCP setting is set to On, the IP sharing device will automatically assign a set of LAN Settings switches to On. Using Your Projector 29 B.Network switch 4 Connect the LAN cable to the projector and the computer. Connect Projector Directly to the Computer A.Direct cable connection 3 Connect the LAN cable to the projector and the computer via the network switch/hub. 5 DHCP of IP Address, Subnet Mask, and Gateway.
Advanced Projector - Users Guide
Page 30
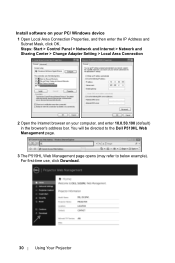
Install software on your PC/ Windows device 1 Open Local Area Connection Properties, and then enter the IP Address and Subnet Mask, click OK. Steps: Start > Control Panel > Network and Internet > Network and Sharing Center > Change Adapter Setting > Local Area Connection 2 Open the Internet browser on your computer, and enter 10.0.50.100 (default) in the browser's address bar. For first-time use, click Download. 30 Using Your Projector You will be directed to the Dell P519HL Web Management page. 3 The P519HL Web Management page opens (may refer to below example).
Install software on your PC/ Windows device 1 Open Local Area Connection Properties, and then enter the IP Address and Subnet Mask, click OK. Steps: Start > Control Panel > Network and Internet > Network and Sharing Center > Change Adapter Setting > Local Area Connection 2 Open the Internet browser on your computer, and enter 10.0.50.100 (default) in the browser's address bar. For first-time use, click Download. 30 Using Your Projector You will be directed to the Dell P519HL Web Management page. 3 The P519HL Web Management page opens (may refer to below example).

Advanced Projector - Users Guide
Page 43
Follow these steps to display the Video, Audio, Photo, or PDF files on your projector. 3 Press the Menu button on the control panel or remote control. 4 Access the Input Source menu, select USB Viewer source. Using Your Projector 43 Setting up to present using External USB Storage NOTE: A USB flash disk must be plugged into the projector if you want to your projector: 1 Connect the power cable and turn on the projector by pressing the power button. 2 Plug in a USB flash disk to use the USB media playback feature.
Follow these steps to display the Video, Audio, Photo, or PDF files on your projector. 3 Press the Menu button on the control panel or remote control. 4 Access the Input Source menu, select USB Viewer source. Using Your Projector 43 Setting up to present using External USB Storage NOTE: A USB flash disk must be plugged into the projector if you want to your projector: 1 Connect the power cable and turn on the projector by pressing the power button. 2 Plug in a USB flash disk to use the USB media playback feature.

Advanced Projector - Users Guide
Page 50
Setting up the projector by pressing the power button. 2 Access the Input Source menu, select the Internal Memory option, and press the button. Power up to Present via Internal Memory Follow these steps to playback the Photo, Video, or Music files on your projector: 1 Connect power cable with AC adapter then usinig USB-A to USB-A cable to connect computer and projector. MOLEX MOLEX 50 Using Your Projector
Setting up the projector by pressing the power button. 2 Access the Input Source menu, select the Internal Memory option, and press the button. Power up to Present via Internal Memory Follow these steps to playback the Photo, Video, or Music files on your projector: 1 Connect power cable with AC adapter then usinig USB-A to USB-A cable to connect computer and projector. MOLEX MOLEX 50 Using Your Projector
Advanced Projector - Users Guide
Page 55
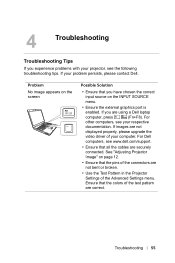
... the colors of the test pattern are not displayed properly, please upgrade the video driver of the Advanced Settings menu. Troubleshooting 55 4 Troubleshooting Troubleshooting Tips If you experience problems with your respective documentation. For other computers, see your projector, see www.dell.com/support. • Ensure that the pins of the connectors are using a Dell laptop computer, press (Fn+F8). Problem No image appears on the screen F8 CRT/LCD Fn...
... the colors of the test pattern are not displayed properly, please upgrade the video driver of the Advanced Settings menu. Troubleshooting 55 4 Troubleshooting Troubleshooting Tips If you experience problems with your respective documentation. For other computers, see your projector, see www.dell.com/support. • Ensure that the pins of the connectors are using a Dell laptop computer, press (Fn+F8). Problem No image appears on the screen F8 CRT/LCD Fn...
Advanced Projector - Users Guide
Page 56
... not using a Dell laptop computer, see www.dell.com/support. If you experience difficulty in the Projector Settings of the Advanced Settings menu. cPress (Fn+F8). If images are correct. 1 Adjust the focus until the image is clear. Ensure that the colors of the test pattern are not displayed properly, please upgrade the video driver of your computer. Problem (continued) Partial, scrolling, or incorrectly displayed image The screen does not display your presentation Image color...
... not using a Dell laptop computer, see www.dell.com/support. If you experience difficulty in the Projector Settings of the Advanced Settings menu. cPress (Fn+F8). If images are correct. 1 Adjust the focus until the image is clear. Ensure that the colors of the test pattern are not displayed properly, please upgrade the video driver of your computer. Problem (continued) Partial, scrolling, or incorrectly displayed image The screen does not display your presentation Image color...
Advanced Projector - Users Guide
Page 57
... the projector mode by pressing and holding the Power button for about 5 minutes and try to the input signal format with new CR2032 battery. If the problem persists, please contact Dell. If the image is stretched when displaying a 16:9 DVD The projector automatically detects the input signal format. The remote control is blinking amber If the projector fan fails, the projector will maintain the aspect ratio of the projected image according to power...
... the projector mode by pressing and holding the Power button for about 5 minutes and try to the input signal format with new CR2032 battery. If the problem persists, please contact Dell. If the image is stretched when displaying a 16:9 DVD The projector automatically detects the input signal format. The remote control is blinking amber If the projector fan fails, the projector will maintain the aspect ratio of the projected image according to power...

Advanced Projector - Users Guide
Page 58
... projector will automatically shut down . Power supply has been interrupted. The projector automatically shuts down . White Flashing White White White OFF OFF AMBER White OFF AMBER Flashing Indicator TEMP (Amber) LAMP (Amber) OFF OFF OFF OFF OFF OFF OFF OFF AMBER OFF AMBER Flashing OFF AMBER OFF AMBER Flashing AMBER Flashing OFF AMBER AMBER AMBER 58 Troubleshooting Guiding Signals Projector Status Description Control Buttons Power Standby mode Warming up and power on . The projector automatically shuts down . If the problem persists, please contact Dell...
... projector will automatically shut down . Power supply has been interrupted. The projector automatically shuts down . White Flashing White White White OFF OFF AMBER White OFF AMBER Flashing Indicator TEMP (Amber) LAMP (Amber) OFF OFF OFF OFF OFF OFF OFF OFF AMBER OFF AMBER Flashing OFF AMBER OFF AMBER Flashing AMBER Flashing OFF AMBER AMBER AMBER 58 Troubleshooting Guiding Signals Projector Status Description Control Buttons Power Standby mode Warming up and power on . The projector automatically shuts down . If the problem persists, please contact Dell...

Advanced Projector - Users Guide
Page 60
...% @ 110 Vac Standby mode: < 0.5 W Network standby: < 2 W NOTE: By default, the projector is set to enter power saving mode after 20 minutes of Pixels Aspect Ratio Displayable Color Color Wheel Speed Projection Lens Projection Screen Size Keystone Video Compatibility Power Supply Power Consumption Audio 0.65" 1080p S600 DMD + DDP4422HV, Dark Chip 3™ 4000 ANSI Lumens (Max.) 1800:1 Typical (Full On/Full Off) 100,000:1 High Contrast Ratio 85% Typical (Japan Standard - 6 Specifications Light Valve Brightness Contrast Ratio Uniformity Number of no...
...% @ 110 Vac Standby mode: < 0.5 W Network standby: < 2 W NOTE: By default, the projector is set to enter power saving mode after 20 minutes of Pixels Aspect Ratio Displayable Color Color Wheel Speed Projection Lens Projection Screen Size Keystone Video Compatibility Power Supply Power Consumption Audio 0.65" 1080p S600 DMD + DDP4422HV, Dark Chip 3™ 4000 ANSI Lumens (Max.) 1800:1 Typical (Full On/Full Off) 100,000:1 High Contrast Ratio 85% Typical (Japan Standard - 6 Specifications Light Valve Brightness Contrast Ratio Uniformity Number of no...

Advanced Projector - Users Guide
Page 67
... adjustment wheel 12 C Connection Ports Audio input connector 6 Audio output connector 6 HDMI-1 (1.4) connector 6 HDMI-2 (1.4) connector 6 Mini USB (mini type B) connector for firmware upgrade 6 Power cord connector 6 RJ45 connector 6 RS232 connector 6 USB Type A 6 USB Type A Power (+5V/1.8A) connector and also for media / wifi 6 VGA input 6 Contact Dell 4 D Dell contacting 65, 66 M Main Unit 5 Focus tab 5 IR receivers 5 Lens 5 Mounting holes for ceiling mount 5 Mounting holes for wall mount 5 Power button 5 Tilt adjustment wheel 5 Zoom tab 5 P phone numbers 66 R Remote Control 9 Replacing...
... adjustment wheel 12 C Connection Ports Audio input connector 6 Audio output connector 6 HDMI-1 (1.4) connector 6 HDMI-2 (1.4) connector 6 Mini USB (mini type B) connector for firmware upgrade 6 Power cord connector 6 RJ45 connector 6 RS232 connector 6 USB Type A 6 USB Type A Power (+5V/1.8A) connector and also for media / wifi 6 VGA input 6 Contact Dell 4 D Dell contacting 65, 66 M Main Unit 5 Focus tab 5 IR receivers 5 Lens 5 Mounting holes for ceiling mount 5 Mounting holes for wall mount 5 Power button 5 Tilt adjustment wheel 5 Zoom tab 5 P phone numbers 66 R Remote Control 9 Replacing...


